
使用 Three.js 的太阳能系统
 浏览:788
Hi! Today, I’m going to build a solar system using Three.js. But before we begin, you should know that the inspiration for this article came from a client's representative whose project I’m currently working on. Yes, that's you—the one who believes the Earth is flat.
JavaScript/Node has largest ecosystem of libraries that cover enormous amount of feature that simplifies your development, so I always can choose which one is better for you purpose. However If we are talking about 3D graphics there is not that much cool options and three.js is probably the best amoug them all and has the biggest comunity.
So let's dive in Three.js and build the Solar system using it. In this article I will cover:
- Init Project and Scene
- Creating Sun
- Creating Planets
- Deploying to GitHub Pages
Init Project and Scene
First things first: to initialize the project, I'm using Vite and installing the Three.js dependency. Now, the question is how to set up Three.js. For this, you'll need three things: a scene, a camera, and a renderer. I'm also using the built-in addon, OrbitControls, which allows me to navigate within the scene. After starting the app, a black screen should appear.
import { Scene, WebGLRenderer, PerspectiveCamera } from "three";
import { OrbitControls } from "three/addons/controls/OrbitControls.js";

const w = window.innerWidth;
const h = window.innerHeight;

const scene = new Scene();
const camera = new PerspectiveCamera(75, w / h, 0.1, 100);
const renderer = new WebGLRenderer();
const controls = new OrbitControls(camera, renderer.domElement);

controls.minDistance = 10;
controls.maxDistance = 60;
camera.position.set(30 * Math.cos(Math.PI / 6), 30 * Math.sin(Math.PI / 6), 40);

renderer.setSize(w, h);
document.body.appendChild(renderer.domElement);

renderer.render(scene, camera);

window.addEventListener("resize", () => {
  const w = window.innerWidth;
  const h = window.innerHeight;
  renderer.setSize(w, h);
  camera.aspect = w / h;
  camera.updateProjectionMatrix();
});

const animate = () => {
  requestAnimationFrame(animate);
  controls.update();
  renderer.render(scene, camera);
};

animate();
You may notice that I'm limiting the zoom via controls and also changing the default angle of the camera. This will be helpful for properly displaying the scene in the next steps.
Now it’s time to add a simple starfield since our solar system should be surrounded by stars. To simplify the explanation, imagine you have a sphere, and you pick 1,000 random points on this sphere. Then, you create stars from these points by mapping a star texture onto them. Finally, I’m adding animation to make all these points spin around the y-axis. With this, the starfield is ready to be added to the scene.
import {
  Group,
  Color,
  Points,
  Vector3,
  TextureLoader,
  PointsMaterial,
  BufferGeometry,
  AdditiveBlending,
  Float32BufferAttribute,
} from "three";

export class Starfield {
  group;
  loader;
  animate;

  constructor({ numStars = 1000 } = {}) {
    this.numStars = numStars;

    this.group = new Group();
    this.loader = new TextureLoader();

    this.createStarfield();

    this.animate = this.createAnimateFunction();
    this.animate();
  }

  createStarfield() {
    let col;
    const verts = [];
    const colors = [];
    const positions = [];

    for (let i = 0; i  {
      requestAnimationFrame(this.animate);
      this.group.rotation.y  = 0.00005;
    };
  }

  getStarfield() {
    return this.group;
  }
}
Adding the starfield is easy, just by using add method in scene class
const starfield = new Starfield().getStarfield();
scene.add(starfield);
As for the textures, you can find all the textures used in this project inside the repository, which is linked at the end of the article. Most of the textures were taken from this site, with the exceptions being the star and planets' rings textures.
Creating Sun
For the sun, I used Icosahedron geometry and mapped a texture onto it. Using Improved Noise, I achieved an effect where the sun pulses, simulating the way a real star emits streams of energy into space. The sun isn't just a figure with a mapped texture; it also needs to be a light source in the scene, so I'm using PointLight to simulate this.
import {
  Mesh,
  Group,
  Color,
  Vector3,
  BackSide,
  PointLight,
  TextureLoader,
  ShaderMaterial,
  AdditiveBlending,
  DynamicDrawUsage,
  MeshBasicMaterial,
  IcosahedronGeometry,
} from "three";
import { ImprovedNoise } from "three/addons/math/ImprovedNoise.js";

export class Sun {
  group;
  loader;
  animate;
  corona;
  sunRim;
  glow;

  constructor() {
    this.sunTexture = "/solar-system-threejs/assets/sun-map.jpg";

    this.group = new Group();
    this.loader = new TextureLoader();

    this.createCorona();
    this.createRim();
    this.addLighting();
    this.createGlow();
    this.createSun();

    this.animate = this.createAnimateFunction();
    this.animate();
  }

  createSun() {
    const map = this.loader.load(this.sunTexture);
    const sunGeometry = new IcosahedronGeometry(5, 12);
    const sunMaterial = new MeshBasicMaterial({
      map,
      emissive: new Color(0xffff99),
      emissiveIntensity: 1.5,
    });
    const sunMesh = new Mesh(sunGeometry, sunMaterial);
    this.group.add(sunMesh);

    this.group.add(this.sunRim);

    this.group.add(this.corona);

    this.group.add(this.glow);

    this.group.userData.update = (t) => {
      this.group.rotation.y = -t / 5;
      this.corona.userData.update(t);
    };
  }

  createCorona() {
    const coronaGeometry = new IcosahedronGeometry(4.9, 12);
    const coronaMaterial = new MeshBasicMaterial({
      color: 0xff0000,
      side: BackSide,
    });
    const coronaMesh = new Mesh(coronaGeometry, coronaMaterial);
    const coronaNoise = new ImprovedNoise();

    let v3 = new Vector3();
    let p = new Vector3();
    let pos = coronaGeometry.attributes.position;
    pos.usage = DynamicDrawUsage;
    const len = pos.count;

    const update = (t) => {
      for (let i = 0; i  {
      const time = t * 0.00051;
      requestAnimationFrame(this.animate);
      this.group.userData.update(time);
    };
  }

  getSun() {
    return this.group;
  }
}
Creating Planets
All planets are built using a similar logic: each planet needs an orbit, a texture, an orbit speed, and a rotation speed. For planets that require them, rings should also be added.
import {
  Mesh,
  Color,
  Group,
  DoubleSide,
  RingGeometry,
  TorusGeometry,
  TextureLoader,
  ShaderMaterial,
  SRGBColorSpace,
  AdditiveBlending,
  MeshPhongMaterial,
  MeshBasicMaterial,
  IcosahedronGeometry,
} from "three";

export class Planet {
  group;
  loader;
  animate;
  planetGroup;
  planetGeometry;

  constructor({
    orbitSpeed = 1,
    orbitRadius = 1,
    orbitRotationDirection = "clockwise",

    planetSize = 1,
    planetAngle = 0,
    planetRotationSpeed = 1,
    planetRotationDirection = "clockwise",
    planetTexture = "/solar-system-threejs/assets/mercury-map.jpg",

    rimHex = 0x0088ff,
    facingHex = 0x000000,

    rings = null,
  } = {}) {
    this.orbitSpeed = orbitSpeed;
    this.orbitRadius = orbitRadius;
    this.orbitRotationDirection = orbitRotationDirection;

    this.planetSize = planetSize;
    this.planetAngle = planetAngle;
    this.planetTexture = planetTexture;
    this.planetRotationSpeed = planetRotationSpeed;
    this.planetRotationDirection = planetRotationDirection;

    this.rings = rings;

    this.group = new Group();
    this.planetGroup = new Group();
    this.loader = new TextureLoader();
    this.planetGeometry = new IcosahedronGeometry(this.planetSize, 12);

    this.createOrbit();
    this.createRings();
    this.createPlanet();
    this.createGlow(rimHex, facingHex);

    this.animate = this.createAnimateFunction();
    this.animate();
  }

  createOrbit() {
    const orbitGeometry = new TorusGeometry(this.orbitRadius, 0.01, 100);
    const orbitMaterial = new MeshBasicMaterial({
      color: 0xadd8e6,
      side: DoubleSide,
    });
    const orbitMesh = new Mesh(orbitGeometry, orbitMaterial);
    orbitMesh.rotation.x = Math.PI / 2;
    this.group.add(orbitMesh);
  }

  createPlanet() {
    const map = this.loader.load(this.planetTexture);
    const planetMaterial = new MeshPhongMaterial({ map });
    planetMaterial.map.colorSpace = SRGBColorSpace;
    const planetMesh = new Mesh(this.planetGeometry, planetMaterial);
    this.planetGroup.add(planetMesh);
    this.planetGroup.position.x = this.orbitRadius - this.planetSize / 9;
    this.planetGroup.rotation.z = this.planetAngle;
    this.group.add(this.planetGroup);
  }

  createGlow(rimHex, facingHex) {
    const uniforms = {
      color1: { value: new Color(rimHex) },
      color2: { value: new Color(facingHex) },
      fresnelBias: { value: 0.2 },
      fresnelScale: { value: 1.5 },
      fresnelPower: { value: 4.0 },
    };

    const vertexShader = `
    uniform float fresnelBias;
    uniform float fresnelScale;
    uniform float fresnelPower;

    varying float vReflectionFactor;

    void main() {
      vec4 mvPosition = modelViewMatrix * vec4( position, 1.0 );
      vec4 worldPosition = modelMatrix * vec4( position, 1.0 );

      vec3 worldNormal = normalize( mat3( modelMatrix[0].xyz, modelMatrix[1].xyz, modelMatrix[2].xyz ) * normal );

      vec3 I = worldPosition.xyz - cameraPosition;

      vReflectionFactor = fresnelBias   fresnelScale * pow( 1.0   dot( normalize( I ), worldNormal ), fresnelPower );

      gl_Position = projectionMatrix * mvPosition;
    }
    `;

    const fragmentShader = `
      uniform vec3 color1;
      uniform vec3 color2;

      varying float vReflectionFactor;

      void main() {
        float f = clamp( vReflectionFactor, 0.0, 1.0 );
        gl_FragColor = vec4(mix(color2, color1, vec3(f)), f);
      }
    `;

    const planetGlowMaterial = new ShaderMaterial({
      uniforms,
      vertexShader,
      fragmentShader,
      transparent: true,
      blending: AdditiveBlending,
    });
    const planetGlowMesh = new Mesh(this.planetGeometry, planetGlowMaterial);
    planetGlowMesh.scale.setScalar(1.1);
    this.planetGroup.add(planetGlowMesh);
  }

  createRings() {
    if (!this.rings) return;

    const innerRadius = this.planetSize   0.1;
    const outerRadius = innerRadius   this.rings.ringsSize;

    const ringsGeometry = new RingGeometry(innerRadius, outerRadius, 32);

    const ringsMaterial = new MeshBasicMaterial({
      side: DoubleSide,
      transparent: true,
      map: this.loader.load(this.rings.ringsTexture),
    });

    const ringMeshs = new Mesh(ringsGeometry, ringsMaterial);
    ringMeshs.rotation.x = Math.PI / 2;
    this.planetGroup.add(ringMeshs);
  }

  createAnimateFunction() {
    return () => {
      requestAnimationFrame(this.animate);

      this.updateOrbitRotation();
      this.updatePlanetRotation();
    };
  }

  updateOrbitRotation() {
    if (this.orbitRotationDirection === "clockwise") {
      this.group.rotation.y -= this.orbitSpeed;
    } else if (this.orbitRotationDirection === "counterclockwise") {
      this.group.rotation.y  = this.orbitSpeed;
    }
  }

  updatePlanetRotation() {
    if (this.planetRotationDirection === "clockwise") {
      this.planetGroup.rotation.y -= this.planetRotationSpeed;
    } else if (this.planetRotationDirection === "counterclockwise") {
      this.planetGroup.rotation.y  = this.planetRotationSpeed;
    }
  }

  getPlanet() {
    return this.group;
  }
}
For Earth, I'm extending the Planet class to add extra textures, such as clouds and a night texture for the planet's night side.
import {
  Mesh,
  AdditiveBlending,
  MeshBasicMaterial,
  MeshStandardMaterial,
} from "three";
import { Planet } from "./planet";

export class Earth extends Planet {
  constructor(props) {
    super(props);

    this.createPlanetLights();
    this.createPlanetClouds();
  }

  createPlanetLights() {
    const planetLightsMaterial = new MeshBasicMaterial({
      map: this.loader.load("/solar-system-threejs/assets/earth-map-2.jpg"),
      blending: AdditiveBlending,
    });
    const planetLightsMesh = new Mesh(
      this.planetGeometry,
      planetLightsMaterial
    );
    this.planetGroup.add(planetLightsMesh);

    this.group.add(this.planetGroup);
  }

  createPlanetClouds() {
    const planetCloudsMaterial = new MeshStandardMaterial({
      map: this.loader.load("/solar-system-threejs/assets/earth-map-3.jpg"),
      transparent: true,
      opacity: 0.8,
      blending: AdditiveBlending,
      alphaMap: this.loader.load(
        "/solar-system-threejs/assets/earth-map-4.jpg"
      ),
    });
    const planetCloudsMesh = new Mesh(
      this.planetGeometry,
      planetCloudsMaterial
    );
    planetCloudsMesh.scale.setScalar(1.003);
    this.planetGroup.add(planetCloudsMesh);

    this.group.add(this.planetGroup);
  }
}
By searching on Google for about five minutes, you’ll come across a table with all the necessary values for adding planets to the scene.
| Planet | Size (diameter) | Rotation speed | Rotation direction | Orbit speed |
|---|---|---|---|---|
| Mercury | 4,880 km | 10.83 km/h | Counterclockwise | 47.87 km/s |
| Venus | 12,104 km | 6.52 km/h | Clockwise | 35.02 km/s |
| Earth | 12,742 km | 1674.4 km/h | Counterclockwise | 29.78 km/s |
| Mars | 6,779 km | 866.5 km/h | Counterclockwise | 24.07 km/s |
| Jupiter | 142,984 km | 45,300 km/h | Counterclockwise | 13.07 km/s |
| Saturn | 120,536 km | 35,500 km/h | Counterclockwise | 9.69 km/s |
| Uranus | 51,118 km | 9,320 km/h | Clockwise | 6.81 km/s |
| Neptune | 49,528 km | 9,720 km/h | Counterclockwise | 5.43 km/s |
Now, all the planets and the sun can be added to the scene.
const planets = [
  {
    orbitSpeed: 0.00048,
    orbitRadius: 10,
    orbitRotationDirection: "clockwise",
    planetSize: 0.2,
    planetRotationSpeed: 0.005,
    planetRotationDirection: "counterclockwise",
    planetTexture: "/solar-system-threejs/assets/mercury-map.jpg",
    rimHex: 0xf9cf9f,
  },
  {
    orbitSpeed: 0.00035,
    orbitRadius: 13,
    orbitRotationDirection: "clockwise",
    planetSize: 0.5,
    planetRotationSpeed: 0.0005,
    planetRotationDirection: "clockwise",
    planetTexture: "/solar-system-threejs/assets/venus-map.jpg",
    rimHex: 0xb66f1f,
  },
  {
    orbitSpeed: 0.00024,
    orbitRadius: 19,
    orbitRotationDirection: "clockwise",
    planetSize: 0.3,
    planetRotationSpeed: 0.01,
    planetRotationDirection: "counterclockwise",
    planetTexture: "/solar-system-threejs/assets/mars-map.jpg",
    rimHex: 0xbc6434,
  },
  {
    orbitSpeed: 0.00013,
    orbitRadius: 22,
    orbitRotationDirection: "clockwise",
    planetSize: 1,
    planetRotationSpeed: 0.06,
    planetRotationDirection: "counterclockwise",
    planetTexture: "/solar-system-threejs/assets/jupiter-map.jpg",
    rimHex: 0xf3d6b6,
  },
  {
    orbitSpeed: 0.0001,
    orbitRadius: 25,
    orbitRotationDirection: "clockwise",
    planetSize: 0.8,
    planetRotationSpeed: 0.05,
    planetRotationDirection: "counterclockwise",
    planetTexture: "/solar-system-threejs/assets/saturn-map.jpg",
    rimHex: 0xd6b892,
    rings: {
      ringsSize: 0.5,
      ringsTexture: "/solar-system-threejs/assets/saturn-rings.jpg",
    },
  },
  {
    orbitSpeed: 0.00007,
    orbitRadius: 28,
    orbitRotationDirection: "clockwise",
    planetSize: 0.5,
    planetRotationSpeed: 0.02,
    planetRotationDirection: "clockwise",
    planetTexture: "/solar-system-threejs/assets/uranus-map.jpg",
    rimHex: 0x9ab6c2,
    rings: {
      ringsSize: 0.4,
      ringsTexture: "/solar-system-threejs/assets/uranus-rings.jpg",
    },
  },
  {
    orbitSpeed: 0.000054,
    orbitRadius: 31,
    orbitRotationDirection: "clockwise",
    planetSize: 0.5,
    planetRotationSpeed: 0.02,
    planetRotationDirection: "counterclockwise",
    planetTexture: "/solar-system-threejs/assets/neptune-map.jpg",
    rimHex: 0x5c7ed7,
  },
];

planets.forEach((item) => {
  const planet = new Planet(item).getPlanet();
  scene.add(planet);
});

const earth = new Earth({
  orbitSpeed: 0.00029,
  orbitRadius: 16,
  orbitRotationDirection: "clockwise",
  planetSize: 0.5,
  planetAngle: (-23.4 * Math.PI) / 180,
  planetRotationSpeed: 0.01,
  planetRotationDirection: "counterclockwise",
  planetTexture: "/solar-system-threejs/assets/earth-map-1.jpg",
}).getPlanet();

scene.add(earth);
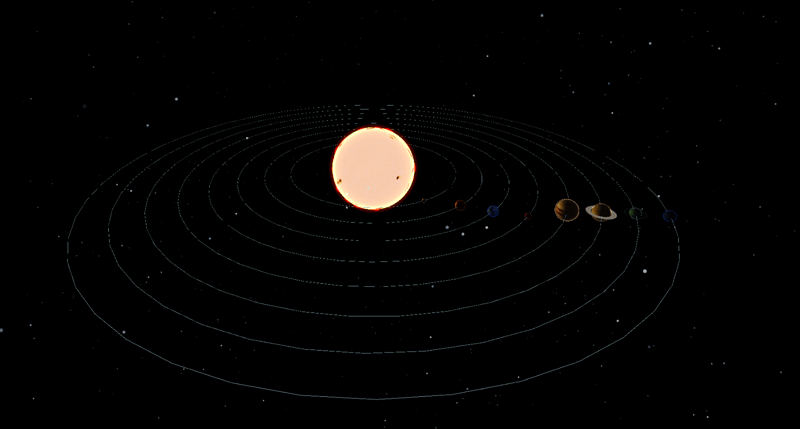
In result all solar system will look sth like:
Deploying to GitHub Pages
For deploying to set the correct base in vite.config.js.
If you are deploying to https://
If you are deploying to https://
Go to your GitHub Pages configuration in the repository settings page and choose the source of deployment as "GitHub Actions", this will lead you to create a workflow that builds and deploys your project, a sample workflow that installs dependencies and builds using npm is provided:
# Simple workflow for deploying static content to GitHub Pages
name: Deploy static content to Pages

on:
  # Runs on pushes targeting the default branch
  push:
    branches: ['main']

  # Allows you to run this workflow manually from the Actions tab
  workflow_dispatch:

# Sets the GITHUB_TOKEN permissions to allow deployment to GitHub Pages
permissions:
  contents: read
  pages: write
  id-token: write

# Allow one concurrent deployment
concurrency:
  group: 'pages'
  cancel-in-progress: true

jobs:
  # Single deploy job since we're just deploying
  deploy:
    environment:
      name: github-pages
      url: ${{ steps.deployment.outputs.page_url }}
    runs-on: ubuntu-latest
    steps:
      - name: Checkout
        uses: actions/checkout@v4
      - name: Set up Node
        uses: actions/setup-node@v4
        with:
          node-version: 20
          cache: 'npm'
      - name: Install dependencies
        run: npm ci
      - name: Build
        run: npm run build
      - name: Setup Pages
        uses: actions/configure-pages@v4
      - name: Upload artifact
        uses: actions/upload-pages-artifact@v3
        with:
          # Upload dist folder
          path: './dist'
      - name: Deploy to GitHub Pages
        id: deployment
        uses: actions/deploy-pages@v4
That is it. If your deployment has not started automatically you can always start it manually in Actions tab in your repo. Link with deployed project can be found below.
Conclusion
That’s it for today! You can find the link to the entire project below. I hope you found this entertaining and don’t still believe the Earth is flat.
See ya!
Repository link
Deployment link
-
 如何使用“ JSON”软件包解析JSON阵列?parsing JSON与JSON软件包 QUALDALS:考虑以下go代码:字符串 } func main(){ datajson:=`[“ 1”,“ 2”,“ 3”]`` arr:= jsontype {} 摘要:= = json.unmarshal([] byte(...编程 发布于2025-05-04
 -
为什么不使用CSS`content'属性显示图像?在Firefox extemers属性为某些图像很大,&& && && &&华倍华倍[华氏华倍华氏度]很少见,却是某些浏览属性很少,尤其是特定于Firefox的某些浏览器未能在使用内容属性引用时未能显示图像的情况。这可以在提供的CSS类中看到:。googlepic { 内容:url(&#...编程 发布于2025-05-04
-
在C#中如何高效重复字符串字符用于缩进?在基于项目的深度下固定字符串时,重复一个字符串以进行凹痕,很方便有效地有一种有效的方法来返回字符串重复指定的次数的字符串。使用指定的次数。 constructor 这将返回字符串“ -----”。 字符串凹痕= new String(' - ',depth); console.Wr...编程 发布于2025-05-04
-
如何为PostgreSQL中的每个唯一标识符有效地检索最后一行?postgresql:为每个唯一标识符在postgresql中提取最后一行,您可能需要遇到与数据集合中每个不同标识的信息相关的信息。考虑以下数据:[ 1 2014-02-01 kjkj 在数据集中的每个唯一ID中检索最后一行的信息,您可以在操作员上使用Postgres的有效效率: id dat...编程 发布于2025-05-04
-
对象拟合:IE和Edge中的封面失败,如何修复?To resolve this issue, we employ a clever CSS solution that solves the problem:position: absolute;top: 50%;left: 50%;transform: translate(-50%, -50%)...编程 发布于2025-05-04
-
C++20 Consteval函数中模板参数能否依赖于函数参数?[ consteval函数和模板参数依赖于函数参数在C 17中,模板参数不能依赖一个函数参数,因为编译器仍然需要对非contexexpr futcoriations contim at contexpr function进行评估。 compile time。 C 20引入恒定函数,必须在编译时进行...编程 发布于2025-05-04
-
Python环境变量的访问与管理方法Accessing Environment Variables in PythonTo access environment variables in Python, utilize the os.environ object, which represents a mapping of envir...编程 发布于2025-05-04
-
在Pandas中如何将年份和季度列合并为一个周期列?pandas data frame thing commans date lay neal and pree pree'和pree pree pree”,季度 2000 q2 这个目标是通过组合“年度”和“季度”列来创建一个新列,以获取以下结果: [python中的concate...编程 发布于2025-05-04
-
版本5.6.5之前,使用current_timestamp与时间戳列的current_timestamp与时间戳列有什么限制?在时间戳列上使用current_timestamp或MySQL版本中的current_timestamp或在5.6.5 此限制源于遗留实现的关注,这些限制需要对当前的_timestamp功能进行特定的实现。 创建表`foo`( `Productid` int(10)unsigned not n...编程 发布于2025-05-04
-
-
如何干净地删除匿名JavaScript事件处理程序?删除匿名事件侦听器将匿名事件侦听器添加到元素中会提供灵活性和简单性,但是当要删除它们时,可以构成挑战,而无需替换元素本身就可以替换一个问题。 element? element.addeventlistener(event,function(){/在这里工作/},false); 要解决此问题,请考虑...编程 发布于2025-05-04
-
JavaScript计算两个日期之间天数的方法How to Calculate the Difference Between Dates in JavascriptAs you attempt to determine the difference between two dates in Javascript, consider this s...编程 发布于2025-05-04
-
Go语言如何动态发现导出包类型?与反射软件包中的有限类型的发现能力相反,本文探索了替代方法,探索了在Runruntime。go import( “ FMT” “去/进口商” ) func main(){ pkg,err:= incorter.default()。导入(“ time”) 如果err...编程 发布于2025-05-04
-
如何使用组在MySQL中旋转数据?在关系数据库中使用mySQL组使用mySQL组进行查询结果,在关系数据库中使用MySQL组,转移数据的数据是指重新排列的行和列的重排以增强数据可视化。在这里,我们面对一个共同的挑战:使用组的组将数据从基于行的基于列的转换为基于列。 Let's consider the following ...编程 发布于2025-05-04
-
如何检查对象是否具有Python中的特定属性?方法来确定对象属性存在寻求一种方法来验证对象中特定属性的存在。考虑以下示例,其中尝试访问不确定属性会引起错误: >>> a = someClass() >>> A.property Trackback(最近的最新电话): 文件“ ”,第1行, AttributeError: SomeClass...编程 发布于2025-05-04


学习中文
- 1 走路用中文怎么说?走路中文发音,走路中文学习
- 2 坐飞机用中文怎么说?坐飞机中文发音,坐飞机中文学习
- 3 坐火车用中文怎么说?坐火车中文发音,坐火车中文学习
- 4 坐车用中文怎么说?坐车中文发音,坐车中文学习
- 5 开车用中文怎么说?开车中文发音,开车中文学习
- 6 游泳用中文怎么说?游泳中文发音,游泳中文学习
- 7 骑自行车用中文怎么说?骑自行车中文发音,骑自行车中文学习
- 8 你好用中文怎么说?你好中文发音,你好中文学习
- 9 谢谢用中文怎么说?谢谢中文发音,谢谢中文学习
- 10 How to say goodbye in Chinese? 再见Chinese pronunciation, 再见Chinese learning


