
如何在 Steam Deck 上安装 Windows
 浏览:296
Do you want to have a familiar operating system or Game Pass on your Steam Deck? You can dual-boot SteamOS with Windows on the device. Here’s a thorough guide on installing Windows 11 on your Steam Deck.
Why You Should Install Windows on Your Steam Deck
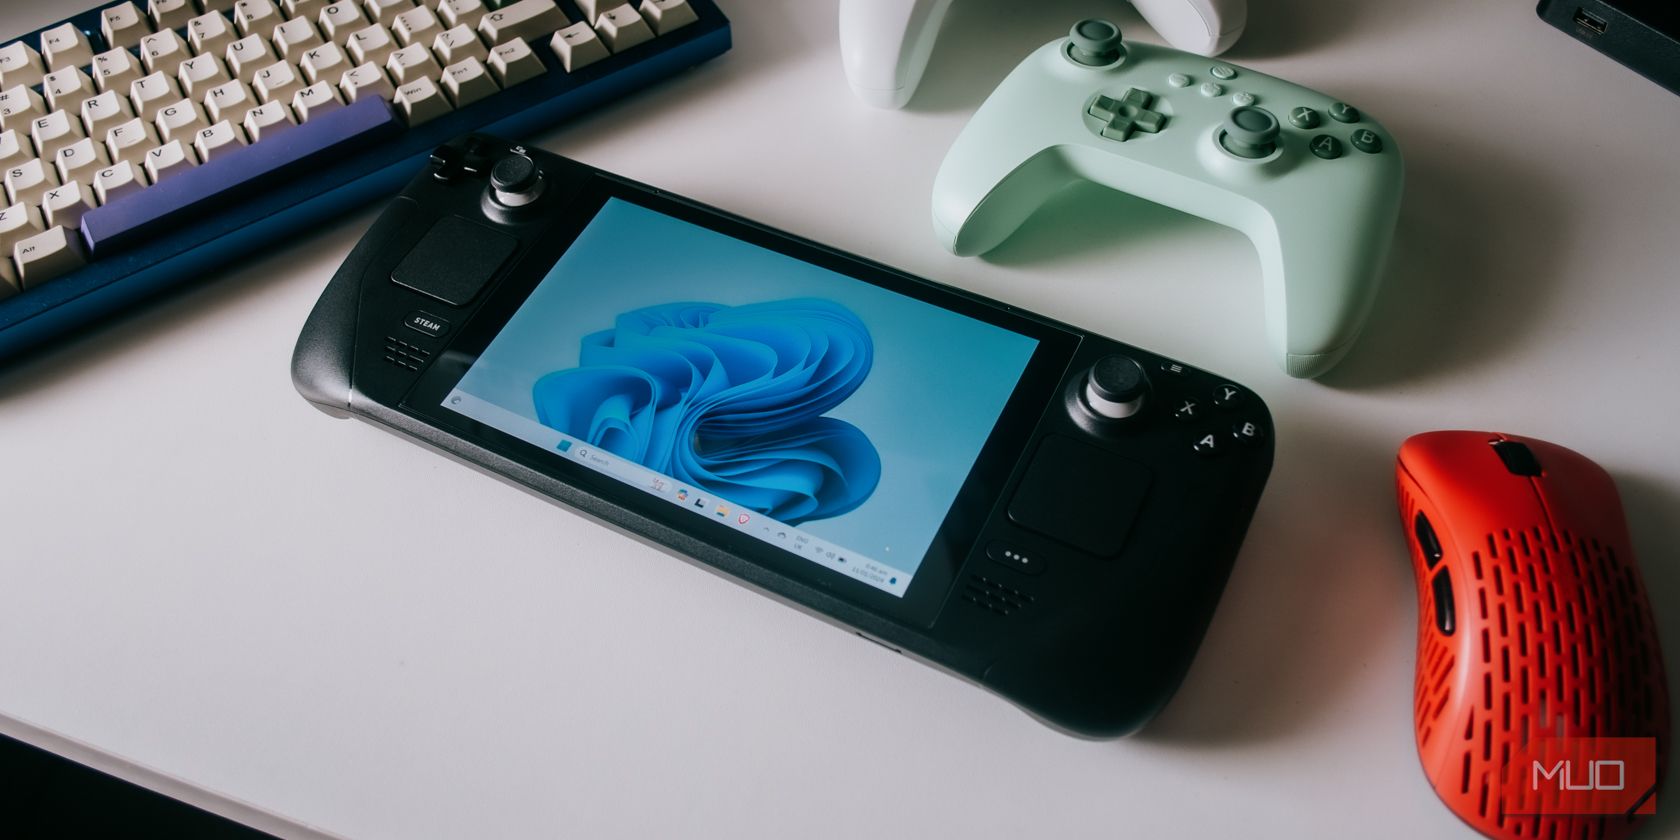
If you’re someone who owns a PC, the chances are very high that you’re running Windows on it. Windows is familiar to many and is fairly easy to use.
While not having a mouse and keyboard on your Steam Deck will pose some navigation issues, having an operating system that’s familiar to you and that you know how to use might be worth that sacrifice.
Having Windows on your Steam Deck can also make it a work laptop or desktop replacement. You can easily use Photoshop, Microsoft Office apps, Lightroom, and all the usual suspects on Windows—so long as you’re willing to bring around a mouse and keyboard. Thankfully, there are plenty of Steam Deck accessories that can make doing real work on it a breeze.
What You Need to Install Windows on Your Steam Deck
You only need a few things to install Windows on your Steam Deck, most of which are software. But you will need a few hardware accessories as well.
Hardware
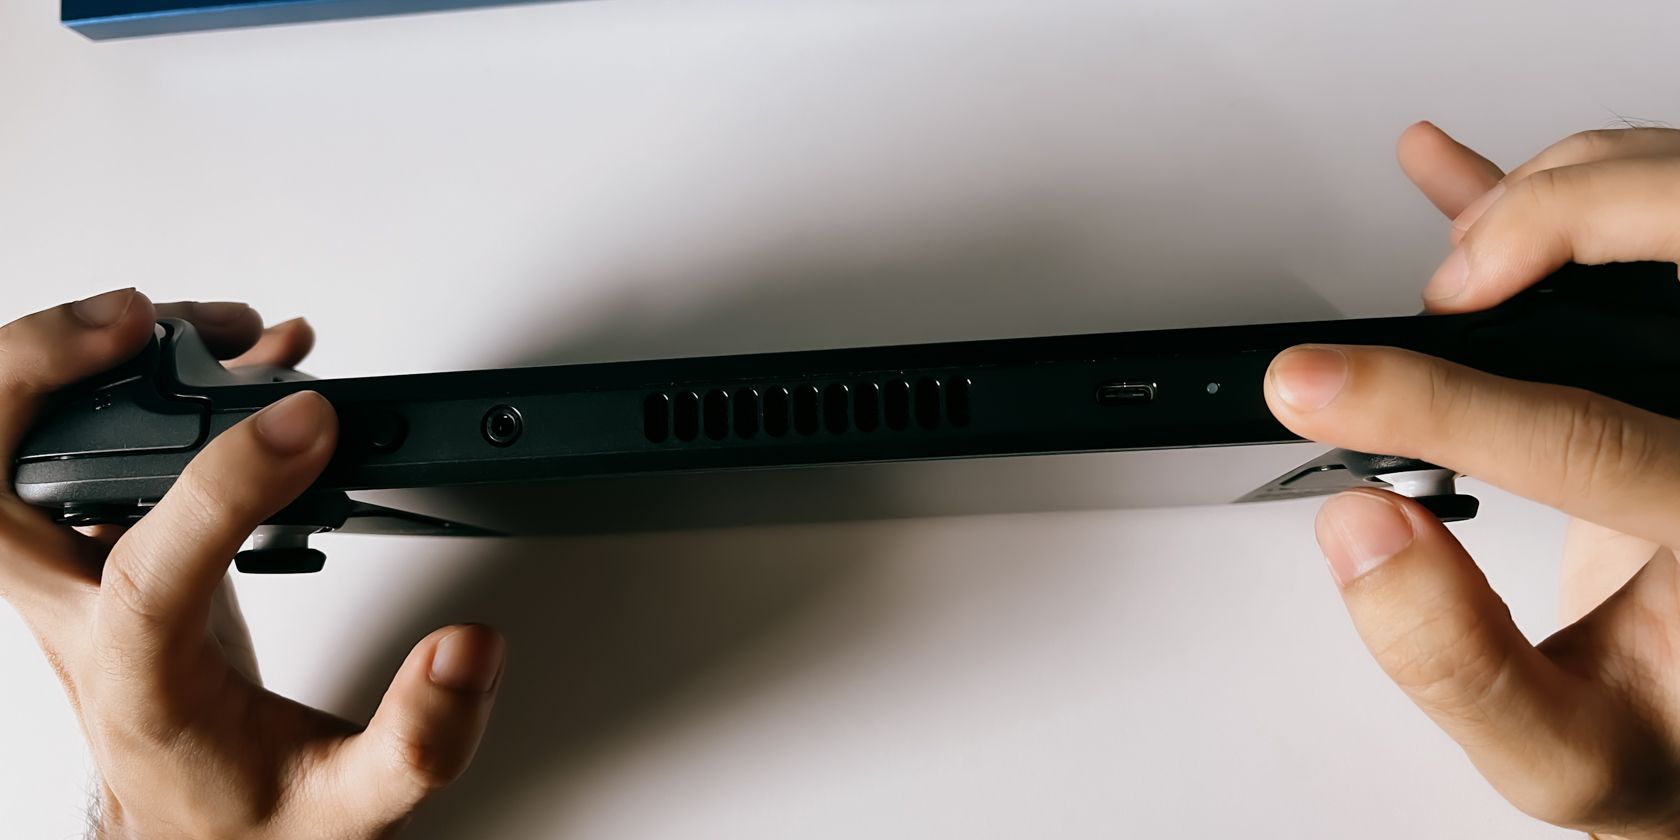
For hardware, you really only need a USB flash drive and a USB-C hub to plug it into your Steam Deck. You can also install an SD card on your Steam Deck as long as it's decently fast. A USB 3.0 or higher flash drive or a UHS-I or higher SD card would suffice, but we wouldn’t suggest anything slower.
We also highly suggest using a separate PC as we've done in this guide, but you can also use your Steam Deck and follow similar steps using the Linux version of Ventoy.
Ventoy
The first piece of software is Ventoy, a program that allows you to boot multiple ISOs from one external storage device without needing to format it to add a different ISO. This will avoid the back-and-forth formatting of the storage device used, making it easier to go back in case you make a mistake along the way.
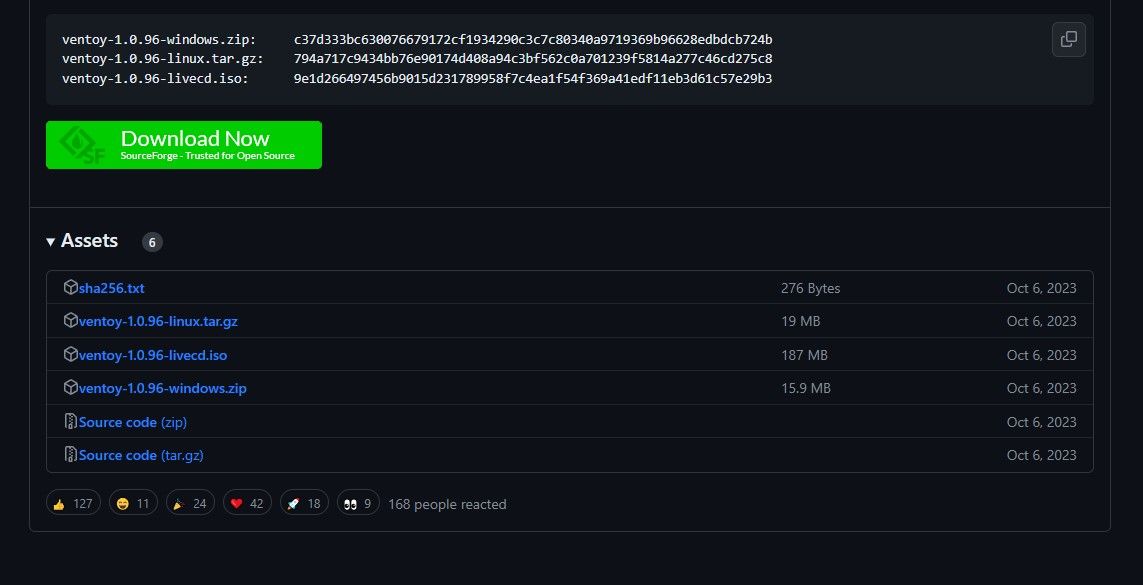
Head to Ventoy’s GitHub page and on the right side, click on Releases. Scroll down to Assets and click on the ZIP folder that says Windows on it. Extract the contents into a folder on your PC.
GNOME Partition Editor (GParted) ISO

GParted is an ISO used to create partitions on your internal SSD on your Steam Deck. The new partition will be where you’ll place the Windows installation. To download it, head to GParted.org and click on the amd64.iso download file.
Windows 11 ISO
To put Windows onto your Steam Deck, you’ll of course need the installer. You can easily find this on Microsoft’s Windows 11 page.

Head to the Download Windows 11 Disk Image (ISO) option and on the dropdown menu, select Windows 11 (multi-edition ISO). Click on Download, then select your language. It should then give you another download button to download the Windows ISO that is about 6GB to 7GB in size.
Windows Drivers for Steam Deck

Windows doesn’t support all the Steam Deck’s hardware straight from the get-go. Fortunately, Steam has provided Windows drivers so that your audio, Wi-Fi, Bluetooth, SD card reader, and APU are all working properly.
You can find and download the Windows drivers for your Steam Deck on the Steam Deck Windows Resources support page. Extract all of them into a single folder so that you can paste it onto your SD card or flash drive later.
How to Install Windows on Your Steam Deck
If you’ve got your flash drive or SD card ready with all the software downloaded, you can now start turning your Steam Deck into a Windows experience. In our case, we’ll be using an SD card so that we don’t need to deal with a USB hub or a dock.
1. Install Ventoy on Your Flash Drive or SD Card
To be able to run both the GParted and the Windows 11 ISOs from one SD card without needing to format it multiple times, you’ll need to use Ventoy. This will make things way more convenient.

To install Ventoy on your flash drive or SD card, you’ll want to plug it into your PC and open the Ventoy folder you extracted earlier. Then click on Ventoy2Disk.exe.
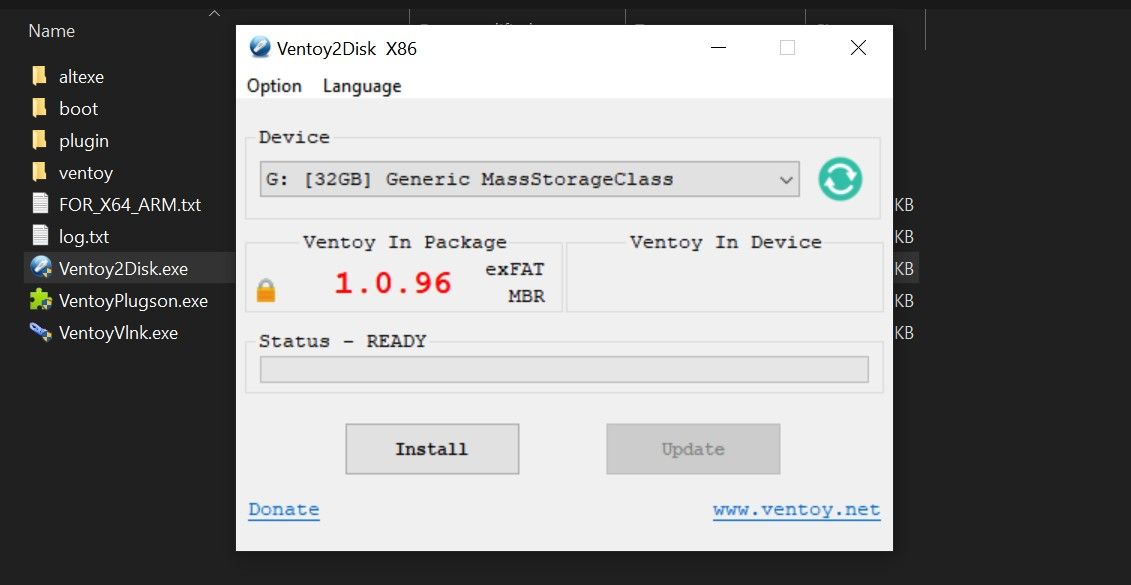
You’ll then select the storage device you want to store Ventoy on. In our case, it’s the 32GB SD card. Click Install.
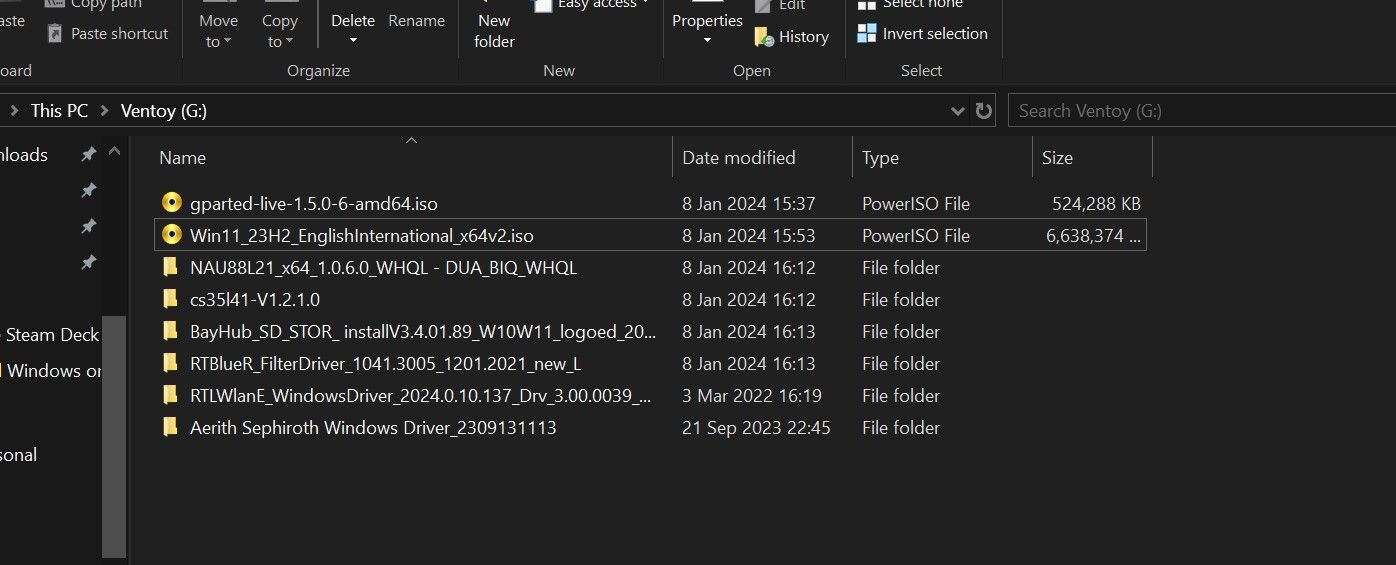
Now that Ventoy is installed, copy over GParted, the Windows 11 ISO, and a folder containing the Windows drivers for the Steam Deck. You can now insert the SD card into the Steam Deck.
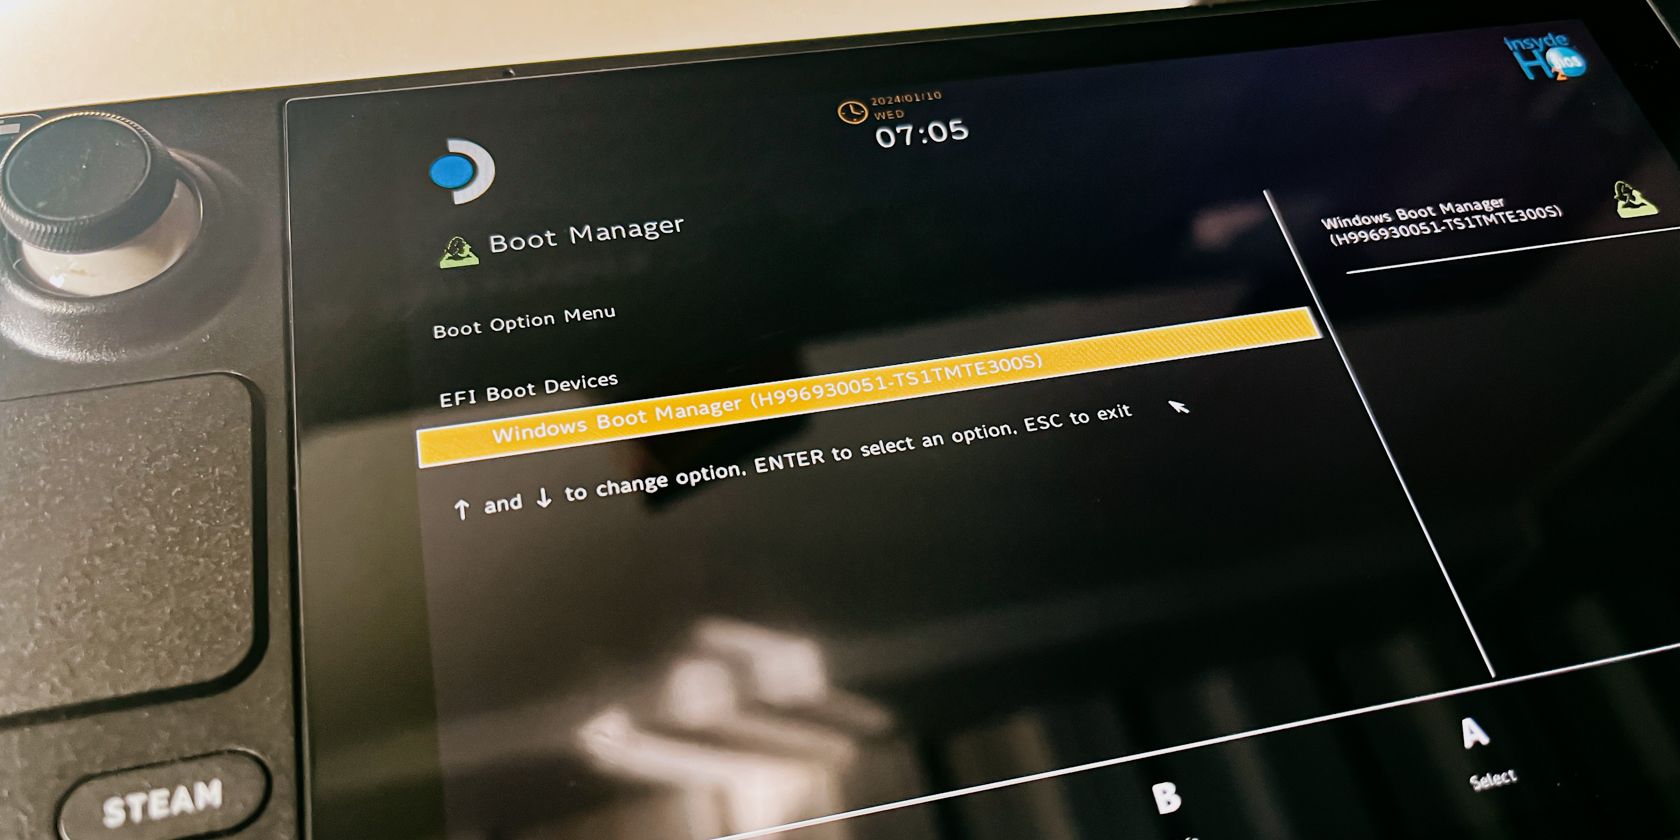
2. Enter the Steam Deck Boot Manager
Next, you’ll need to boot from the SD card or flash drive you’ve connected to the Steam Deck using the device's boot manager.
To do this, shut down your Steam Deck first. Once it’s off, hold down the volume down button and power button until you hear a chime. Once you hear the chime, let go of the power button, but keep holding down the volume down button until the boot manager shows, like in the image below.
If you hold down the power button after the chime, you’ll most likely end up turning your Steam Deck off again.
Once you’re in the boot manager, select the SD card or flash drive. This should show Ventoy and both the Windows and GParted ISOs.
3. Use GParted to Partition Your Internal SSD
You'll now need to partition your Steam Deck's SSD. If you don't, you most likely won't be able to install Windows 11 on the /home partition, and you'll also end up wiping SteamOS from your drive.
If you want just Windows on your Steam Deck, you can also use Ventoy to wipe all partitions and either leave the combined partition as unallocated or format it as NTFS. We don't suggest this, however, as SteamOS really is the best way to experience the Steam Deck. It's better to have the option to switch between the two than be stuck with just Windows.

On Ventoy, select GParted to run it. You can run it in normal mode, but if that doesn’t work, grub2 might do it.
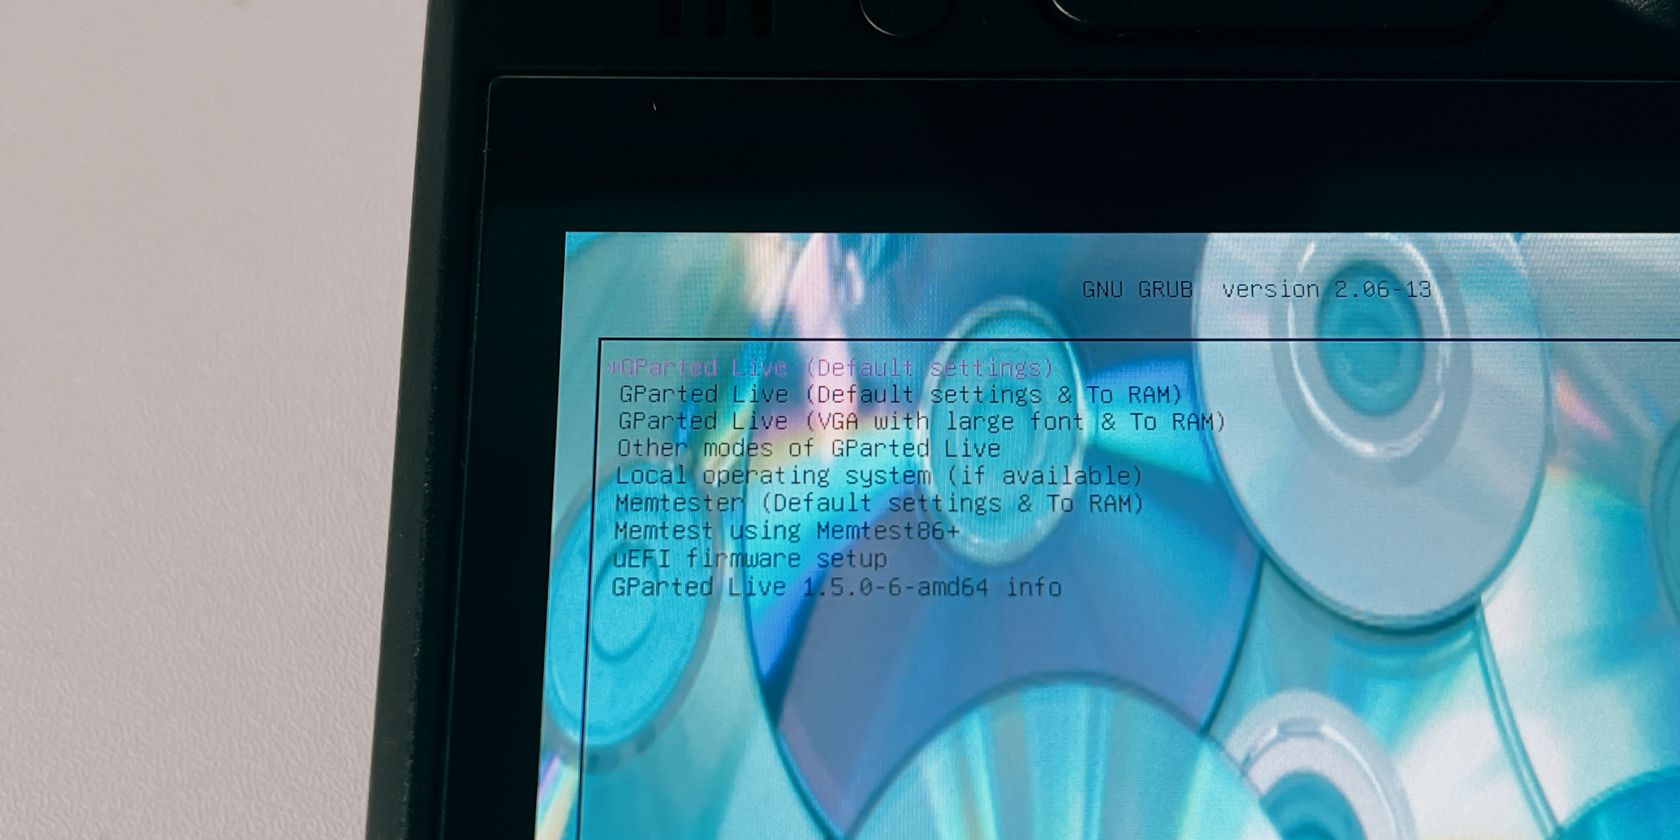
Once GParted is open, you’ll be greeted with a few things before you can get to partitioning. Firstly, you’ll need to select the settings. Pick the first one—GParted Live (Default Settings).
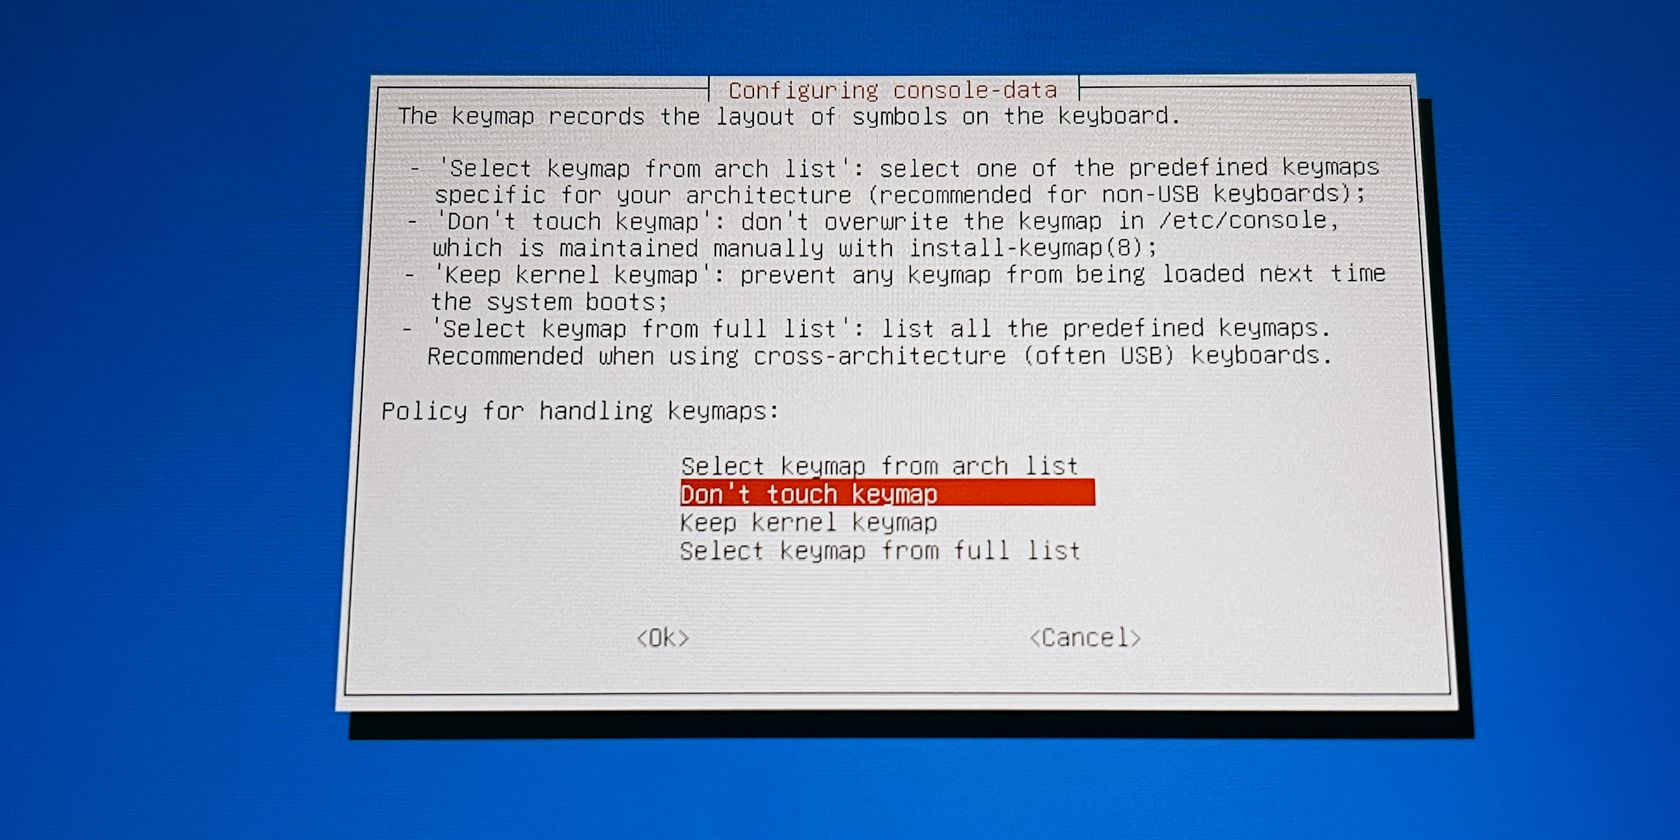
Next, select Don’t touch keymap and then select your language. If you’re just going to use English, we suggest just pressing A on the Steam Deck until you reach the main screen.
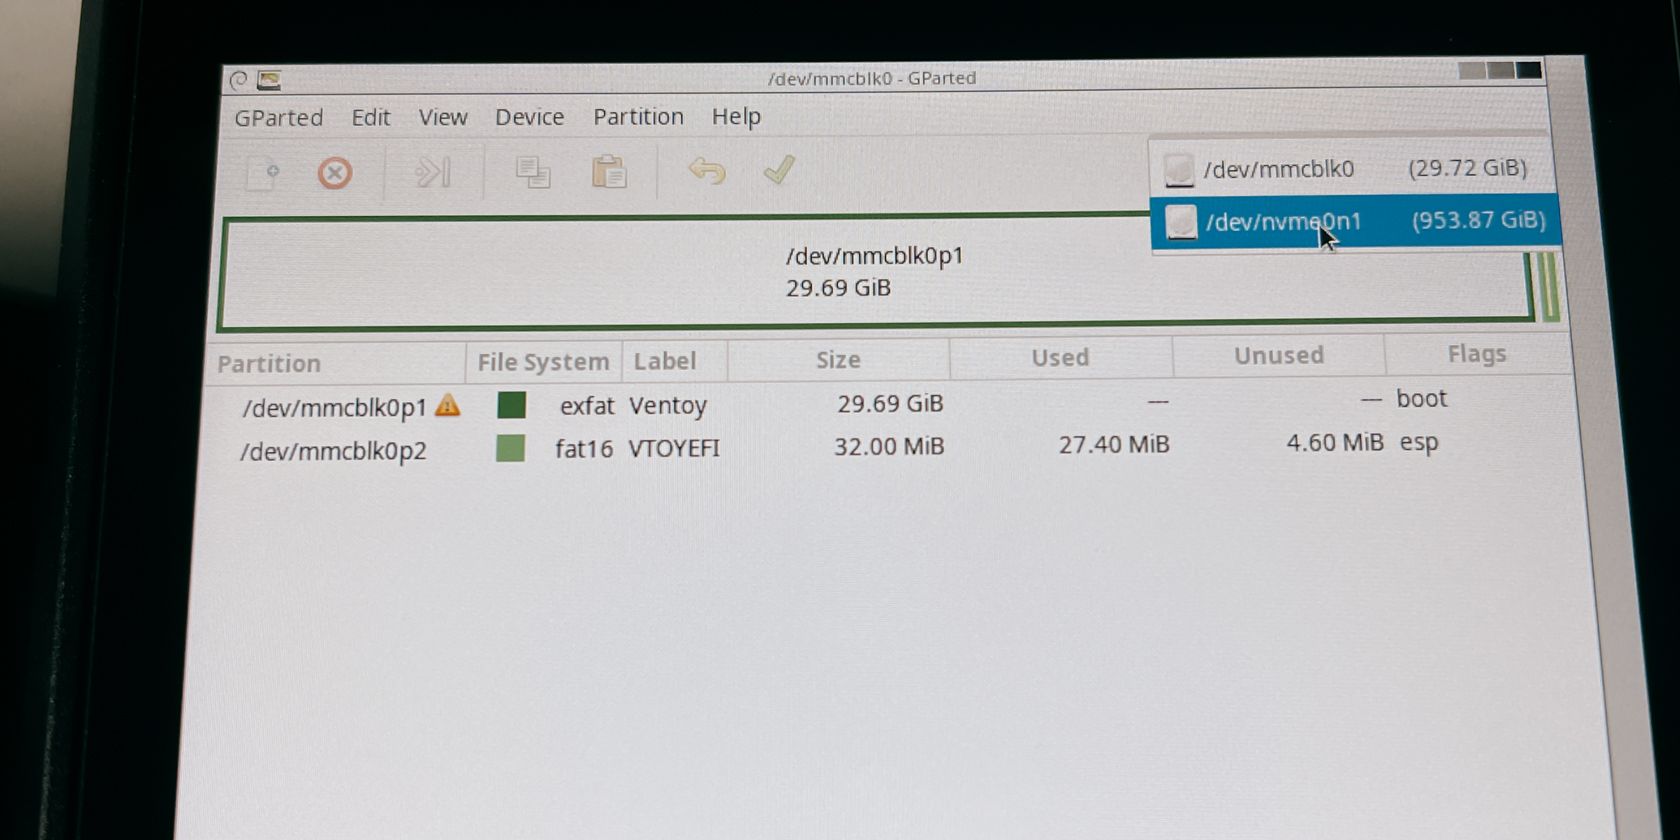
Finally, you’re ready to partition your SSD. By this point, you can plug in your mouse and keyboard to make it easier to navigate. If your SD card or flash drive is the only thing you can see, switch it to your SSD on the upper right drop-down menu.
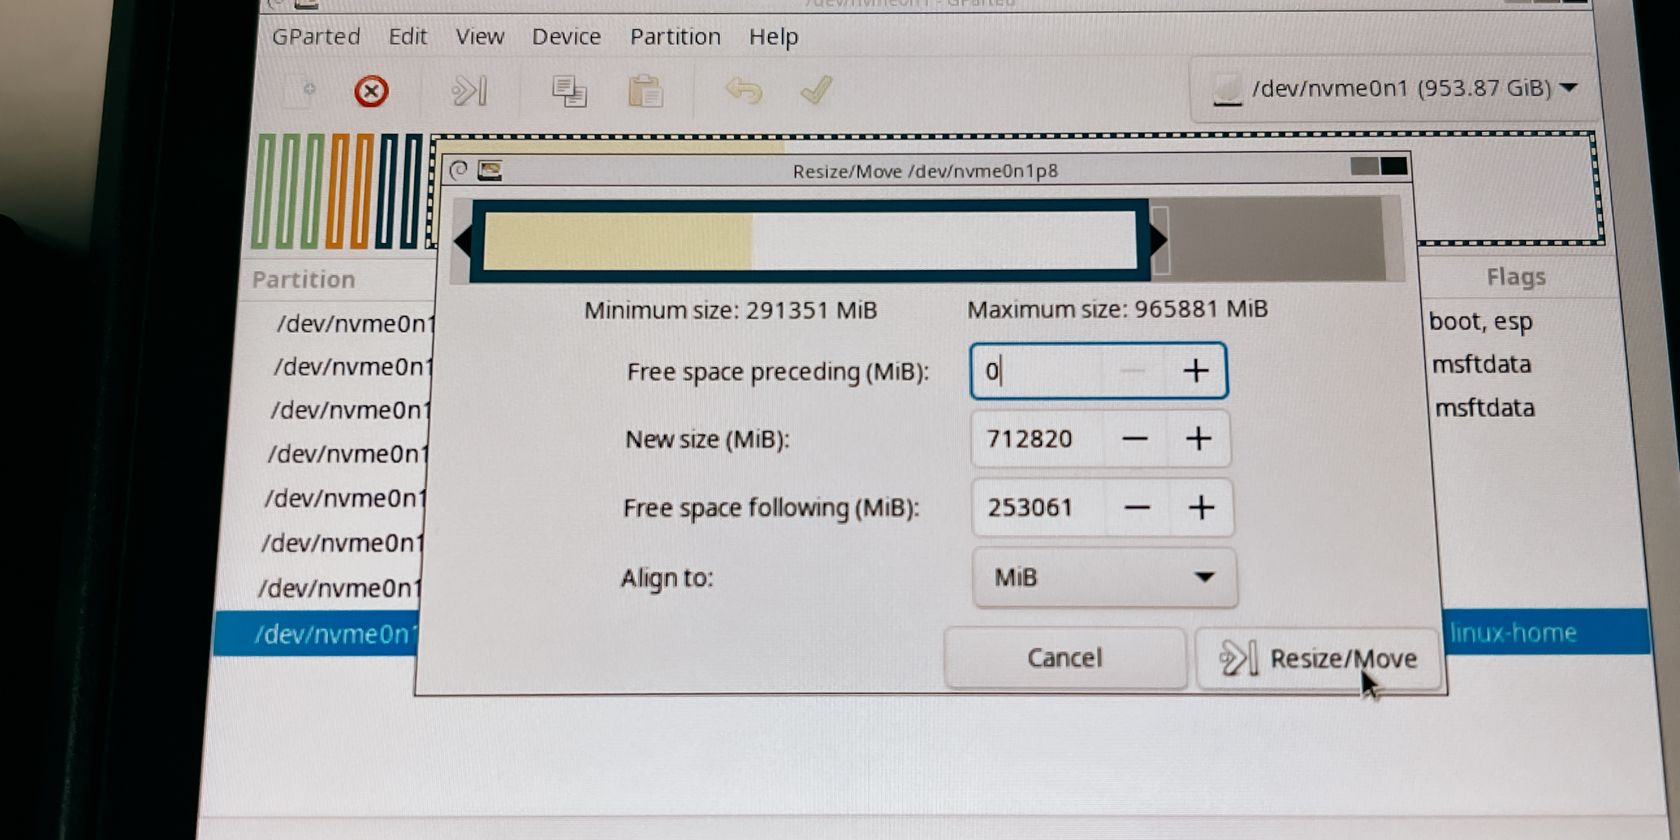
To partition your SSD, right-click (left trigger) on the /home partition or the largest partition on the SSD. Click on Resize/Move and move the right wall to the left, leaving the empty space as a new unallocated partition.
In our case, we’re leaving around 250 GB or about 250,000 MiB for Windows 11. Click on the Resize/Move button on the bottom right to make your changes.

Finally, click on the green check mark in the toolbar. Forgetting to do this will not apply your partition changes.
The software will then process the new partition sizes, which may take a few minutes depending on how big your SSD is. Once it’s done, you can now press the power button to exit GParted and power down.
4. Windows 11 Setup on the Steam Deck
Now you're ready to install Windows on your Steam Deck. Before you go to the boot manager though, unplug any other USB devices you used earlier except the flash drive. This prevents the ISOs or Ventoy from malfunctioning.
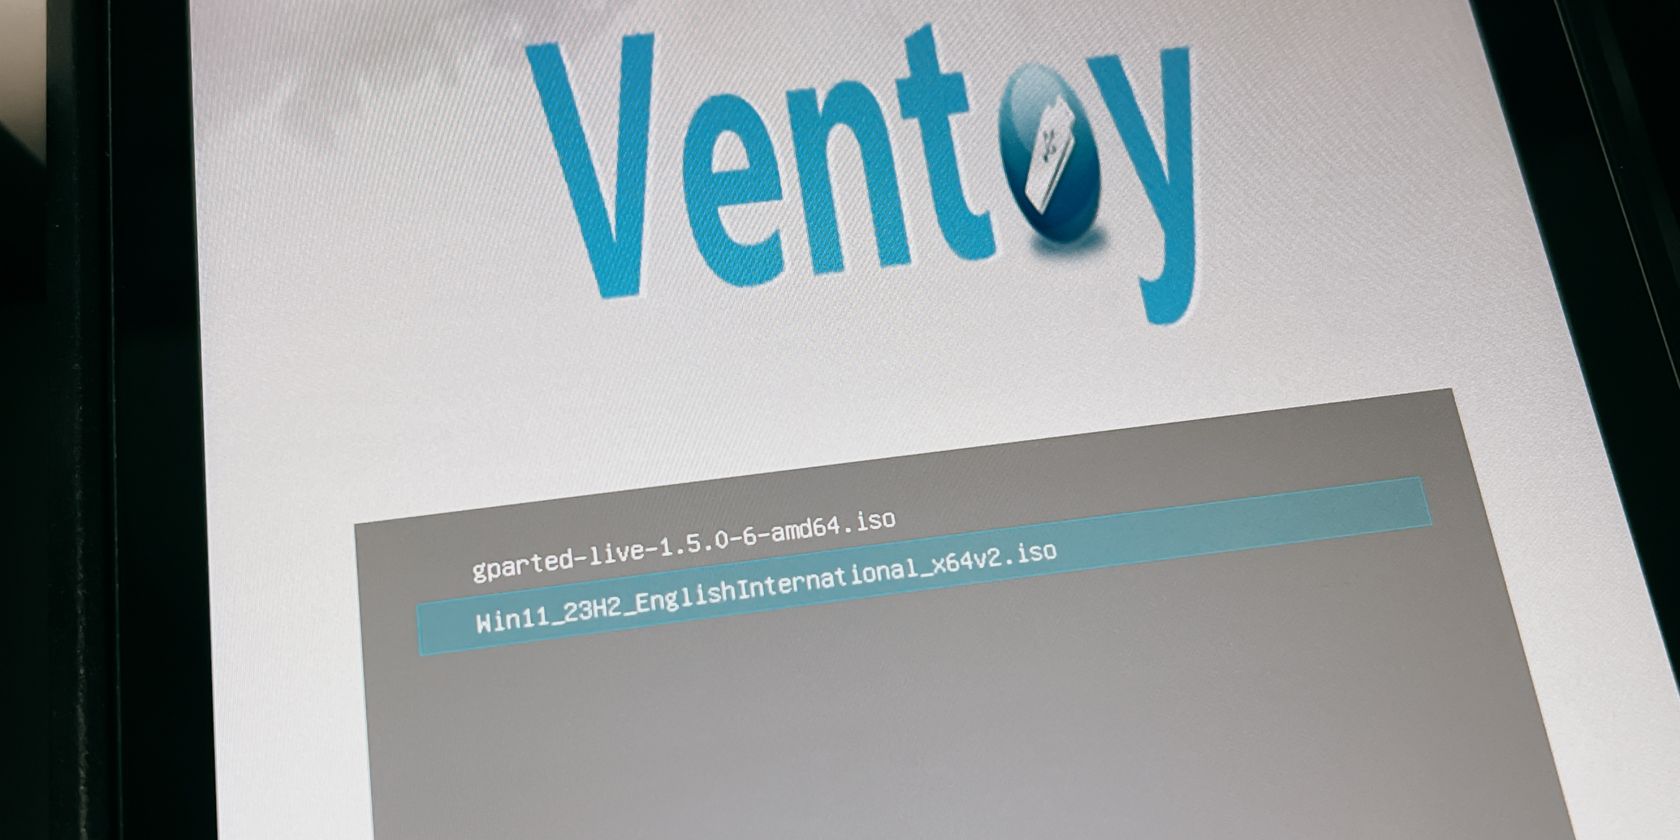
Go back to the boot manager (with the volume down button and the power button) and select the SD card or flash drive once again. With Ventoy open, this time select the Windows 11 ISO.

Just follow the setup by choosing the right language and keyboard layout until you reach the Windows key section. There, you can safely choose I don’t have a product key if you don’t have one.
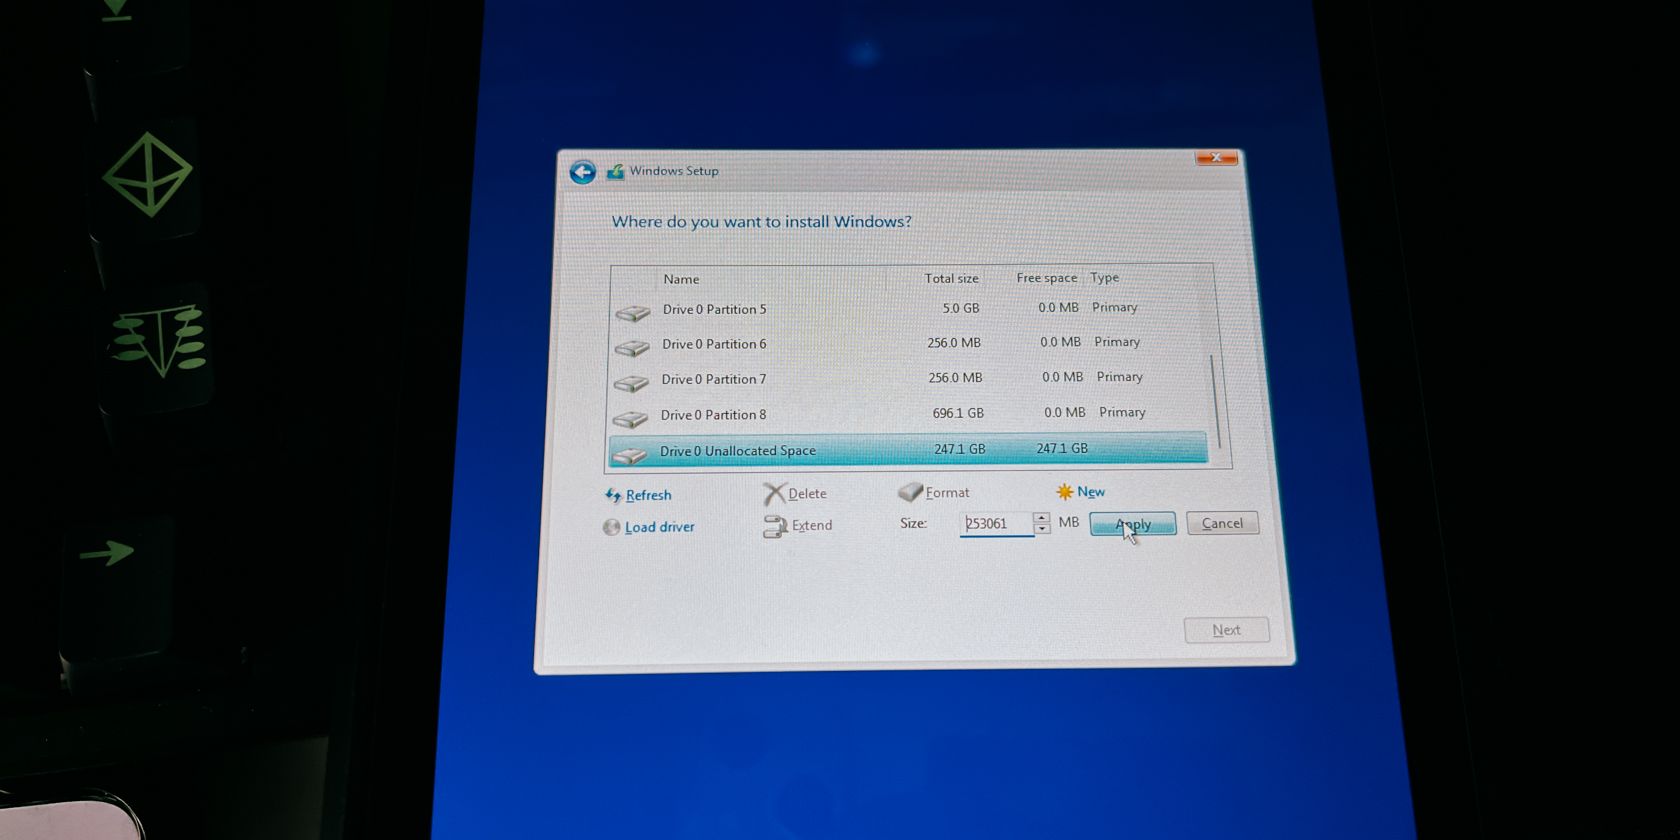
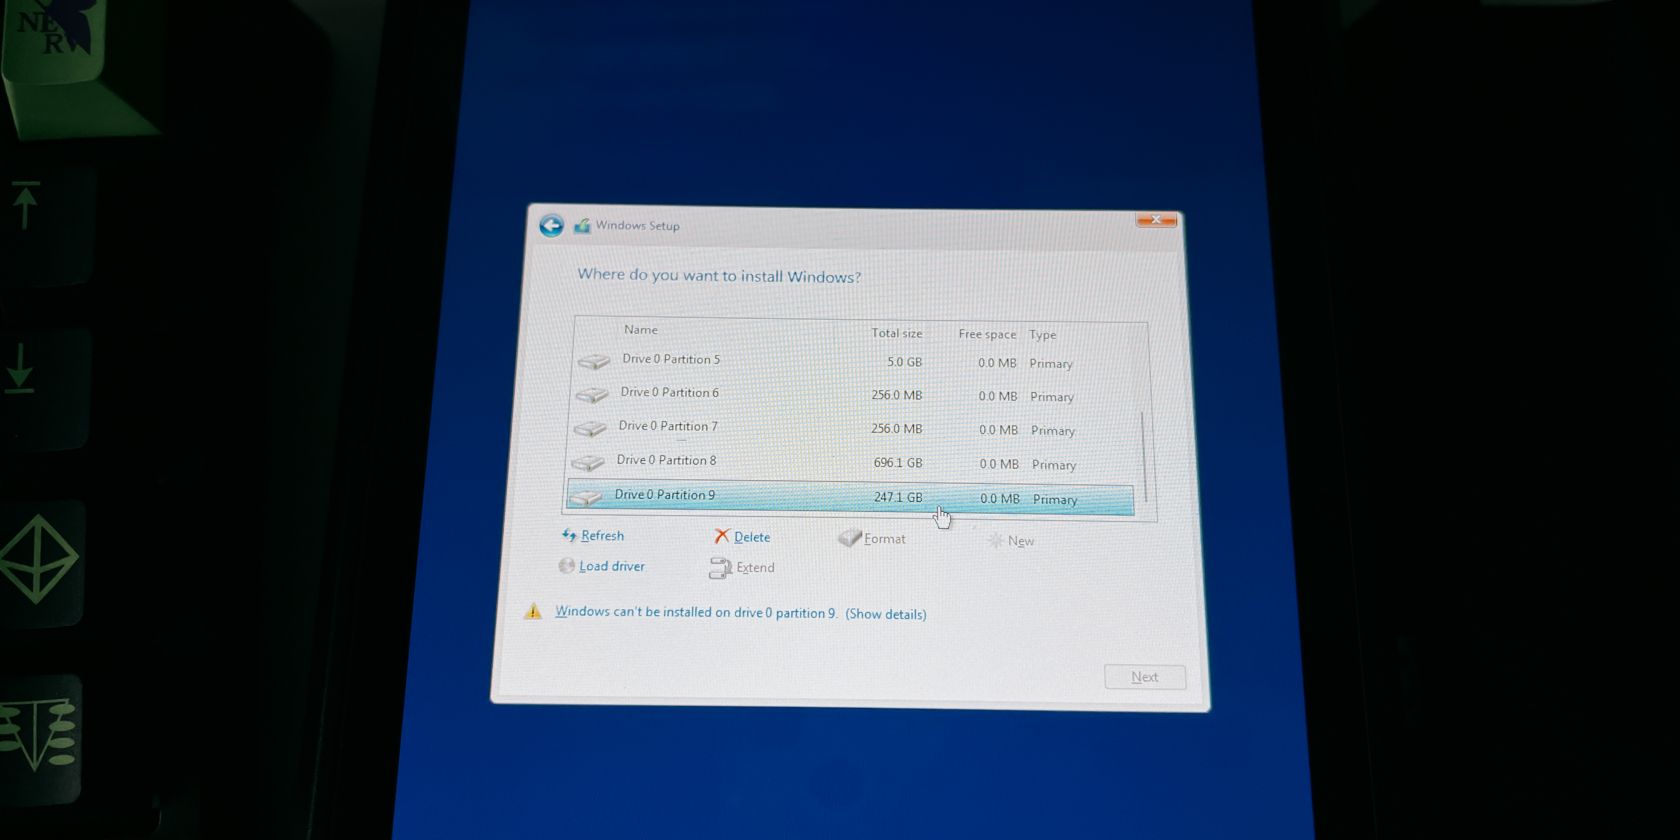
Proceed until you reach the Where do you want to install Windows? screen. You’ll want to scroll to the very bottom and click the drive that says Unallocated space. Next, click New, and it’ll automatically add the right size for you. So just click Apply.
It will then start installing Windows onto that partition. Once Windows 11 is installed, you’ll have to go through another setup process.
5. Install the Windows Drivers for the Steam Deck
Once you’ve installed Windows, you can now install the drivers for your Steam Deck.
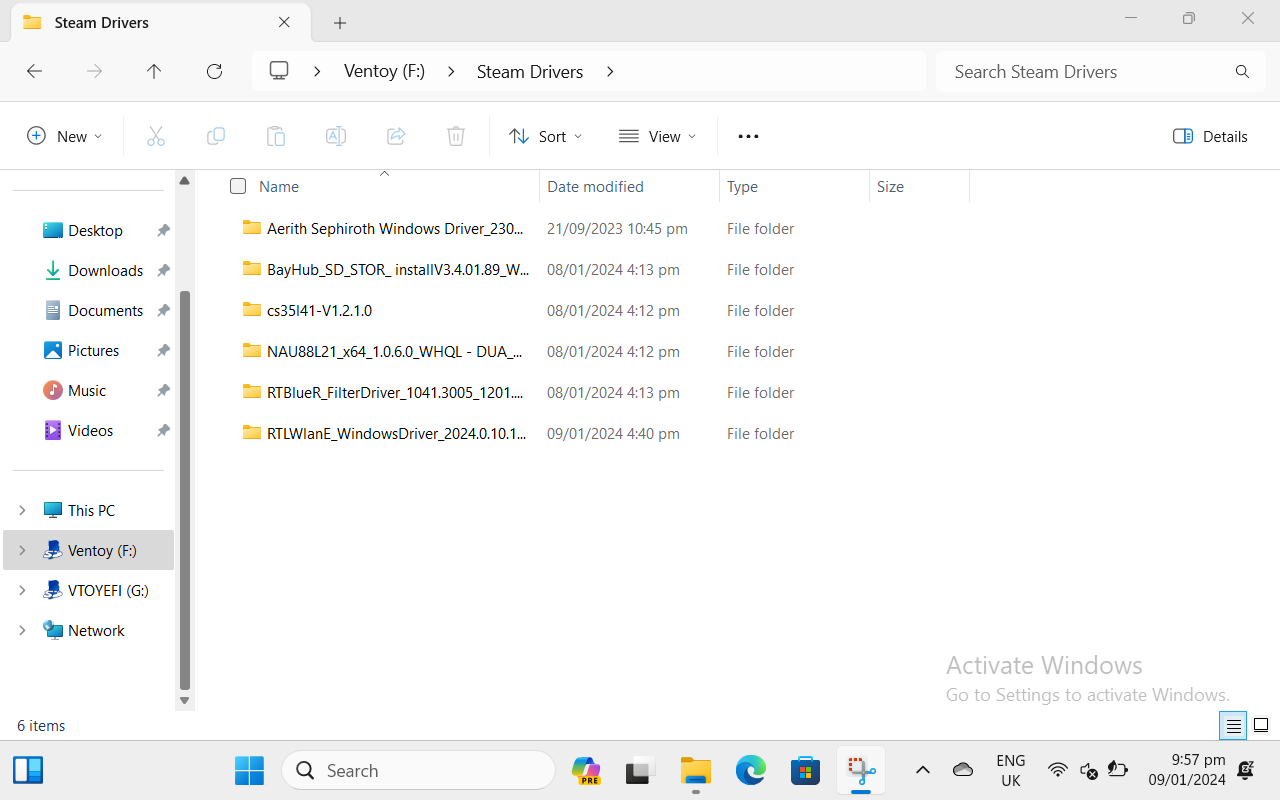
To do this, open up your File Explorer and click on the Ventoy drive. Open the folder we told you to place the Steam Deck drivers inside and start with any one of them.
If you’re prompted to restart, don’t do it yet. You can restart once you’ve installed all the drivers to make it easier.

Proceed to click on Install for the other drivers, but you may find that the audio drivers do not have an executable. To install the two audio drivers, simply right-click (left trigger) on the file that says Setup information and click Install.
Once they’re all installed, you can now restart your Steam Deck. If things didn’t go so smoothly, you can refer to the section below to find your issue and the solution for it.
Potential Issues and Solutions While Installing Windows on Your Steam Deck
We’ve compiled a few issues that we came across during our installation and found solutions to them so that you don’t have to scour the internet to find fixes.
ISOs Show a Black Screen or Don't Boot Up
If the ISOs aren’t working properly, just press the power button once to exit and shut down. This is most likely due to other USB devices plugged into your Steam Deck like a keyboard and mouse. This is why we used an SD card in our installation. Remove all USB devices except your flash drive or use a USB-C flash drive if possible.
If this doesn’t work, you may also try to delete the other ISO from the SD card or flash drive. You may also try reinstalling Ventoy as a last resort, but this will format the drive so make sure you have everything in a folder that you can easily paste onto the drive.
The Windows 0x80300001 Error
This error will most likely pop up because the partition you want to install Windows on isn’t in NTFS format or a blank unallocated partition.
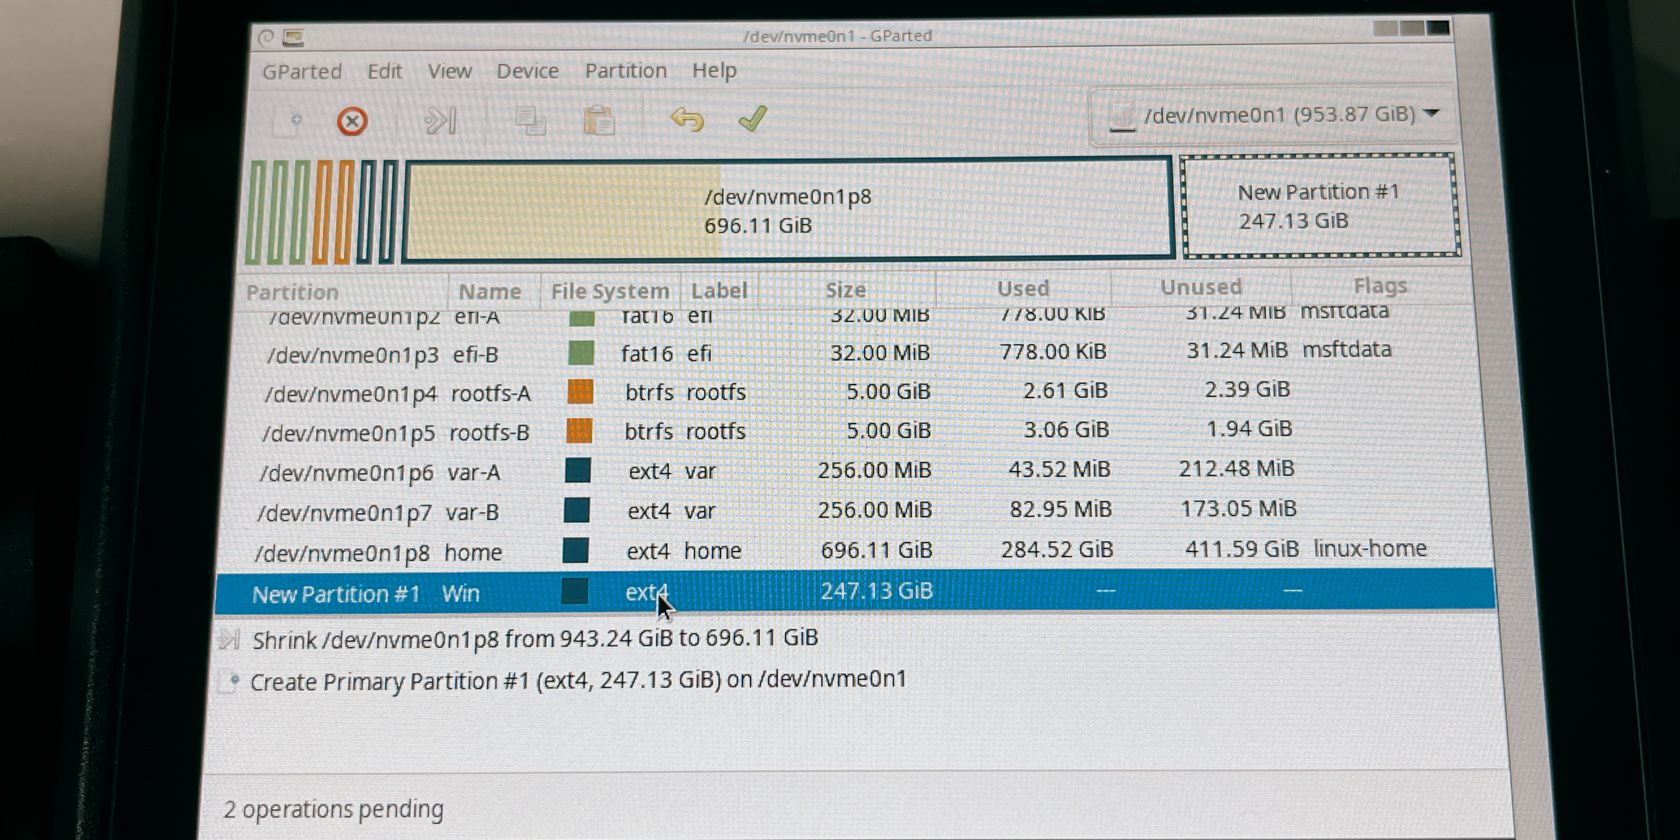
You may have created a new partition as ext4 in GParted instead of leaving the unallocated partition as it is. If you insist on creating a new partition in GParted, make sure it’s in NTFS format and not ext4.
Windows Cannot Install Drivers
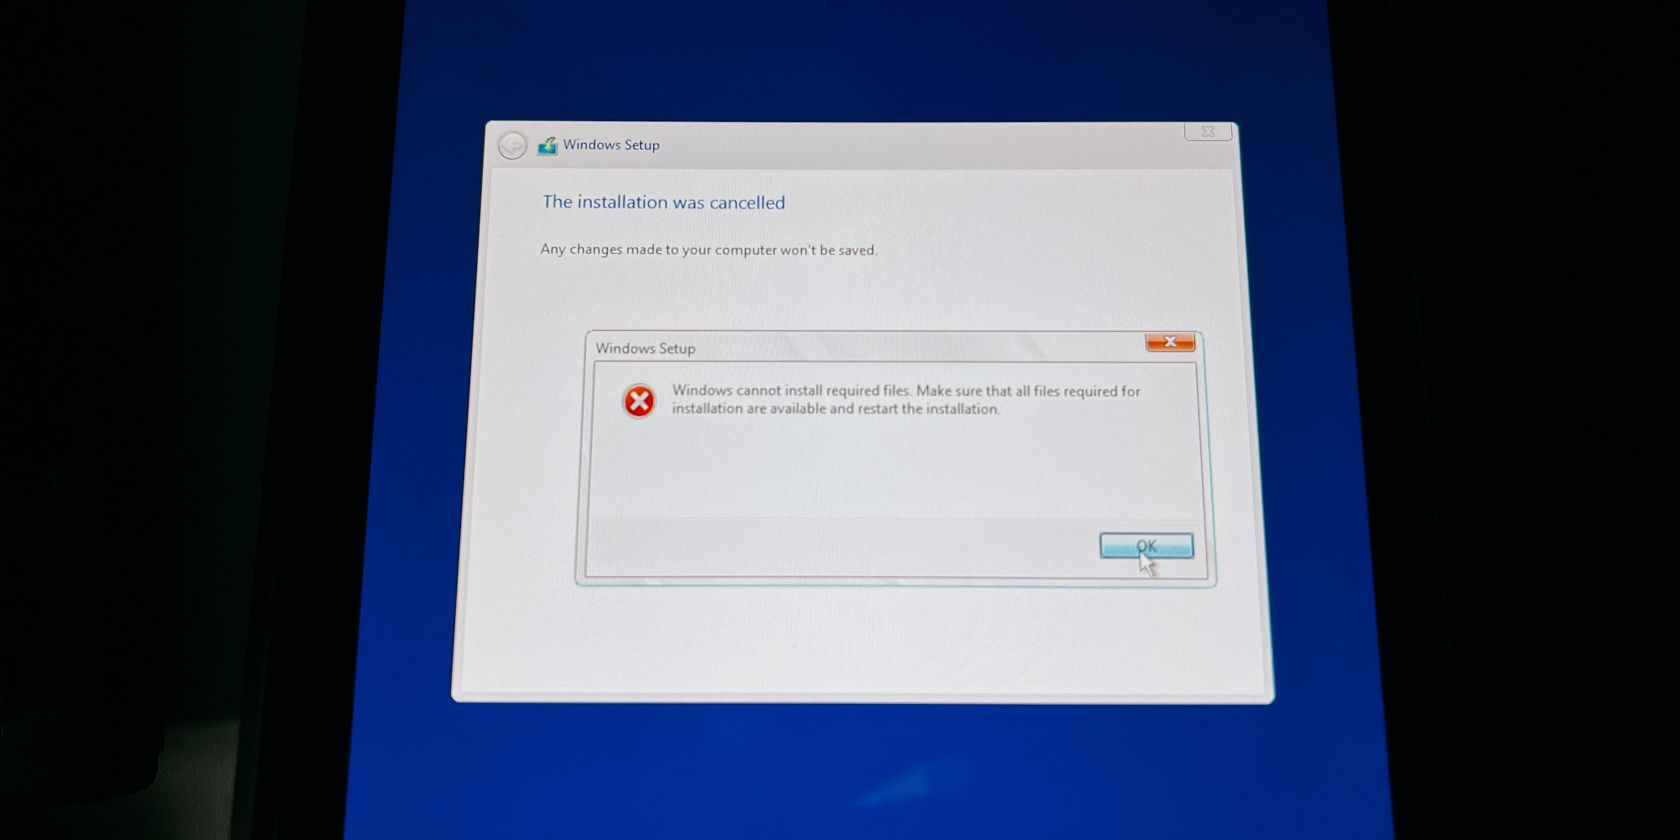
If you’re near the end of your Windows installation and it suddenly says it cannot install drivers, other USB devices may be interfering with the installation.
Shut down your Steam Deck by holding down the power button and unplug any USB devices except your flash drive or SD card. Don’t plug in any USB devices during the installation to avoid this issue.
You Can’t Find SteamOS in the Boot Manager
If you want to go back to SteamOS and can’t find it in the boot manager, you should shut down your Steam Deck and go to the BIOS instead.
To enter the BIOS, hold down the volume up button and the power button until you hear the chime. Let go of the power button but hold down the volume up button until you enter the BIOS.
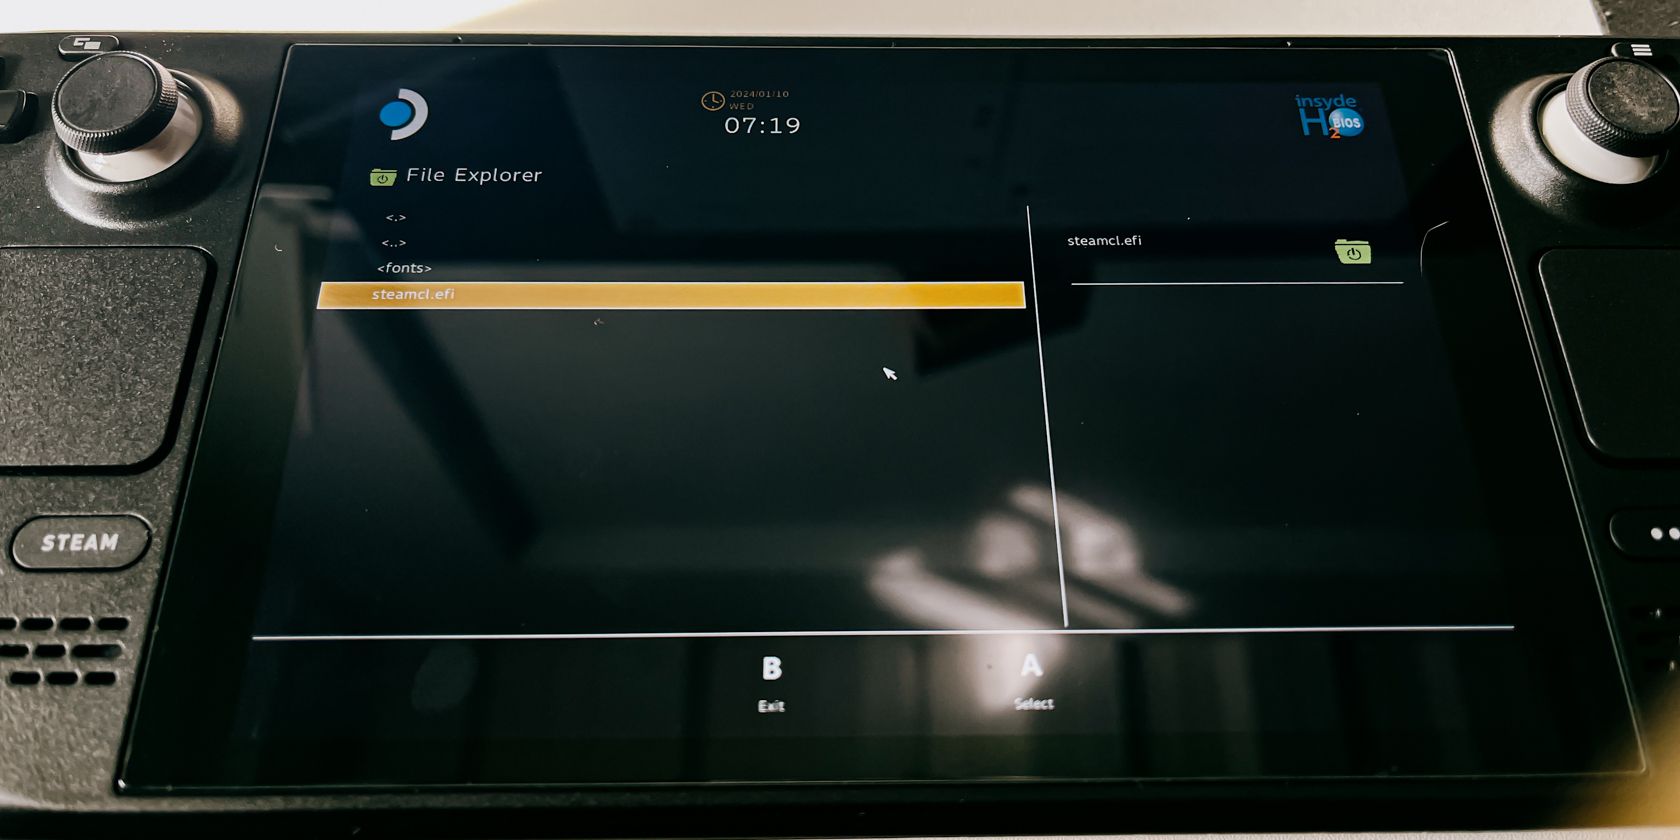
Once you’re in the BIOS, select Boot from file > eps > efi > steamos > steamcl.efi. This should boot you back into SteamOS.
Now that you’re in SteamOS, you can put it back onto the boot manager by entering desktop mode.
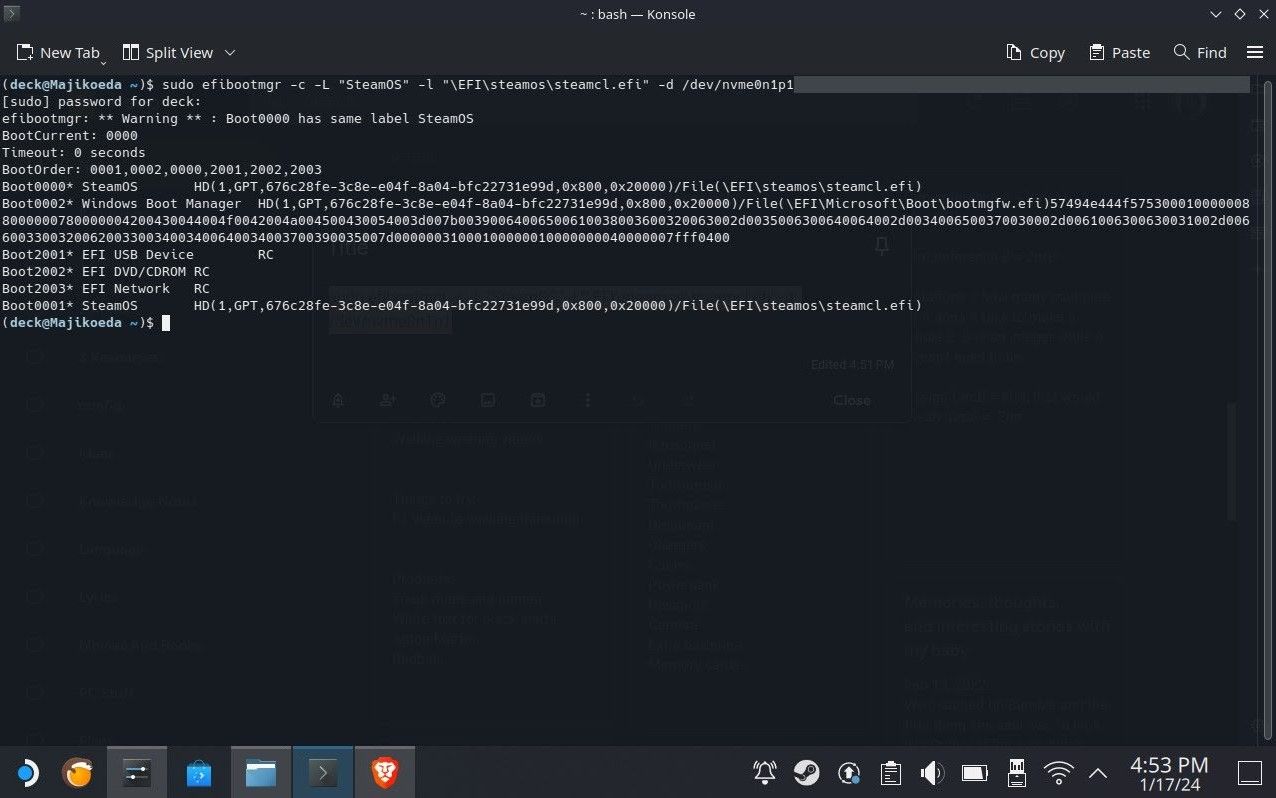
On desktop mode, click on the Steam Deck icon on the bottom left and open Konsole. You can search for it by bringing up the keyboard by clicking on the text box and pressing on the Steam button X.
Then type:
sudo efibootmgr -c -L "SteamOS" -l "\EFI\steamos\steamcl.efi" -d /dev/nvme0n1p1 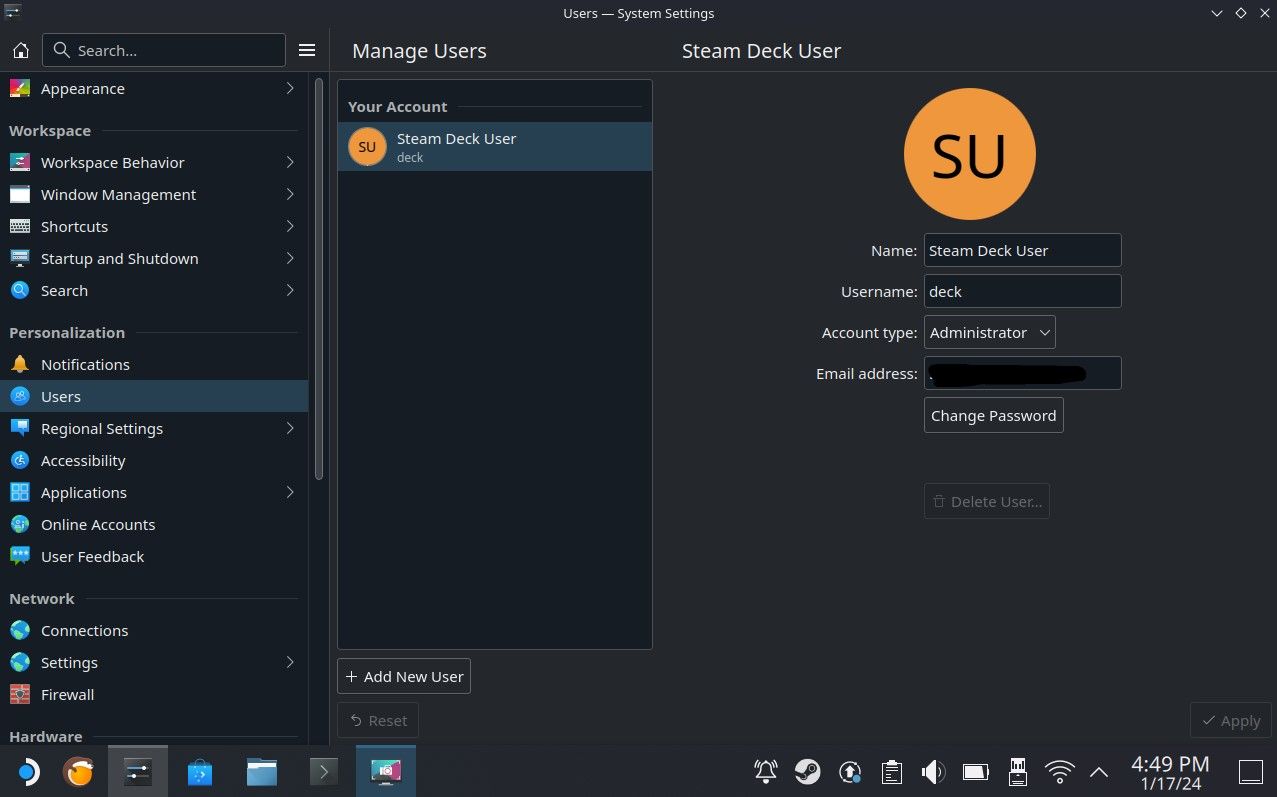
In case you don’t have a sudo account and can’t add the command, go to Settings > Users then assign a username and password. You can then try adding the same command in Konsole and adding your password after pressing Enter. It will then show your boot options.
If you can see steamcl.efi with an asterisk next to its boot order number, it means that it’s in your boot manager now. You can verify it by shutting your Steam Deck down and entering the boot manager.
Steam Deck Navigation and Controls on Windows
If you’re having a hard time with the Steam Deck controls on Windows and want to use the controls like on SteamOS, download Steam and have it open.
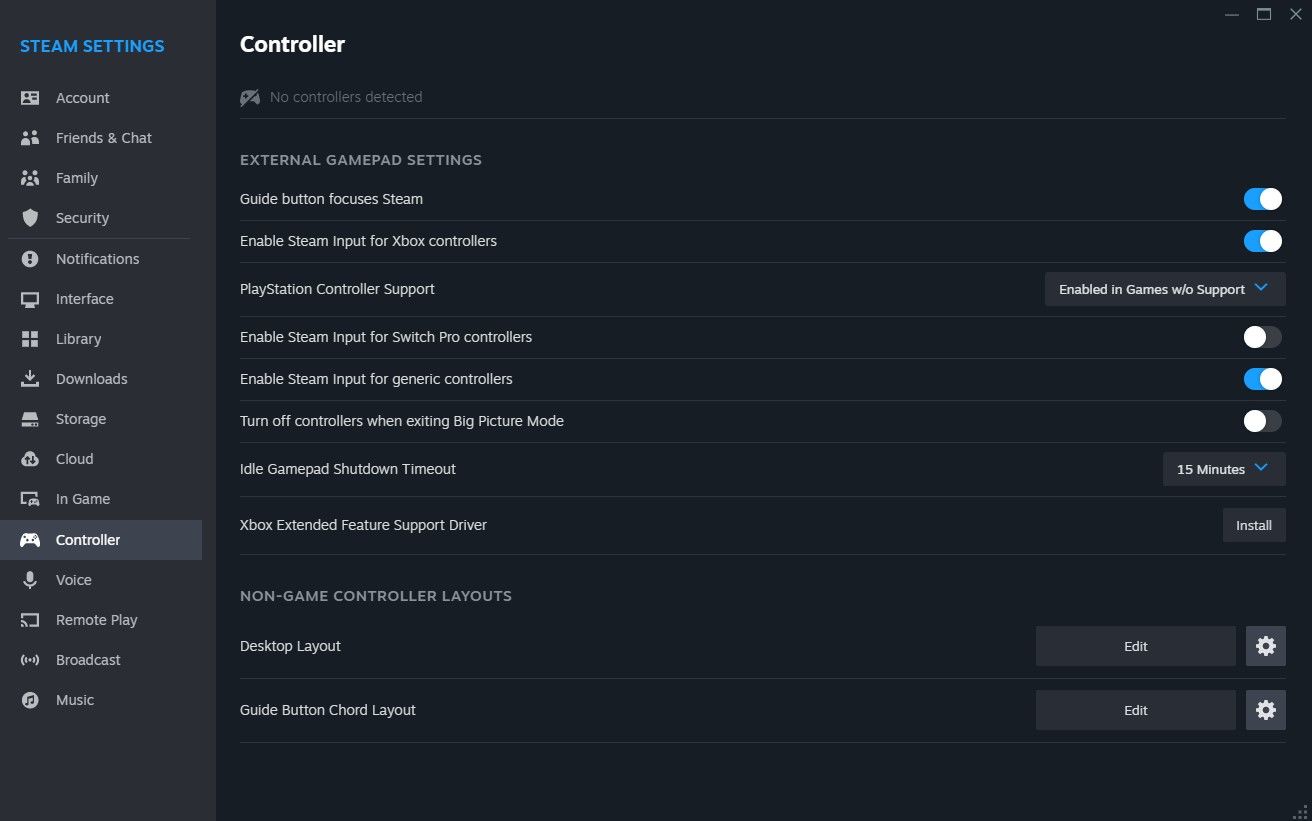
Then go to Steam > Settings > Controller > Enable Steam Input for Xbox Controllers. You should then be able to use both trackpads like on SteamOS. You may also configure it by scrolling down and editing it on the Non-game controller layouts.
The Steam Deck is a very versatile device as it’s not just a full-on gaming device, but also a full-on PC. Installing Windows on it will allow you to use it similarly to your desktop PC for regular writing work, but also for more intensive work like video and photo editing.
We hope this guide has helped you figure out how to install Windows on your Steam Deck and fix some of the issues you might face while doing so.
-
 手机如何传真文件的简单教程一些组织仍然不通过电子邮件接受文档 - 您可能需要传真文件。不,您不能将智能手机的手机连接用作传真机或拨号调制解调器。您需要依靠为您提供传真的应用程序或第三方服务,就像您将偶尔从PC发送传真一样。 是的,这将使您花费您,但是,尽管这会花费您,但它可以节省您的钱,而且比其他替代方案更方便。替代方案是付...软件教程 发布于2025-04-29
 -
Mac临时文件如何删除?查找与清除方法在Mac上清除临时文件:回收磁盘空间并提高性能 通常被忽略的临时文件可以在Mac上消耗大量磁盘空间,从而影响性能。本指南详细详细介绍了手册和自动化方法,可有效删除这些文件,释放存储并改善MacBook的速度和稳定性。 什么是临时文件? 临时文件,主要是缓存和日志文件,是由应用程序和浏览器创建的。 ...软件教程 发布于2025-04-29
-
Windows音量卡在100%?试试这些解决方法Windows音量卡在100%?轻松修复! 电脑音量问题令人头疼!如果你的Windows音量一直卡在100%,别担心,MiniTool这篇指南将助你快速解决! 每次重启电脑,音量滑块就失灵,无论设置为多少,都停留在100%。我发现禁用Synaptics音频驱动程序可以解决问题,但下次重启后又失效了。...软件教程 发布于2025-04-29
-
如何从人物查找网站删除你的数据[2 本文最后一次更新于2025年2月24日。 许多人都不知道很容易在线访问他们的大量个人数据。这包括敏感信息,例如您的姓名,年龄,地址,联系方式,关系状态甚至法院记录。许多网站,通常是收费的,并提供此信息。虽然可以拆除,但这可能是一个具有挑战性的过程。 根据电子边界基金会研究副总监Gennie G...软件教程 发布于2025-04-21
-
iPad如何伪装成笔记本电脑此更新的文章(最初发布于2019年10月31日)探讨了如何使用iPados 16 beta功能将iPad转换为笔记本电脑替代方案。 文章强调,尽管Apple长期以来一直将iPad作为笔记本电脑替代品提升,但iPados显着增强了此功能。 [2 [2 在最大化iPados功能之前,键盘至关重要。 ...软件教程 发布于2025-04-21
-
如何清理Mac邮箱缓存?Mac上如何删除?本指南说明了如何在Mac上清除邮件缓存,从而解决了诸如慢速性能和电子邮件加载问题之类的常见问题。 MacOS邮件应用程序虽然受欢迎,但由于较大的缓存可能会变得迟钝。本文详细介绍了邮件缓存是什么,为什么清除邮件是有益的,以及如何影响性能。 它还提供了清除缓存的手册和自动化方法。 [2 邮件应用程序...软件教程 发布于2025-04-21
-
如何优先分配WiFi给最需要的设备现代家庭通常有多个设备同时连接Wi-Fi访问网络,这常常导致带宽紧张,尤其是在进行在线游戏或视频流媒体等高带宽需求活动时。 为了帮助您管理网络负载,一些路由器(例如Google、Netgear、Eero等厂商生产的路由器)提供了一种名为“服务质量”(QoS)的功能。简单来说,它允许您优先处理Wi-...软件教程 发布于2025-04-19
-
McAfee杀毒软件测评:够用吗?【功能、价格】McAfee:老将防病毒,但这是Mac的最佳吗? 什么是mcafee? McAfee提供了领先的网络安全解决方案,包括功能强大的防病毒软件,具有诸如VPN,密码管理和身份保护的集成功能。 订阅计划,例如全面保护和LiveAfe,满足不同的用户需求和预算。 McAfee Antivirus功能...软件教程 发布于2025-04-19
-
OnePlus Watch 3推迟至四月,因搞笑问题期待已久的OnePlus Watch 3智能手表发布后,购买计划可能需要稍作调整。一处令人哭笑不得的生产问题导致OnePlus不得不推迟大部分手表的出货。 OnePlus宣布,其最新智能手表OnePlus Watch 3的发布将推迟到2025年4月。原定于今天发布,由于OnePlus在预购期间已发...软件教程 发布于2025-04-19
-
充分利用iPhone背部轻点功能的技巧多年来,苹果公司开发了大量工具,让使用iPhone变得更加便捷。“轻点背面”功能虽然名称平淡无奇,却常常被忽视。它可能不够炫目,但这个辅助功能快捷键能让你快速访问许多难以打开的功能。你只需轻点手机背面两下或三下即可。 没错——就是手机背面。如果你熟悉这个快捷键或iOS辅助功能设置,这对你来说不算新...软件教程 发布于2025-04-18
-
快速获取Windows 11 24H2更新,跳过等待队列在综合指南中,Minitool将带您浏览Windows 11 24H2等待线路使用组策略和注册表。 Take action if you want to force install this major update immediately when the update isn’t yet ava...软件教程 发布于2025-04-18
-
手机热点使用技巧:如何避免数据流量暴增将手机用作手机上的笔记本电脑的热点很方便,但笔记本电脑是数据猪。与手机对软件更新等任务进行优先级Wi-Fi的电话不同,笔记本电脑不断消耗数据,尤其是当您远离无限Wi-Fi时。 这可能会迅速消耗您的移动数据计划,即使是那些被广告为“无限”的计划,通常在某些用法阈值之后的油门速度。 避免出乎意料的过度...软件教程 发布于2025-04-18
-
iPhone与Android对比,哪个更好?在iOS和Android之间进行选择:详细的比较 手机市场由两个主要参与者主导:iOS和Android。 两者在全球范围内拥有数百万用户,每个用户都受益于15年以上的开发。尽管两者都是极好的,但存在关键差异,尤其是与安全性有关。 这种比较深入研究了每个平台的优势和劣势。 [2 iOS和Andr...软件教程 发布于2025-04-17
-
Safari在Mac上变慢?加速苹果浏览器的秘诀!Safari浏览器运行缓慢?Mac用户必看加速指南! Safari是Mac上速度最快的浏览器之一,但它也并非完全免受速度下降和性能问题的困扰。如果网页加载时间过长或网站导航响应迟缓,请继续阅读本文,了解如何提升Mac上Safari浏览器的速度。 Safari在Mac上运行缓慢的原因有哪些? 在探讨解...软件教程 发布于2025-04-17
-
以为再也不需钱包,直到这件事发生您在一家挚爱的餐厅里都在一家不错的餐厅中;也许你们俩都喜欢牛排。过了一会儿,您举手向服务员询问账单。怎么了,对吧?除了您意识到自己把钱包留在家中。您可以通过考虑设置数字钱包来避免这些尴尬的时刻。您可以使用它来数字化任何物理会员卡,票或轻松通过。使用近场通信(NFC)使这是可能的,该通信允许设备在彼此...软件教程 发布于2025-04-17


学习中文
- 1 走路用中文怎么说?走路中文发音,走路中文学习
- 2 坐飞机用中文怎么说?坐飞机中文发音,坐飞机中文学习
- 3 坐火车用中文怎么说?坐火车中文发音,坐火车中文学习
- 4 坐车用中文怎么说?坐车中文发音,坐车中文学习
- 5 开车用中文怎么说?开车中文发音,开车中文学习
- 6 游泳用中文怎么说?游泳中文发音,游泳中文学习
- 7 骑自行车用中文怎么说?骑自行车中文发音,骑自行车中文学习
- 8 你好用中文怎么说?你好中文发音,你好中文学习
- 9 谢谢用中文怎么说?谢谢中文发音,谢谢中文学习
- 10 How to say goodbye in Chinese? 再见Chinese pronunciation, 再见Chinese learning


