
如何使用 Vite 和 Axios 在 React 中实现 MUI 文件上传:综合指南
 浏览:904
Introduction
In modern web applications, file uploads play a vital role, enabling users to upload documents, images, and more, directly to a server. Implementing efficient file upload functionality can significantly enhance the user experience. In this blog, we'll explore how to create a sleek mui file upload feature using React and Material UI (MUI). React is a powerful JavaScript library for building user interfaces, while MUI is a collection of customizable React components based on Google's Material Design. We'll leverage Vite, a modern build tool, for faster development compared to traditional bundlers like Webpack. This step-by-step guide will walk you through creating a reliable file upload feature, focusing on performance and user experience.
Setting Up the React Project with Vite
To get started with the mui file upload project, we'll set up a React environment using Vite. If you need a more in-depth guide, check out our detailed Beginners Guide to Using Vite with React. Below are the essential steps to get you up and running:
- First, create a new React project using Vite by running the following command:
npm create vite@latest mui-file-upload
- Navigate to the project directory:
cd mui-file-upload
- Install project dependencies:
npm install
- Next, add MUI and Axios to your project:
npm install @mui/material axios
Vite offers blazing-fast build times, hot module replacement, and a simpler configuration than Webpack. These benefits make it an excellent choice when building performance-sensitive features like a mui file upload. Now, let's dive into creating the file upload functionality!
Creating the File Upload Button with MUI
To start building our mui file upload feature, we'll create a simple and user-friendly upload button using Material UI (MUI). The Button component from MUI is versatile and easy to style, making it perfect for creating an intuitive file upload button.
First, let's import the Button component and set up a basic button for file uploads:
import React from 'react';
import Button from '@mui/material/Button';
export default function UploadButton() {
return (
);
}
Here, the Button component uses the variant="contained" prop for a filled style, and the color="primary" prop to match your theme's primary color. The component="label" prop makes the button a label for the hidden element, triggering file selection when clicked.
To make your button stand out, you can customize it using MUI’s powerful theming capabilities. MUI allows you to adjust the button’s color, size, and even add icons. Here's an example of a more customized button:
}
  sx={{ margin: 2, padding: '10px 20px' }}
>
  Upload
This example uses startIcon to add an icon at the beginning of the button, and the sx prop for inline styling. The ability to quickly change button styles makes MUI an ideal choice for creating visually appealing mui file upload components.
Building the File Upload Form
Now, let's create a form component for our mui file upload feature using MUI’s TextField. The TextField component can be customized to handle various input types, but in this case, we’ll focus on file uploads.
Here’s a basic form setup with a file input field:
import React from 'react';
import Button from '@mui/material/Button';
import TextField from '@mui/material/TextField';

export default function UploadForm() {
  return (
);
}
and after some styles it will look like this

Using the type="file" attribute is crucial for file uploads, ensuring that the user can select files from their local system. You can add validation through attributes like accept, which limits file types (e.g., accept="image/*" allows only image files). This attention to detail improves the user experience by preventing invalid file types from being selected. The full-width TextField with proper margin also makes the form more accessible and visually appealing for the mui file upload functionality.
Handling File Upload with Axios
Uploading files efficiently is a crucial task in modern web applications, and using Axios makes this process both straightforward and manageable. In our mui file upload example, Axios takes center stage, handling the file transfer seamlessly while keeping our React app responsive.
The heart of our upload process lies in a function that triggers when the user submits the form. We use a FormData object, a native JavaScript tool, that’s perfect for handling multipart data like files. The setup is simple: the selected file is wrapped in FormData and passed to Axios, which then takes care of sending it to the server.
const handleFileUpload = async (event) => {
  event.preventDefault();
  setUploadProgress(0);
  setUploadComplete(false);

  const formData = new FormData();
  const file = event.target.elements.fileInput.files[0];
  formData.append('file', file);

  try {
    await axios.post('https://api.escuelajs.co/api/v1/files/upload', formData, {
      onUploadProgress: (progressEvent) => {
        const percentCompleted = Math.round((progressEvent.loaded * 100) / progressEvent.total);
        setUploadProgress(percentCompleted);
      },
    });
    setUploadComplete(true);
  } catch (error) {
    console.error('Error uploading file:', error);
  }
};
The logic here is clean and straightforward. We handle the file selection through an element, pass it to FormData, and let Axios do the heavy lifting. By leveraging onUploadProgress, we can keep users updated on the progress—an essential feature that makes the upload experience engaging rather than frustrating.
Beyond the mechanics, it’s wise to validate files on the client side before sending them off, ensuring that our server isn't burdened with invalid requests. Additionally, keeping the upload secure over HTTPS adds a layer of protection for sensitive data, making the mui file upload process both reliable and safe.
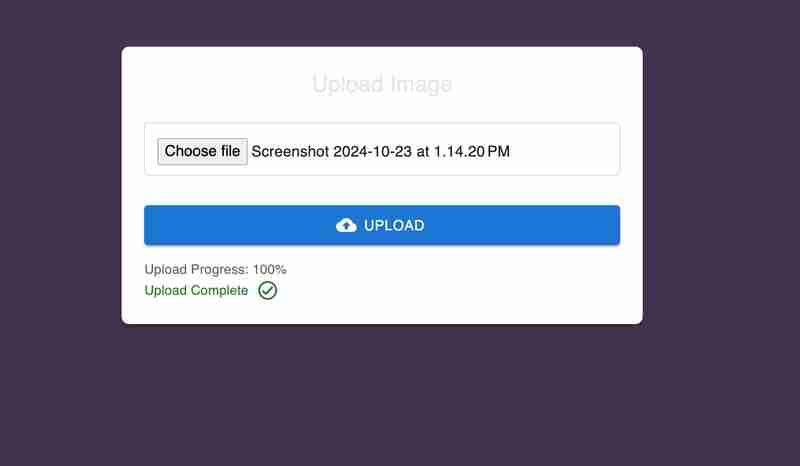
Implementing Progress Feedback Using MUI
Feedback during a file upload can be the difference between a confident user and a confused one. That's where MUI’s flexibility shines, allowing us to seamlessly integrate progress indicators that keep users in the loop.
Using Axios’s onUploadProgress feature, we can dynamically update the state with the current progress percentage. MUI’s Typography component provides a straightforward yet elegant way to display this feedback, without cluttering the UI.
{uploadProgress > 0 && (

    Upload Progress: {uploadProgress}%

)}

This component elegantly fades in once the upload starts, clearly displaying the percentage completed. It’s a small touch but adds a professional feel to the user experience. Similarly, when the upload completes, a confirmation message appears—celebrating a job well done:
{uploadComplete && (

    Upload Complete

)}

This combination of progress feedback and visual confirmation ensures that users are never left guessing. The dynamic update of the upload progress keeps the interaction engaging, while the success message provides closure. It’s about creating a seamless journey—from file selection to completion—where users feel in control at every step. That's the beauty of building a robust mui file upload feature with modern tools like Axios and MUI.
Error Handling and User Feedback
Handling errors during a file upload is crucial for a smooth user experience. Common issues include network disruptions, server errors, and uploading unsupported file types. React’s state management combined with Axios’s error handling makes it straightforward to manage these problems gracefully.
In our mui file upload example, error feedback is handled using MUI's Typography component. If an upload fails, we display a user-friendly error message.
const handleFileUpload = async (event) => {
  event.preventDefault();
  setUploadProgress(0);
  setUploadComplete(false);
  setUploadError(null);

  const formData = new FormData();
  const file = event.target.elements.fileInput.files[0];
  formData.append('file', file);

  try {
    await axios.post('https://api.escuelajs.co/api/v1/files/upload', formData, {
      onUploadProgress: (progressEvent) => {
        const percentCompleted = Math.round((progressEvent.loaded * 100) / progressEvent.total);
        setUploadProgress(percentCompleted);
      },
    });
    setUploadComplete(true);
  } catch (error) {
    console.error('Error uploading file:', error);
    setUploadError('Failed to upload file. Please try again.');
  }
};
Errors are displayed dynamically using:
{uploadError && (

    {uploadError}

)}
This ensures users are kept informed of any issues, enhancing the mui file upload experience with clear, actionable feedback.
Enhancing Reusability with Custom Hooks
Custom hooks in React are a fantastic way to streamline your code and manage reusable logic. In the context of our mui file upload functionality, we can create a custom hook to encapsulate the file upload process, including error handling, progress updates, and completion status.
Here’s a custom hook that manages the core upload logic:
import { useState } from 'react';
import axios from 'axios';

const useFileUpload = () => {
  const [uploadProgress, setUploadProgress] = useState(0);
  const [uploadComplete, setUploadComplete] = useState(false);
  const [uploadError, setUploadError] = useState(null);

  const uploadFile = async (file) => {
    setUploadProgress(0);
    setUploadComplete(false);
    setUploadError(null);

    const formData = new FormData();
    formData.append('file', file);

    try {
      await axios.post('https://api.escuelajs.co/api/v1/files/upload', formData, {
        onUploadProgress: (progressEvent) => {
          const percentCompleted = Math.round((progressEvent.loaded * 100) / progressEvent.total);
          setUploadProgress(percentCompleted);
        },
      });
      setUploadComplete(true);
    } catch (error) {
      console.error('Error uploading file:', error);
      setUploadError('Failed to upload file. Please try again.');
    }
  };

  return { uploadProgress, uploadComplete, uploadError, uploadFile };
};
By using useFileUpload, you can simplify any component that handles file uploads, ensuring consistent behavior across your application. This makes the mui file upload logic more readable, maintainable, and reusable.
Creating a Higher-Order Component (HOC) for File Upload
In React, a Higher-Order Component (HOC) is a pattern that allows you to reuse component logic. An HOC is essentially a function that takes a component as an argument and returns a new component with additional features. For our mui file upload, creating an HOC allows us to abstract the file upload logic and apply it across different components effortlessly.
Here's how we can create an HOC to handle file uploads:
import React from 'react';
import useFileUpload from './useFileUpload'; // Custom hook for file upload
// Higher-Order Component for file upload
const withFileUpload = (WrappedComponent) => {
return function (props) {
const { uploadProgress, uploadComplete, uploadError, uploadFile } = useFileUpload();
const handleFileChange = (event) => {
const file = event.target.files[0];
if (file) uploadFile(file);
};
return (
This HOC wraps any component, adding upload logic to it. For example:
import React from 'react';
import withFileUpload from './withFileUpload';
function UploadInput({ onFileChange, uploadProgress, uploadComplete, uploadError }) {
return (
{uploadProgress > 0 && Progress: {uploadProgress}%
}
{uploadComplete && Upload Complete!
}
{uploadError && Error: {uploadError}
}
);
}
export default withFileUpload(UploadInput);
By using this pattern, our file upload logic is modular, reusable, and easy to maintain. It enables consistent behavior across components, minimizing duplication and making the codebase cleaner.
Conclusion
Throughout this blog, we've explored how to implement a powerful mui file upload feature using React, MUI, Vite, and Axios. We started by setting up the project, creating customizable file upload components, and adding robust error handling and progress feedback. Custom hooks and HOCs have demonstrated how to make the code modular, reusable, and easier to manage.
Using Vite, we benefited from faster builds and simplified configuration. MUI’s components provided a polished UI, while Axios’s simplicity made file handling straightforward. For the complete code, you can explore the GitHub repository where all examples are available, allowing you to experiment and extend the functionality further. Dive in, and feel free to adapt the concepts for your own projects!
-
 在Ubuntu/linux上安装mysql-python时,如何修复\“ mysql_config \”错误?mysql-python安装错误:“ mysql_config找不到”“ 由于缺少MySQL开发库而出现此错误。解决此问题,建议在Ubuntu上使用该分发的存储库。使用以下命令安装Python-MysqldB: sudo apt-get安装python-mysqldb sudo pip in...编程 发布于2025-07-19
 -
Python元类工作原理及类创建与定制python中的metaclasses是什么? Metaclasses负责在Python中创建类对象。就像类创建实例一样,元类也创建类。他们提供了对类创建过程的控制层,允许自定义类行为和属性。在Python中理解类作为对象的概念,类是描述用于创建新实例或对象的蓝图的对象。这意味着类本身是使用类关...编程 发布于2025-07-19
-
如何实时捕获和流媒体以进行聊天机器人命令执行?在开发能够执行命令的chatbots的领域中,实时从命令执行实时捕获Stdout,一个常见的需求是能够检索和显示标准输出(stdout)在cath cath cant cant cant cant cant cant cant cant interfaces in Chate cant inter...编程 发布于2025-07-19
-
如何将MySQL数据库添加到Visual Studio 2012中的数据源对话框中?在Visual Studio 2012 尽管已安装了MySQL Connector v.6.5.4,但无法将MySQL数据库添加到实体框架的“ DataSource对话框”中。为了解决这一问题,至关重要的是要了解MySQL连接器v.6.5.5及以后的6.6.x版本将提供MySQL的官方Visual...编程 发布于2025-07-19
-
为什么在我的Linux服务器上安装Archive_Zip后,我找不到“ class \” class \'ziparchive \'错误?class'ziparchive'在Linux Server上安装Archive_zip时找不到错误 commant in lin ins in cland ins in lin.11 on a lin.1 in a lin.11错误:致命错误:在... cass中找不到类z...编程 发布于2025-07-19
-
Go web应用何时关闭数据库连接?在GO Web Applications中管理数据库连接很少,考虑以下简化的web应用程序代码:出现的问题:何时应在DB连接上调用Close()方法?,该特定方案将自动关闭程序时,该程序将在EXITS EXITS EXITS出现时自动关闭。但是,其他考虑因素可能保证手动处理。选项1:隐式关闭终止数...编程 发布于2025-07-19
-
Java为何无法创建泛型数组?通用阵列创建错误 arrayList [2]; JAVA报告了“通用数组创建”错误。为什么不允许这样做?答案:Create an Auxiliary Class:public static ArrayList<myObject>[] a = new ArrayList<myO...编程 发布于2025-07-19
-
如何限制动态大小的父元素中元素的滚动范围?在交互式接口中实现垂直滚动元素的CSS高度限制问题:考虑一个布局,其中我们具有与用户垂直滚动一起移动的可滚动地图div,同时与固定的固定sidebar保持一致。但是,地图的滚动无限期扩展,超过了视口的高度,阻止用户访问页面页脚。$("#map").css({ marginT...编程 发布于2025-07-19
-
为什么我会收到MySQL错误#1089:错误的前缀密钥?mySQL错误#1089:错误的前缀键错误descript [#1089-不正确的前缀键在尝试在表中创建一个prefix键时会出现。前缀键旨在索引字符串列的特定前缀长度长度,以便更快地搜索这些前缀。理解prefix keys `这将在整个Movie_ID列上创建标准主键。主密钥对于唯一识别...编程 发布于2025-07-19
-
版本5.6.5之前,使用current_timestamp与时间戳列的current_timestamp与时间戳列有什么限制?在时间戳列上使用current_timestamp或MySQL版本中的current_timestamp或在5.6.5 此限制源于遗留实现的关注,这些限制需要对当前的_timestamp功能进行特定的实现。 创建表`foo`( `Productid` int(10)unsigned not n...编程 发布于2025-07-19
-
我可以将加密从McRypt迁移到OpenSSL,并使用OpenSSL迁移MCRYPT加密数据?将我的加密库从mcrypt升级到openssl 问题:是否可以将我的加密库从McRypt升级到OpenSSL?如果是这样,如何?答案:是的,可以将您的Encryption库从McRypt升级到OpenSSL。可以使用openssl。附加说明: [openssl_decrypt()函数要求iv参...编程 发布于2025-07-19
-
为什么尽管有效代码,为什么在PHP中捕获输入?在php ;?>" method="post">The intention is to capture the input from the text box and display it when the submit button is clicked.但是,输出...编程 发布于2025-07-19
-
在PHP中如何高效检测空数组?在PHP 中检查一个空数组可以通过各种方法在PHP中确定一个空数组。如果需要验证任何数组元素的存在,则PHP的松散键入允许对数组本身进行直接评估:一种更严格的方法涉及使用count()函数: if(count(count($ playerList)=== 0){ //列表为空。 } 对...编程 发布于2025-07-19
-
查找当前执行JavaScript的脚本元素方法如何引用当前执行脚本的脚本元素在某些方案中理解问题在某些方案中,开发人员可能需要将其他脚本动态加载其他脚本。但是,如果Head Element尚未完全渲染,则使用document.getElementsbytagname('head')[0] .appendChild(v)的常规方...编程 发布于2025-07-19
-
解决Spring Security 4.1及以上版本CORS问题指南弹簧安全性cors filter:故障排除常见问题 在将Spring Security集成到现有项目中时,您可能会遇到与CORS相关的错误,如果像“访问Control-allo-allow-Origin”之类的标头,则无法设置在响应中。为了解决此问题,您可以实现自定义过滤器,例如代码段中的MyFi...编程 发布于2025-07-19


学习中文
- 1 走路用中文怎么说?走路中文发音,走路中文学习
- 2 坐飞机用中文怎么说?坐飞机中文发音,坐飞机中文学习
- 3 坐火车用中文怎么说?坐火车中文发音,坐火车中文学习
- 4 坐车用中文怎么说?坐车中文发音,坐车中文学习
- 5 开车用中文怎么说?开车中文发音,开车中文学习
- 6 游泳用中文怎么说?游泳中文发音,游泳中文学习
- 7 骑自行车用中文怎么说?骑自行车中文发音,骑自行车中文学习
- 8 你好用中文怎么说?你好中文发音,你好中文学习
- 9 谢谢用中文怎么说?谢谢中文发音,谢谢中文学习
- 10 How to say goodbye in Chinese? 再见Chinese pronunciation, 再见Chinese learning


