
《Elden Ring SotE Belurat》,塔楼定居点演练:武器、物品、Boss 等
 浏览:480
While you can go anywhere right from the beginning of Elden Ring Shadow of the Erdtree, the first dungeon that most people will encounter is Belurat, Tower Settlement.
Elden Ring Shadow of the Erdtree Balurate, Tower Settlement guide
Located north of the Scorched Ruins and the initial starting point of the Land of Shadow, this seemingly small town is home to dangerous enemies, a major boss fight, and even some important collectibles like a Miquella Cross. It’s a great introduction to the verticality of Shadow of the Erdtree, so be prepared to delve into every nook and cranny of Belurat.
Table of contents
- Elden Ring Shadow of the Erdtree Balurate, Tower Settlement guide
- How to get into Belurat, Tower Settlement
- How to continue past Small Private Altar
- How to beat the yellow knight
- How to beat Fire Knight Queelign
- How to get Crusade Insignia Talisman and Shriek of Sorrow Ash of War
- Where to use the Storeroom Key in Belurat, Tower Settlement
- How to unlock the Belurat, Tower Settlement Site of Grace shortcut and get the Bone Bow
- Where to find the Miquella Cross, Scadutree Fragment, and Dried Bouquet Talisman in Belurat, Tower Settlement
- Stagefront Site of Grace: How to prepare for the boss
- How to Beat Divine Beast Dancing Lion
- Should you pick Enraged Divine Beast Talisman, Divine Beast Frost Stomp Ash of War, or use the Runes?
- How to cheese Divine Beast Dancing Lion
How to get into Belurat, Tower Settlement
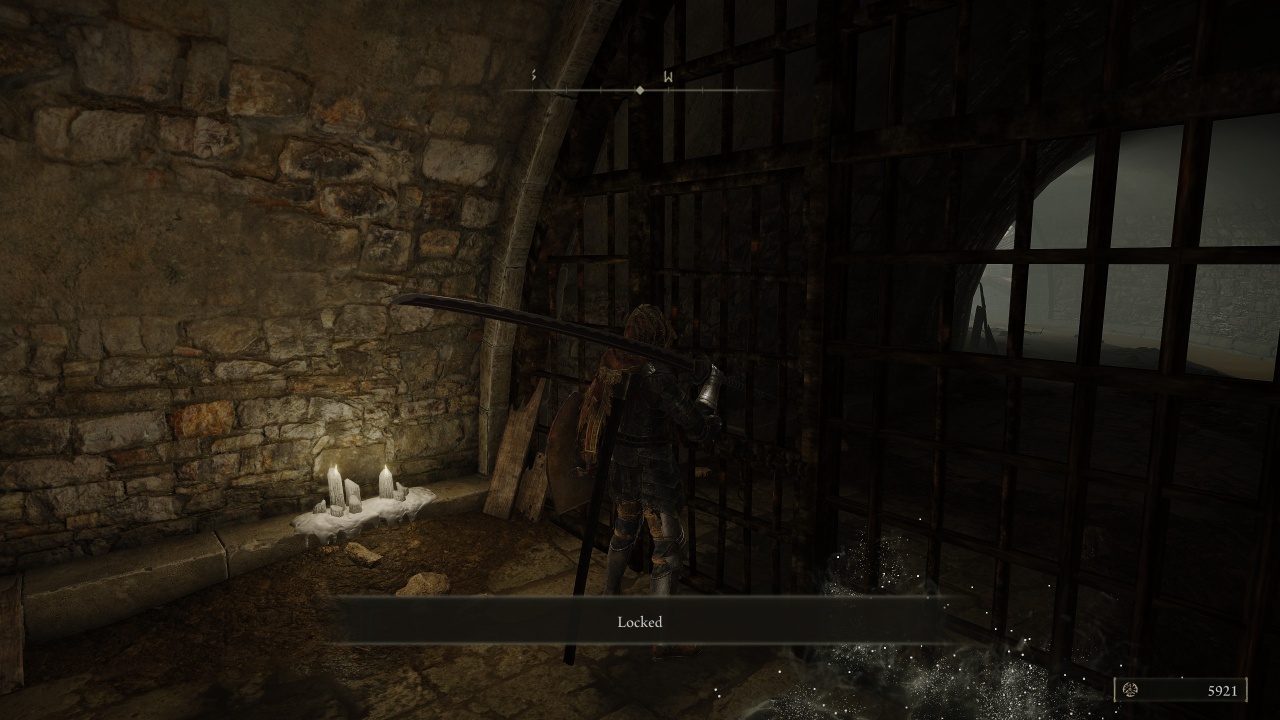
When you first arrive in Belurat, you’ll find a Site of Grace at the top of the stairs leading into the settlement. The main gate is locked and opens from the other side, and the small door in the western room is the same way. The only way forward is to the east.
Heading east will take you to Belurat’s main street, a highly linear path with plenty of enemies guarding the way. The ghostly inhabitants of Belurat will go down with a single strike for the most part, but a few of them are stronger than the rest. The taller ones that wield large cleavers are the real enemies here, and they can easily deplete your entire health bar in two or three swings.
Prioritize defeating those enemies first as you make your way down the street. If you turn right after defeating the first enemy, you’ll see a crowd of people kneeling in front of a fountain where you can collect a Somber Smithing Stone. You’ll also find a well that you can descend into, but there’s nothing in the sewers down below besides a locked door that you cannot open yet.
Continue east along the main street and you’ll come across two enemies on a bridge above. They’ll pelt you with powerful projectiles, but they’re easy enough to dodge. There’s a path to the right that you may think you can use to avoid them, but it’s a dead end. Head underneath the bridge and enter the room on the left to find the Small Private Altar Site of Grace at the top of the stairs.
How to continue past Small Private Altar
Once you reach the Small Private Altar Site of Grace, the core of Belurat becomes available to you. As soon as you exit the room and continue forward, you’ll meet your first real challenge.
How to beat the yellow knight
A tall knight dressed in yellow carries two large swords and patrols the area. You can be patient and sneak past him, but he drops a bunch of Runes and can potentially drop unique armor like the Horned Warrior Helm. His attacks deal an insane amount of damage no matter how high your stats are, however, so there’s very little room for error.

The knight attacks with fast-paced flurries, but if you keep your distance from him, you can watch and learn when his downtime is. Patience is key here. You can only get one or two strikes in between the knight’s combo attacks, so don’t get greedy. The Site of Grace is right there, thankfully, so practicing should be easy.
This knight is the first real test of Belurat, and if you’re struggling to defeat him, we recommend leaving the Tower Settlement and searching for Scadutree Fragments to boost your damage output and resistance in the Land of Shadow. The DLC area uses an entirely unique progression system compared to the base game, and you’ll need to collect Scadutree Fragments to raise your stats even higher to survive Shadow of the Erdtree.
Once you’ve either defeated or given up on the knight, you can either continue to the left where the knight was going to make your way toward the next Site of Grace or head right to collect some unique gear and items.
How to beat Fire Knight Queelign
If you head to the right, you’ll find a wide-open plaza where a hostile summoned enemy is waiting for you. The battle with Fire Knight Queelign is the only thing of note in this area, so if you don’t want the Crusade Insignia Talisman or the Shriek of Sorrow Ash of War, you can skip it and head back the other way.
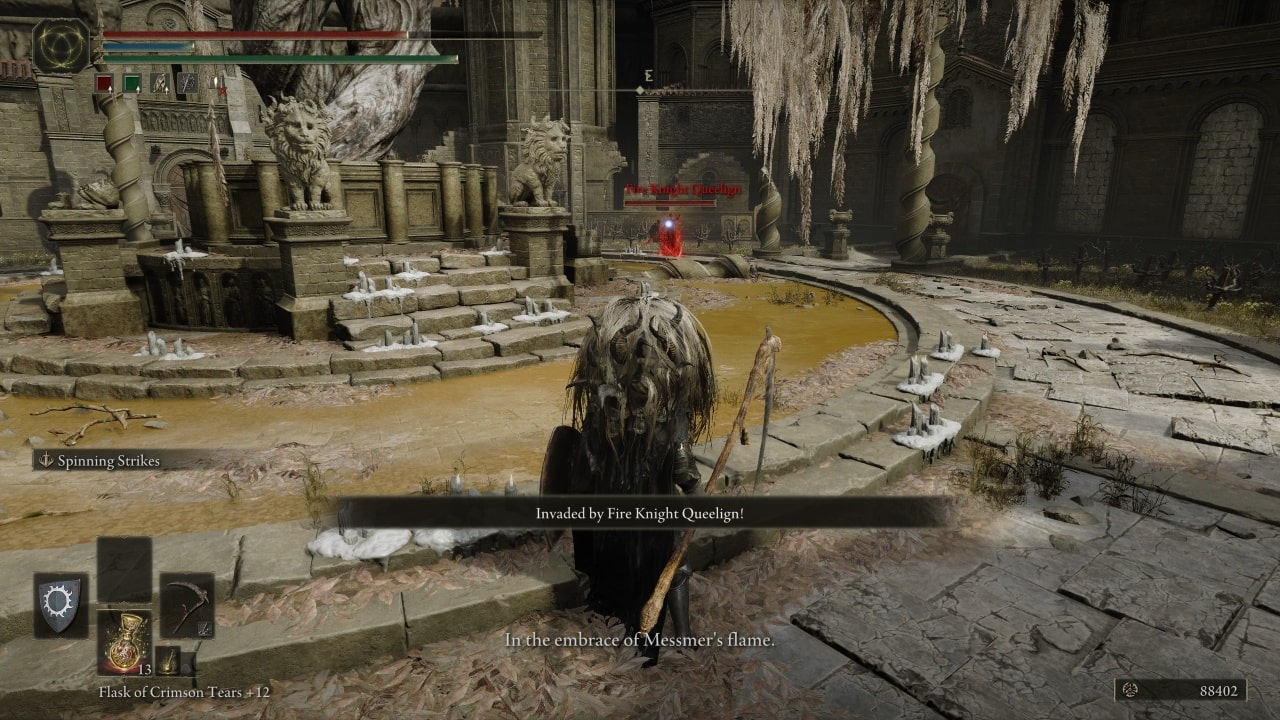
If you do choose to battle Queelign, however, you’ll need to watch out for his flame-based attacks. These will deal chip damage to you even if you block, and if you get hit by them normally, large chunks of your health bar will burn away.
To make things worse, Queelign’s spear lets him poke you repeatedly from afar, so closing the gap and applying constant pressure is crucial. Like most summoned foes, Queelign has a healing flask that he’ll use if he gets the chance, so keep the pressure on and remain aggressive.
How to get Crusade Insignia Talisman and Shriek of Sorrow Ash of War
Once Queelign falls, you’ll receive the Crusade Insignia Talisman, which raises your attack power after defeating an enemy. It’s great for clearing hordes of foes, but not so useful for boss fights.
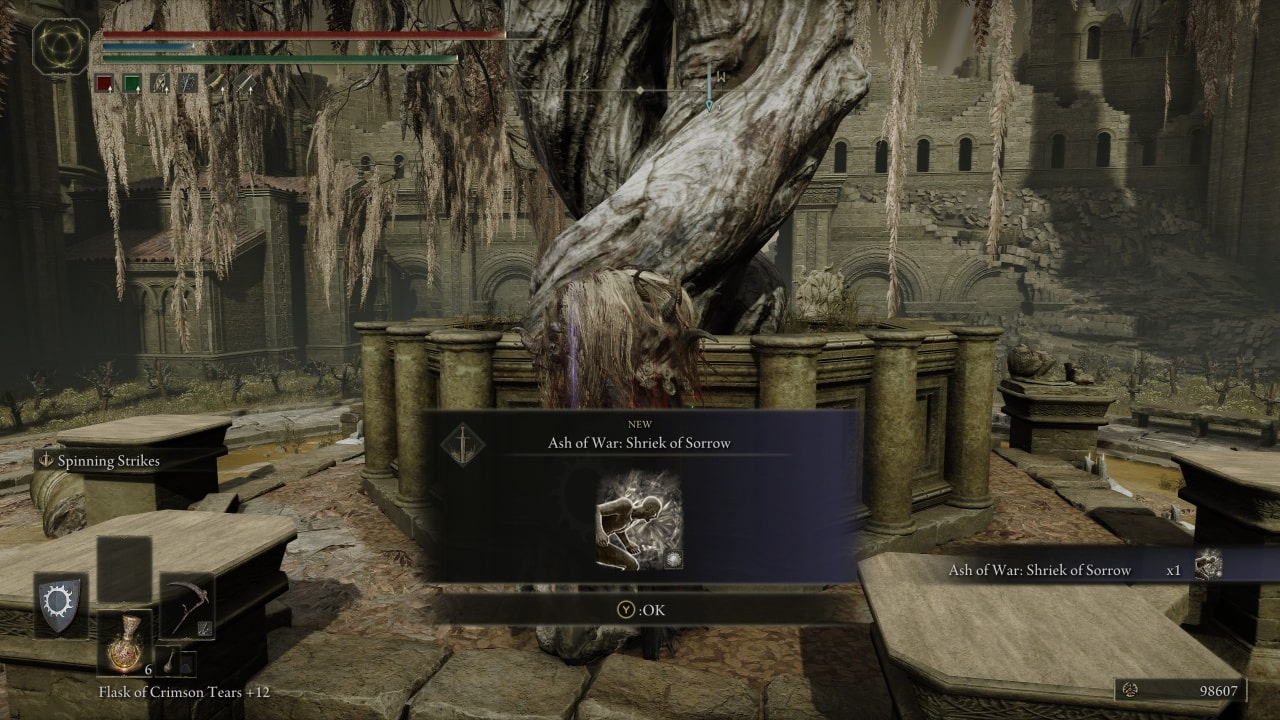
At the foot of the tree in the center of the plaza, you can collect the Shriek of Sorrow Ash of War as well. This Ash of War lets out a loud scream, causing all nearby enemies to flinch and boosting your attack power based on the amount of HP they have remaining. The less HP they have, the stronger you get. It also applies the Occult affinity to your active weapon.
There’s nothing else to see in this direction, so it’s time to head back the other way past the knight. You’ll find a broken bridge impeding your progress, so you’ll need to use the alley to the right to get around it. Proceed slowly since enemies are waiting around every corner to surprise you.
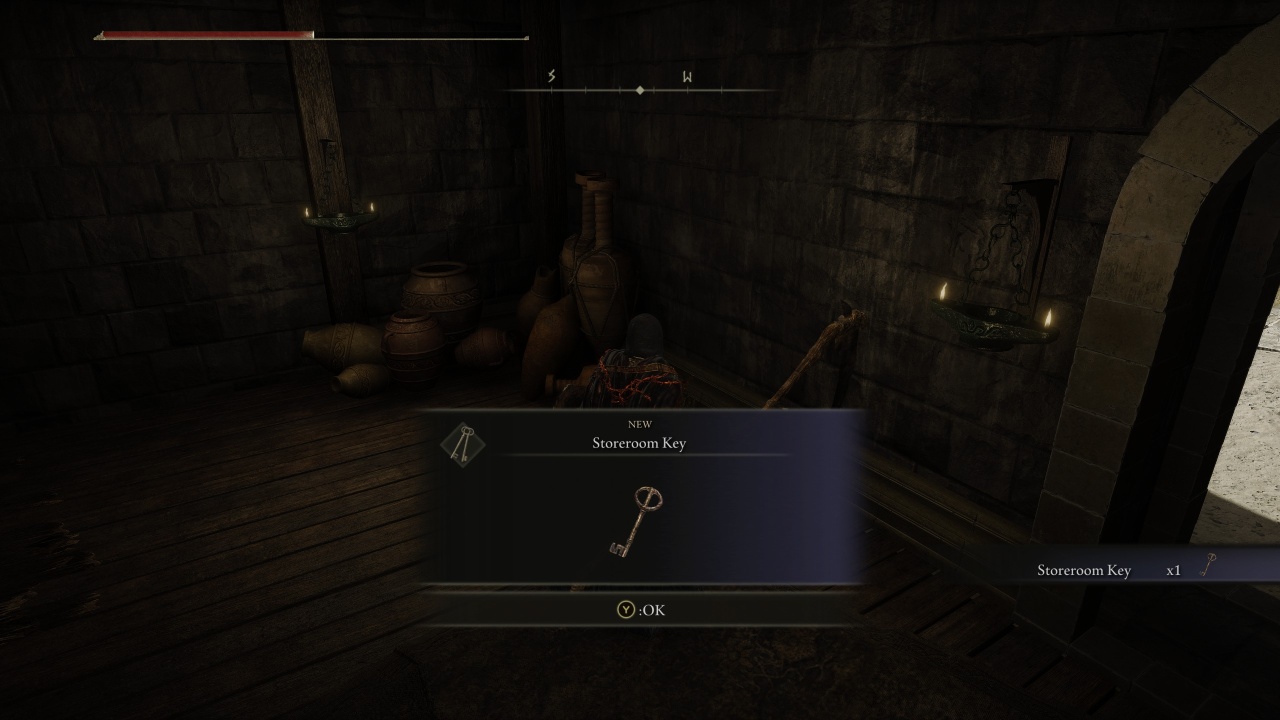
You’ll eventually reach a shallow river of murky water with two strong enemies waiting to ambush you. Once you defeat them, take a look at your surroundings and you’ll realize that you’re at the top of the waterfall that you saw at the start of the dungeon. Head inside the nearby room and climb the ladder to find the Storeroom Key.
Where to use the Storeroom Key in Belurat, Tower Settlement
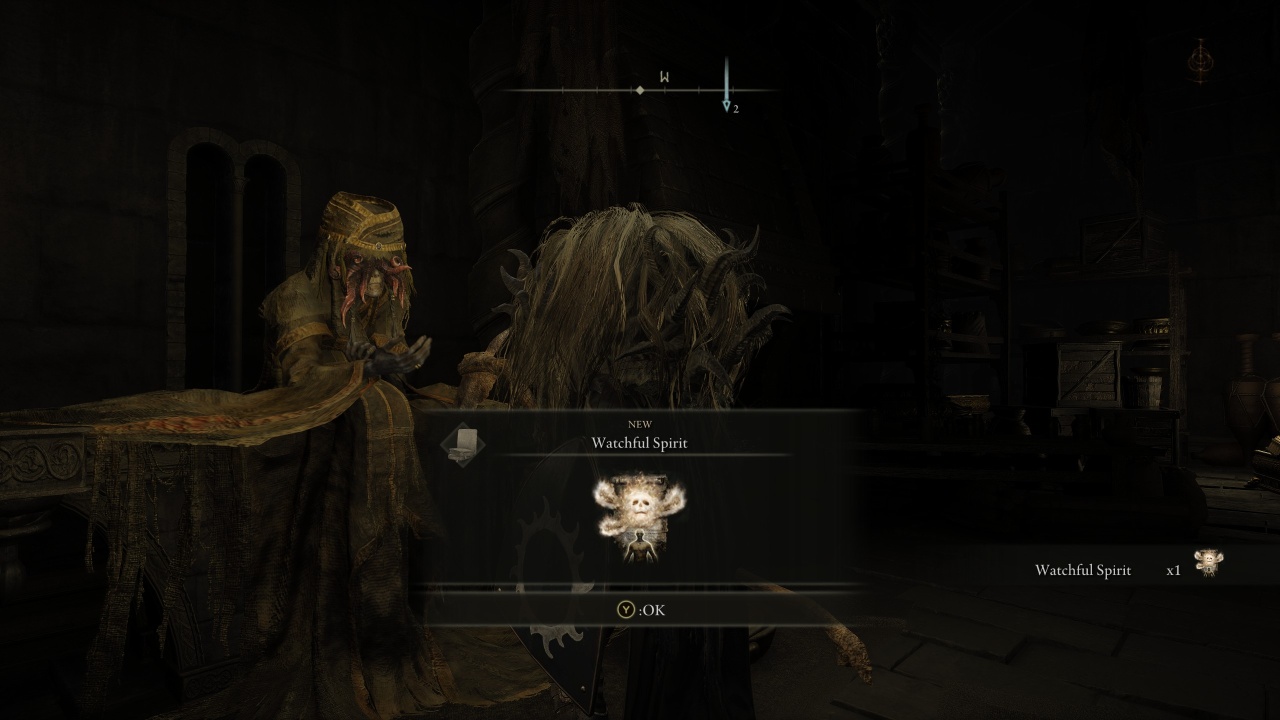
The Storeroom Key unlocks the door on the bridge where the ranged enemies were casting spells from on the main street before the Small Private Altar Site of Grace. Fast travel back there and you’ll see the enemies on the bridge just outside of the door. Kill them and cross the bridge to find the locked door that matches the Storeroom Key.
Inside, you’ll meet Hornsent Grandam. She’ll give you the Guardian Spirit Incantation, which spawns a protective spirit above your head that will shoot projectiles at nearby foes. It has a Faith requirement of 26, which is quite low at this point in the game. There’s nothing else to do here, so retrace your steps past the Small Private Altar until you reach the room by the waterfall where you first found the Storeroom Key to continue your journey.
Once you’re back at the room where you found the key, head out the door to find the path diverging in two ways. To the left is the other end of the broken bridge where a single enemy and item are waiting for you, but you cannot proceed any further. The only way forward is to the right. At the top of the stairs, the path diverges yet again. The correct way forward is across the rooftops to the right with the bird enemies, but don’t go there just yet.
How to unlock the Belurat, Tower Settlement Site of Grace shortcut and get the Bone Bow
Instead, turn left. You’ll shortly be ambushed by a swarm of small scorpions. Ignore them for now and take the stairs down on the left to find an elevator. This will bring you to the main gate at the start of the area, leading you back to the Belurat, Tower Settlement Site of Grace. Shortcut unlocked!
Head back up and slay the scorpion swarm so you can enter the large room they came from. Inside, you’ll find two gigantic scorpions. Try to use a throwing item to bait one of them toward you because fighting them simultaneously is a huge pain.
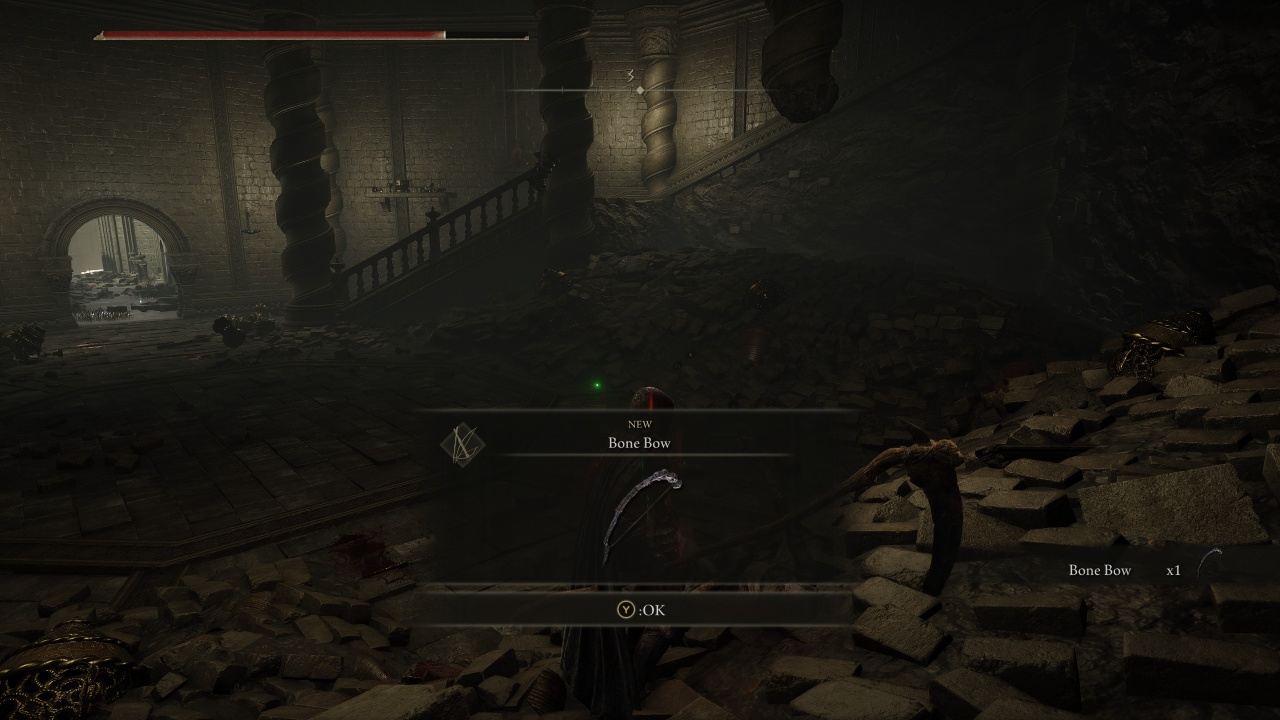
At least you have a shortcut that lets you avoid the knight and other enemies if you fail! If you defeat the pair of scorpions, you’ll be able to loot the Bone Bow that they’re guarding.
Where to find the Miquella Cross, Scadutree Fragment, and Dried Bouquet Talisman in Belurat, Tower Settlement

That’s not the only important thing in the area, though. Just outside the big door leading to the scorpion room. You’ll see a pile of rubble to the right. Jump over it and you’ll find a small door leading to a secret room filled with insectoid enemies. Defeat them and you’ll be rewarded with a Scadutree Fragment and a Miquella Cross! Just outside, you’ll find the Dried Bouquet Talisman as well, which raises your attack power when a summoned spirit dies.
Once you’ve collected the goods, head back the other way and proceed across the rooftops where the bird enemies are waiting. Take these on one at a time. They’re susceptible to jumping attacks, which will ground them most of the time. Near the end of the rooftops, you’ll find a spellcasting enemy guarding the final two birds. Take him out first and then focus on the others.
Once you make it back onto the street, you’ll see a covered bridge with a lone ghostly enemy holding a pot above its head. These enemies always drop Scadutree Fragments upon defeat, so slay him and claim your spoils! The fight’s not over yet, though, as another yellow knight is waiting at the other end of the bridge.
The same strategy from the past knight applies to this knight as well, only this one has a large singular greatsword instead of dual blades. Since he’s much slower, he’s much easier to hit. Watch out for his gap-closing attacks, though, as these will lock onto your position and let him dash straight to you for a devastating blow. Again, just be patient and wait for safe openings.
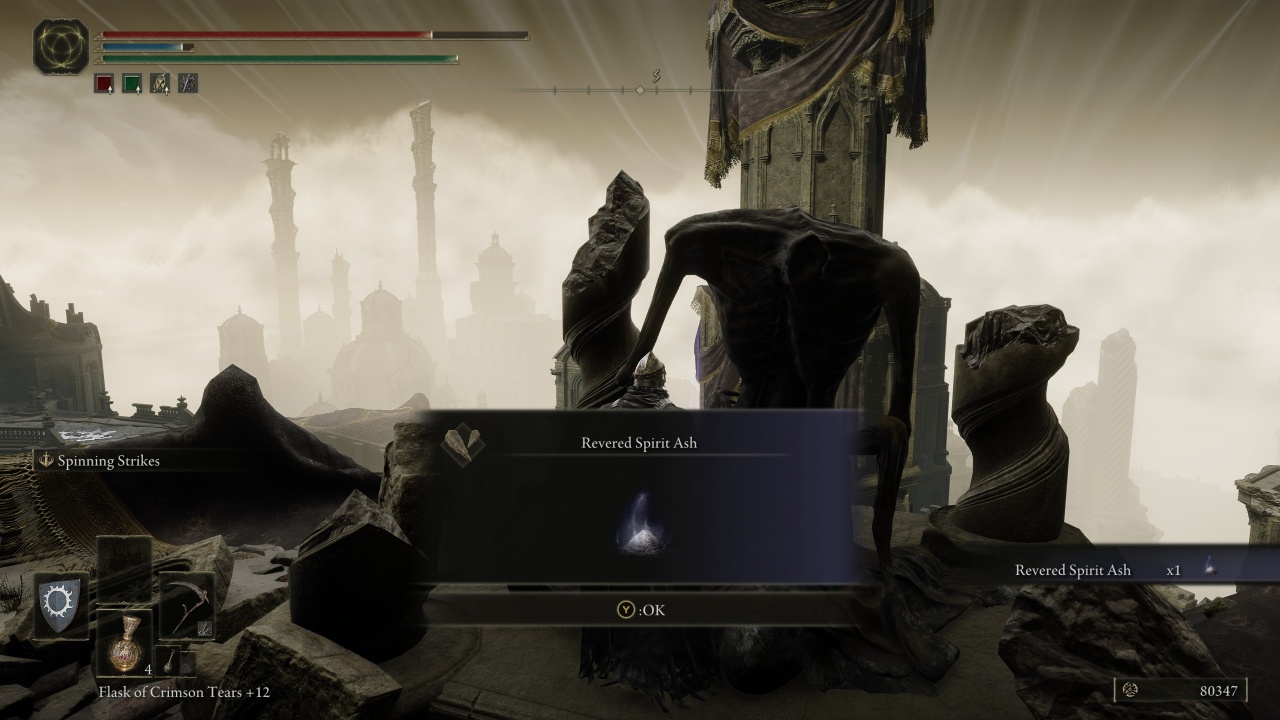
Once the knight is down, you’re nearly at the next Site of Grace. Continue along the path and you’ll find a large crowd of ghostly enemies surrounding a tree. Most of these are easy to beat, but there are a few dangerous cleaver-wielders in their midst. Defeat them first before thinning the horde. Your reward is a Revered Spirit Ash waiting on a statue nearby.
Continue forward through the large door and you’ll find yourself in a familiar place. It’s the scorpion room, only you’re above the two scorpions. Climb the stairs and you’ll come face to face with a strong enemy that dishes out long combos of rapid strikes. He’s easy to overcome as long as you apply constant pressure and don’t lose focus. Either defeat him or sprint past him to reach the Stagefront Site of Grace.
Stagefront Site of Grace: How to prepare for the boss
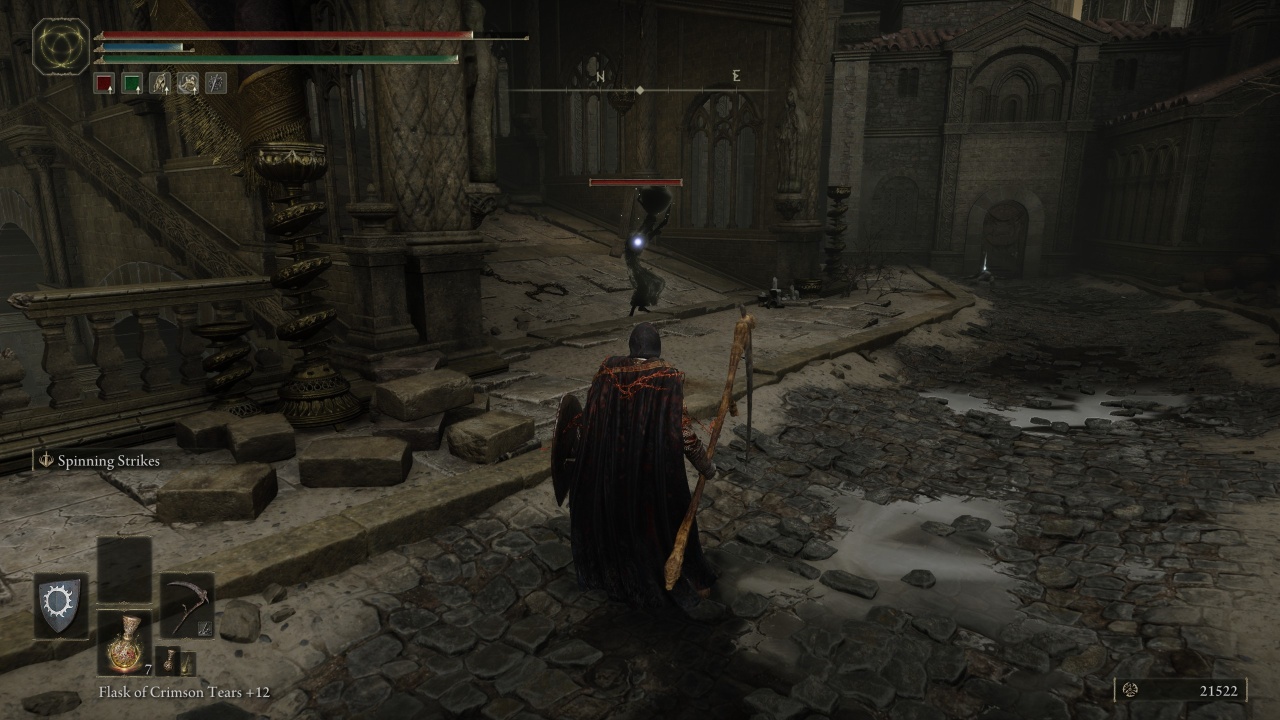
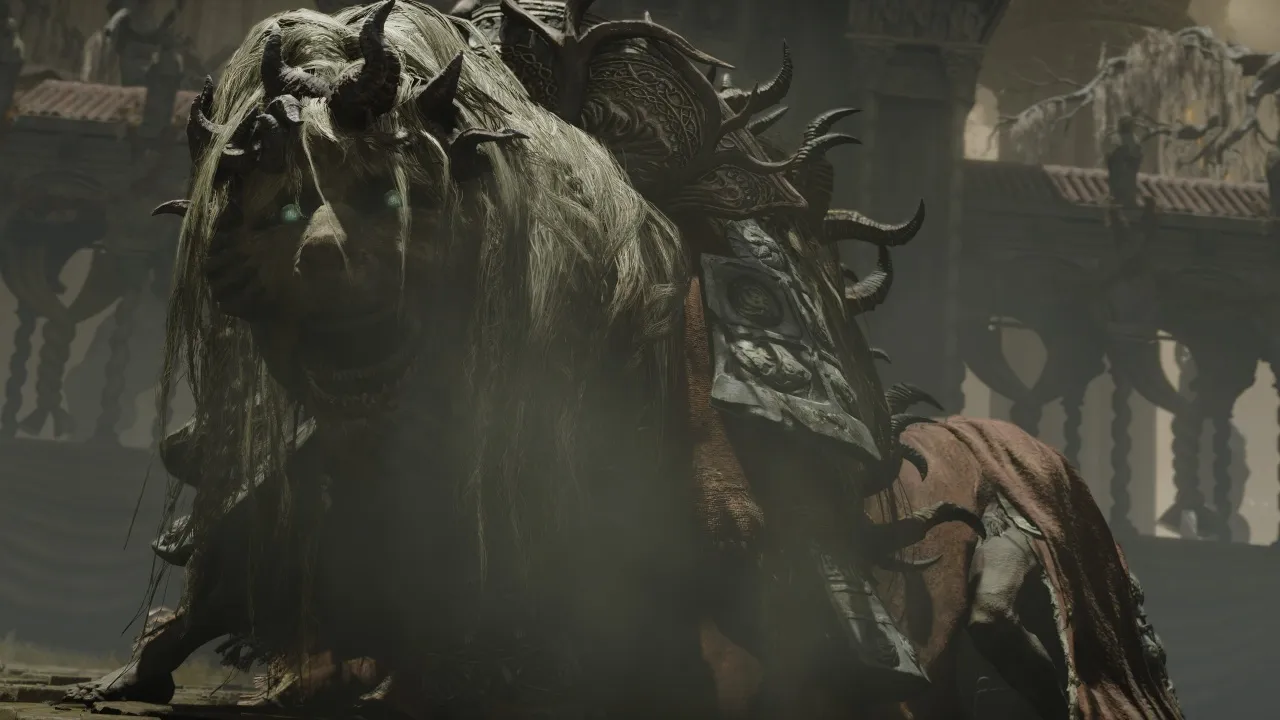
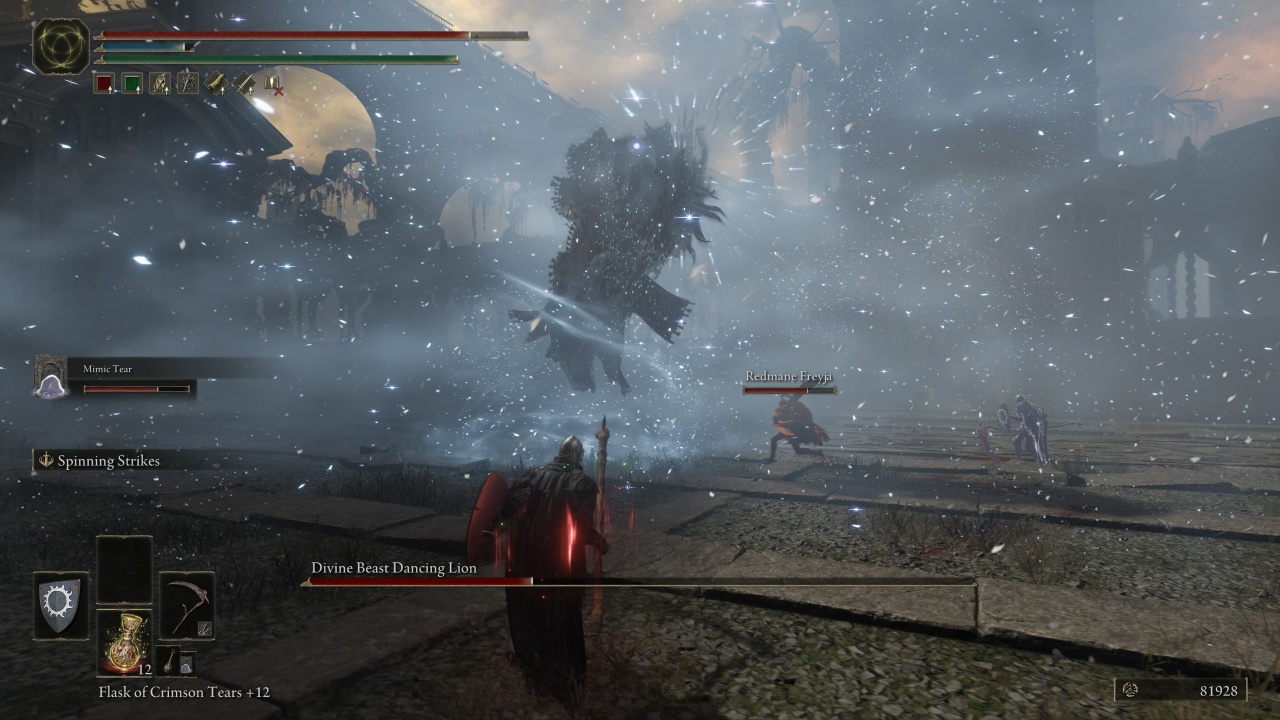
This is it. Beyond the door ahead is the final boss of Belurat: the Divine Beast Dancing Lion. There’s not much else to do at this Site of Grace besides prepare.
The battle with the Dancing Lion is hectic and especially challenging if you haven’t upgraded your Scadutree Blessing at least a few times, so we highly recommend summoning Redmane Freyja for assistance. If you haven’t spoken to her yet, she’s located at the Three-Path Cross Site of Grace north of the Scorched Ruins along the path to Belurat. Also, Spirit Ashes like Mimic Tear make this fight a breeze.
How to Beat Divine Beast Dancing Lion
The final boss of Belurat is the Divine Beast Dancing Lion, a ravenous beast that commands lightning, wind, and ice to perform a wide range of elemental attacks. The first part of the fight features a strictly physical moveset, so you won’t have to worry about ranged attacks until you deal enough damage.
The Dancing Lion is highly aggressive, and you should match its aggression if you want to survive the first phase. Roll into each of its attacks instead of away. This will put you in a place where you can easily avoid any follow-up strikes.
The main thing to worry about during this phase is the Dancing Lion’s grab attack. When it rears up and makes a loud clicking noise, it will lunge toward you and grab you, usually resulting in death if successful. Make sure you dodge this attack no matter what.
The Dancing Lion will also occasionally launch a spinning attack that sends waves of debris in your direction. These waves can be avoided by rolling through them or jumping over them, but make sure to keep an eye on the advancing boss as it spins toward you as well.
Once you whittle down the boss’ HP bar enough, the Dancing Lion will begin to utilize elemental attacks. It will alternate between lightning, ice, and wind phases. During the lightning phase, it will cast lightning strikes throughout the arena. In the ice phase, icicles will launch up from the ground and the Lion’s attack will inflict Frostbite. In the wind phase, gusts of wind will radiate from the Lion’s strikes and it will send wind projectiles at you in between combos.
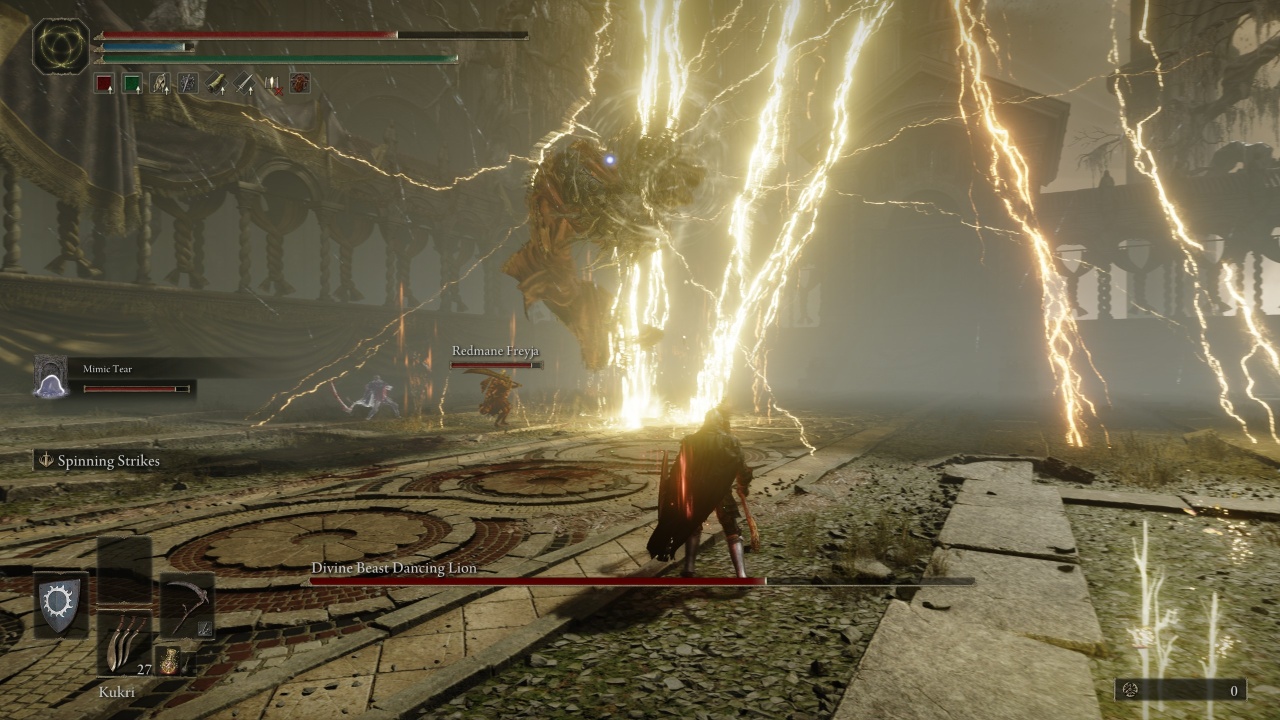
The Lion will launch into the air and scream when it switches elements, buying you some breathing room to heal. We recommend playing it safe during the lightning phase and going on the attack during the wind and ice phases since there aren’t as many projectiles to avoid. If you’re having trouble with a specific phase, bring armor or items that grant you resistance to each type of elemental damage.
Should you pick Enraged Divine Beast Talisman, Divine Beast Frost Stomp Ash of War, or use the Runes?
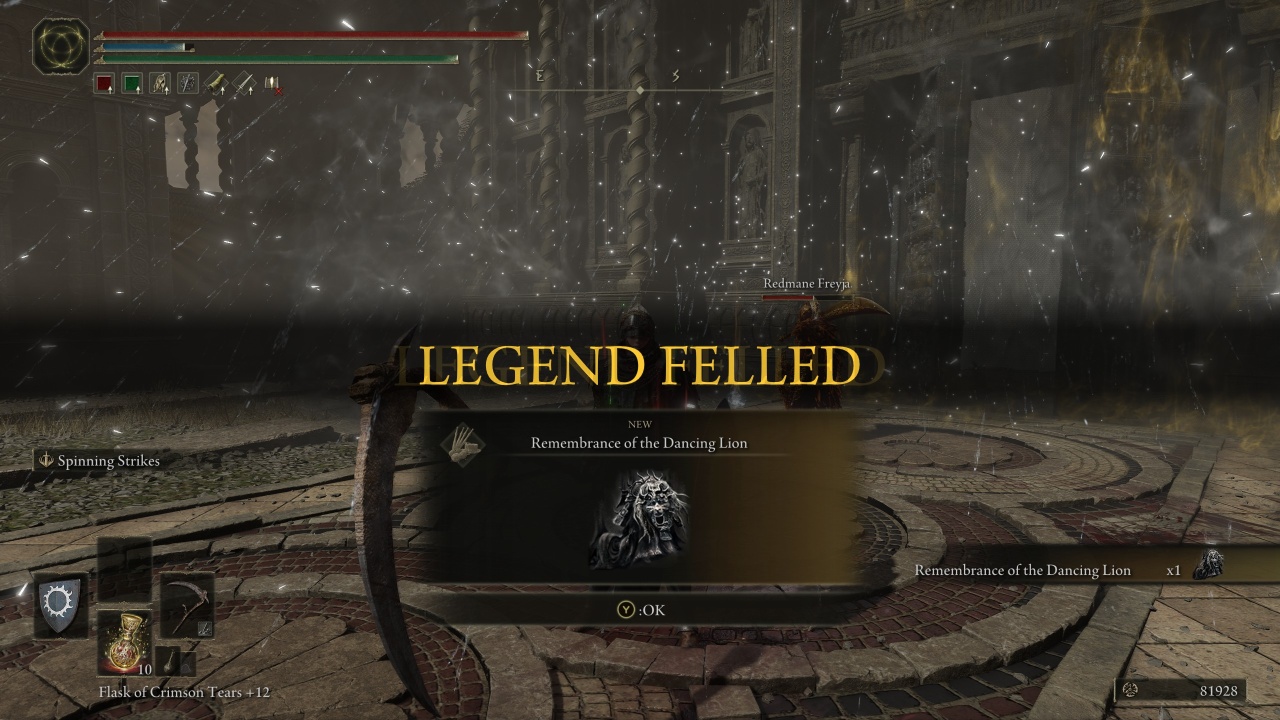
Defeating the Divine Beast Dancing Lion will reward you with the Remembrance of the Dancing Lion. Take this to the Roundtable Hold to obtain either the Enraged Divine Beast Talisman or the Divine Beast Frost Stomp Ash of War. The former increases the potency of storms, while the latter grants your weapon the Cold affinity and performs an icy stomp that can be charged for increased power and range.
Honestly, we don’t recommend taking either of these items. The Enraged Divine Beast Talisman is highly situational, and the Divine Beast Frost Stomp Ash of War isn’t that strong. The Ash of War is definitely the better of the two options, though, so go that route if you want to spice up your moveset.
In addition to your Remembrance reward, you’ll also get the Divine Beast Head, a resilient helmet with a striking appearance. Be warned that wearing this helmet reduces the healing efficiency of your flasks, though.
How to cheese Divine Beast Dancing Lion
The easiest way to win this fight is to summon Freyja and Spirit Ashes to keep the Lion’s attention while you swoop in for easy attacks. The Dancing Lion doesn’t have an incredibly large health pool, so it should go down pretty quickly as long as you stay on the offensive and don’t panic.
The best way to cheese this fight is just to let Freyja and your Spirit Ashes do all the work while you sit back and attack the boss with ranged weapons. The Bone Bow from earlier in the dungeon is a great choice if you have enough arrows, and you can always stock up on throwing items to deal large chunks of damage to the Dancion Lion from afar.
If you need to get in close to deal damage, then you can easily exploit the Dancing Lion’s ice attacks. When it sends ice spikes out onto the floor, just jump over them. It’s basically a free jumping attack every time. To make things even better, jumping attacks are better for staggering foes, so there’s a chance you’ll make the boss vulnerable to a critical hit after a few swings.
Continue through the door after defeating the boss to receive another Revered Spirit Ash. The path forward is blocked, however, as the next door is sealed and obscured by shadow. The Tower of Shadow message tells you where to head next to continue your search for Miquella, however, so it’s time to move on in pursuit of more dungeons and new weapon types.
-
 最后生还者2季首改动保护艾比演员我已经等待了多年,以了解在HBO上如何适应[的非线性事件,这是我们的最后一部分第2部分,该系列的游戏是基于的。季节开始时,跳跃的情况发生了巨大的变化。 短暂返回了第一个赛季的关键结尾对话后,我们看到了长颈鹿的照片。这立即将我们返回盐湖城,盐湖城是乔尔(Joel)屠杀了萤火虫以保持艾莉(Ellie)活...游戏 发布于2025-05-03
 -
Delta Force弹药与护甲系统详解与传统的FPS游戏不同,提取射手具有更高级的装甲和弹药伤害系统。 The Operations mode in Delta Force is no different, though their version is somewhat simplified compared to a game li...游戏 发布于2025-05-03
-
神秘轮盘的诡异冒险:Split Fiction离开齐天大圣的领域后,你会偶然发现一个奇怪的小角落。那里有一台吐出香蕉的老虎机(为什么不呢?),还有一个看起来很重要的轮盘……但其实什么都不是。 你可能会认为这个轮盘隐藏着什么秘密谜题或游戏机制。也许正确地旋转它可以解锁一条隐藏的路径,或者也许落在正确的数字上会给你奖励。不。它什么也不做。 继续,...游戏 发布于2025-05-03
-
Pet Simulator 99 VIP福利详解许多Roblox游戏都提供购买游戏通行证,而PET Simulator 99也不例外。 VIP游戏通行证的价格为400 Robux,有望带来许多好处和奖励。但是您到底得到了什么,这是一项值得投资的? 本指南分解了宠物模拟器99 VIP游戏通行证的内容。 [2 从游戏中独家商店购买的VIP Pass...游戏 发布于2025-05-03
-
Smite 2解锁众神指南Smite 2 的众神并非唾手可得。想要扩充你的神明阵容,你需要付出努力——或者金钱。以下是如何解锁神明并打造你梦想阵容的方法。 在 Smite 2 中解锁神明的方法 创始者礼包:购买任何等级的创始者版本即可立即解锁所有神明,包括现有的和未来的。如果你不想费心磨练等级,这是最简单的方法。 神明代币...游戏 发布于2025-05-02
-
如何在《Anime Last Stand》中获得传送门动漫最后一站更新2引入门户 - 获取对掌握游戏至关重要的特殊单位的新方法。本指南说明了如何获取和利用这些门户。 [2 [2 获取门户的最有效方法是在噩梦难度下以无限模式征服老板。 每个老板击败都有10%的机会接收门户。 协助其他人完成门户网站也有机会赚钱。 虽然在故事模式下击败老板可能会产生门...游戏 发布于2025-05-02
-
任天堂宣布《旷野之息》在Switch 2上无好消息令人失望的消息:任天堂Switch 2版《塞尔达传说:旷野之息》或将缺失DLC内容 对于期待在任天堂Switch 2上完整体验《塞尔达传说:旷野之息》的玩家来说,任天堂似乎带来了一些坏消息。作为2017年Switch的首发游戏,《旷野之息》至今仍是该主机上最受欢迎的游戏之一。Switch 2版《旷野...游戏 发布于2025-05-02
-
《流放之路2》战士职业攻略Path of Exile 2中的战士:近战格斗大师 战士是《流放之路2》中典型的近战格斗职业。一手持战锤,一手持大盾,战士化身为战场上的坦克,吸收伤害的同时,用强大的打击击溃敌人。 战士在攻防两方面都能专精,使其成为一个优秀的全能型职业。如果您想在《流放之路2》中扮演战士,以下内容将向您介绍该职业...游戏 发布于2025-05-02
-
豪龙:夏威夷海盗黑帮财神神社兑换攻略在“像龙:无限的财富”中,熟悉的Kamurocho吉祥物Kamulop带着他的财富交换店返回! 本指南详细介绍了如何解锁商店,找到纸质命运并利用商店的独特奖励。 [2 在檀香山中收集纸质命运,在其他地方无法解锁独家项目。 [2 [2 开始第二章后不久,访问bar的访问会触发过过场动画,引入了Kam...游戏 发布于2025-05-01
-
Mudborne:如何增加更多存储空间Mudborne的最初库存感觉很宽敞,但探索,繁殖青蛙和资源收集很快需要更多存储。 幸运的是,存在几种选择来扩大您的承载能力。虽然有些家具适合特定生物,但随着您的进展,许多存储解决方案都可以使用。 背包甚至可以很早就可以实现! [2 增加泥浆中的存储 [2 [2 您可能已经获得了青蛙和虫子家具...游戏 发布于2025-05-01
-
-
模拟人生4狼人模式作弊码大全The Sims 4 Werewolves rounds out the trilogy of occult-themed game packs, giving your Sims the ability to transform into a beastly, barely-humanoid ba...游戏 发布于2025-05-01
-
怪物猎人荒野火石获取地点及攻略Monster Hunter Wilds手工制作需要各种特殊的材料,而Firestones是您使用武器和装甲所需的首次。 但是,他们的位置并未明确标记。本指南解释了在哪里可以找到和有效地耕种木材。 在Monster Hunter Wild 是从位于油井盆地的采矿露头获得的。 它们是每个节点的...游戏 发布于2025-05-01
-
王朝霸业起源终极解锁攻略及隐藏要素大全《王朝无双:起源》通关后挑战:解锁吕布、赤兔马及更多精彩内容! 恭喜你战胜了《王朝无双:起源》的主线剧情!真正的乐趣才刚刚开始,游戏丰富的后期内容等你探索!从更具挑战性的关卡到隐藏解锁要素,这里将为你揭晓所有内容,并教你如何轻松应对,避免抓狂(以及肉包子短缺)。 后期游戏内容:有哪些新内容? 完成主...游戏 发布于2025-04-30
-
苏丹游戏:13个新手必备攻略掌握苏丹的游戏:生存的1001阿拉伯夜晚的指南 在苏丹的游戏中,您浏览了一个疯狂的独裁者的奸诈世界,努力通过日常挑战为生存而努力。 本指南提供了胜过苏丹并避免迅速而令人不快的结局的基本技巧。 5:31 核心挑战在于巧妙地导航道德上模棱两可的难题。您将面临对流血,盗窃和不忠的需求,同时保持微妙的平...游戏 发布于2025-04-30


学习中文
- 1 走路用中文怎么说?走路中文发音,走路中文学习
- 2 坐飞机用中文怎么说?坐飞机中文发音,坐飞机中文学习
- 3 坐火车用中文怎么说?坐火车中文发音,坐火车中文学习
- 4 坐车用中文怎么说?坐车中文发音,坐车中文学习
- 5 开车用中文怎么说?开车中文发音,开车中文学习
- 6 游泳用中文怎么说?游泳中文发音,游泳中文学习
- 7 骑自行车用中文怎么说?骑自行车中文发音,骑自行车中文学习
- 8 你好用中文怎么说?你好中文发音,你好中文学习
- 9 谢谢用中文怎么说?谢谢中文发音,谢谢中文学习
- 10 How to say goodbye in Chinese? 再见Chinese pronunciation, 再见Chinese learning


