
使用 Spring Security 保護微服務:實施 JWT
 瀏覽:989
JSON WEB TOKEN (JWT)
JWT (JSON Web Token) is a method for securely transmitting information between two parties (such as a client and a server) as a JSON object. It's designed to be compact and URL-safe, making it easy to pass around in URLs, headers.
- Header
- Payload
- Signature
Header
The header typically consist two parts: the type of the token (JWT) and the signing algorithm being used, such as HMAC SHA256 or RSA.
{
"alg":"HS256",
"typ":"JWT"
}
Payload
This is where the actual data is stored. It can include information like the user ID, roles, expiration time, and other claims (data about the user or session).
{
"email":"[email protected]",
"name":"Ayush"
}
Signature
Ensures the integrity of the token. This is a security feature that ensures the token hasn’t been altered. It’s created by combining the encoded header and payload with a secret key using the specified algorithm. The signature helps the server verify that the token is legitimate and hasn’t been tampered with.
The benefits of JWT
No Need to Repeatedly Send Credentials: With JWT, you don't have to send your username and password with every request. Instead, you log in once, and the server gives you a token. You then send this token with each request to prove your identity, making the process more secure and efficient.
Built-in Expiration: Each JWT comes with an expiration time, meaning it’s only valid for a specific period. This reduces the risk of long-term misuse if a token is somehow intercepted. After it expires, the user needs to log in again to get a new token, adding an extra layer of security.
JWT with Spring Boot securely manages user authentication by issuing tokens after login. These tokens are sent with each request, ensuring secure, stateless communication without repeatedly sending credentials.
Stateless communication means the server doesn't remember past requests. Each request carries everything needed (like a JWT), so the server doesn't store session info.
Implementing JWT in a Java Spring Boot application involves several steps. Here's a simplified outline to get you started:
1. Add Dependencies
Include the necessary dependencies in your pom.xml file
            io.jsonwebtoken
            jjwt-api
            0.12.5


            io.jsonwebtoken
            jjwt-impl
            0.12.5
            runtime


            io.jsonwebtoken
            jjwt-jackson
            0.12.5
            runtime
All the dependencies that we need to create the spring-boot application with JWT
    4.0.0

        org.springframework.boot
        spring-boot-starter-parent
        3.3.3


    com.tier3Hub
    user-auth-service
    0.0.1-SNAPSHOT
    user-auth-service
    The user-auth-service is a microservice responsible for handling user authentication and authorization within a distributed system. It is designed to manage user login, registration, and secure access to various services using robust security practices. This service implements authentication mechanisms like JSON Web Tokens (JWT) and integrates with OAuth 2.0 for third-party authentication. Built with Spring Boot, it ensures scalability, reliability, and easy integration with other microservices in the system.


        21


            org.springframework.boot
            spring-boot-starter-actuator


            org.springframework.boot
            spring-boot-starter-data-jpa


            org.springframework.boot
            spring-boot-starter-security


            org.springframework.boot
            spring-boot-starter-web


            io.jsonwebtoken
            jjwt-api
            0.12.5


            io.jsonwebtoken
            jjwt-impl
            0.12.5
            runtime


            io.jsonwebtoken
            jjwt-jackson
            0.12.5
            runtime


            com.mysql
            mysql-connector-j
            runtime


            org.projectlombok
            lombok
            true


            org.springframework.boot
            spring-boot-starter-test
            test


            org.springframework.security
            spring-security-test
            test


            org.springframework.boot
            spring-boot-starter-validation


            org.springdoc
            springdoc-openapi-starter-webmvc-ui
            2.5.0


            org.modelmapper
            modelmapper
            3.1.1


                org.springframework.boot
                spring-boot-maven-plugin


                            org.projectlombok
                            lombok
we are using different types of dependencies like
- Spring Boot Starter Actuator: 3.3.3 - Adds production-ready features like monitoring and health checks.
- Spring Boot Starter Data JPA: 3.3.3 - Simplifies database interactions with JPA support.
- Spring Boot Starter Security: 3.3.3 - Provides security features like authentication and authorization.
- Spring Boot Starter Web: 3.3.3 - Supports building web applications, including RESTful services.
- JJWT API: 0.12.5 - Handles JWT creation and parsing for secure token management.
- JJWT Impl: 0.12.5 - Implements core JWT functionalities.
- JJWT Jackson: 0.12.5 - Enables JWT JSON parsing using Jackson.
- MySQL Connector: Runtime - Connects your application to a MySQL database.
- Lombok: Not specified - Reduces boilerplate code with annotations.
- Spring Boot Starter Test: 3.3.3 - Provides testing support for Spring Boot applications.
- Spring Security Test: 3.3.3 - Helps with testing security configurations.
- Spring Boot Starter Validation: 3.3.3 - Adds validation support for request and response objects.
- SpringDoc OpenAPI Starter WebMVC UI: 2.5.0 - Integrates Swagger UI for API documentation.
- ModelMapper: 3.1.1 - Simplifies object mapping between different layers.
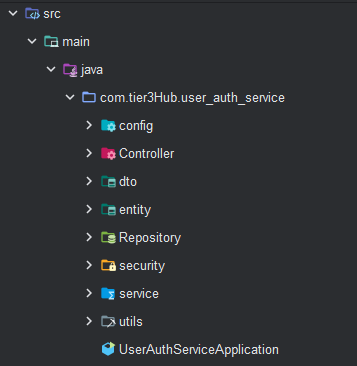
*2. Project structure *
3. Add the configuration in application.properties file
spring.application.name=user-auth-service

server.port=8000

spring.datasource.url=jdbc:mysql://localhost:3306/auth_services
spring.datasource.username=root
spring.datasource.password=ayush@123

spring.jpa.hibernate.ddl-auto=update
spring.jpa.show-sql=true

#debug logs
logging.level.org.springframework.security=debug

spring.main.allow-circular-references=true
4. Create the USER entity
package com.tier3Hub.user_auth_service.entity;

import jakarta.persistence.*;
import lombok.AllArgsConstructor;
import lombok.Builder;
import lombok.Data;
import lombok.NoArgsConstructor;

import java.time.LocalDateTime;
import java.util.List;

@AllArgsConstructor
@NoArgsConstructor
@Data
@Builder
@Table
@Entity(name = "User")
public class User {
    @Id
    @GeneratedValue(strategy = GenerationType.IDENTITY)
    private Long id;
    private String username;
    private String password;
    private String email;
    private String phoneNumber;
    private List roles;
    private LocalDateTime createdAt;
    private LocalDateTime updatedAt;
}
** 5. create the service and repository class and interface**
Repository.java
package com.tier3Hub.user_auth_service.Repository; import com.tier3Hub.user_auth_service.entity.User; import org.springframework.data.jpa.repository.JpaRepository; public interface AuthRepository extends JpaRepository{ User findByUsername(String username); }
service.java
package com.tier3Hub.user_auth_service.service;

import com.tier3Hub.user_auth_service.dto.LoginResponse;
import com.tier3Hub.user_auth_service.dto.RegisterDTO;
import com.tier3Hub.user_auth_service.dto.RegisterResponse;

public interface AuthService {
    RegisterResponse register(RegisterDTO registerDTO);
}
6. create the DTO's for login and signin request and response
CreateloginDTO.java
package com.tier3Hub.user_auth_service.dto;

import jakarta.validation.constraints.NotBlank;
import jakarta.validation.constraints.Size;
import lombok.AllArgsConstructor;
import lombok.Data;
import lombok.NoArgsConstructor;

@AllArgsConstructor
@NoArgsConstructor
@Data
public class LoginDTO {
    @NotBlank(message = "Username is required")
    @Size(min = 3, max = 20, message = "Username must be between 3 and 20 characters")
    private String username;

    @NotBlank(message = "Password is required")
    private String password;
}
loginResponse.java
package com.tier3Hub.user_auth_service.dto;

import lombok.AllArgsConstructor;
import lombok.Builder;
import lombok.Data;
import lombok.NoArgsConstructor;

@Data
@AllArgsConstructor
@NoArgsConstructor
@Builder
public class LoginResponse {
    private String accessToken;
    private String tokenType = "Bearer";
}
RegisterDTO.java
package com.tier3Hub.user_auth_service.dto;

import jakarta.validation.constraints.Email;
import jakarta.validation.constraints.NotBlank;
import jakarta.validation.constraints.Size;
import lombok.AllArgsConstructor;
import lombok.Data;
import lombok.NoArgsConstructor;

@AllArgsConstructor
@NoArgsConstructor
@Data
public class RegisterDTO {
    @NotBlank(message = "Username is required")
    @Size(min = 3, max = 20, message = "Username must be between 3 and 20 characters")
    private String username;

    @NotBlank(message = "Password is required")
    @Size(min = 8, message = "Password must be at least 8 characters")
    private String password;

    @NotBlank(message = "Email is required")
    @Email(message = "Email should be valid")
    private String email;
}
RegisterResponse.java
package com.tier3Hub.user_auth_service.dto;

import lombok.AllArgsConstructor;
import lombok.Data;
import lombok.NoArgsConstructor;

import java.time.LocalDateTime;

@AllArgsConstructor
@NoArgsConstructor
@Data
public class RegisterResponse {
    private Long id;
    private String username;
    private String email;
    private LocalDateTime createdAt;
    private LocalDateTime updatedAt;
}
*7. for sending custom response from the API we use the ResponseHandler.java *
package com.tier3Hub.user_auth_service.utils;
import org.springframework.http.HttpStatus;
import org.springframework.http.ResponseEntity;
import java.util.HashMap;
import java.util.Map;
public class ResponseHandler {
public static ResponseEntity
8. for storing some constants we create the class inside the utils package that is ApplicationConstants.java
package com.tier3Hub.user_auth_service.utils;

public class AppConstants {
    public static final String[] PUBLIC_URLS = { "/v3/api-docs/**", "/swagger-ui/**", "/api/auth/register/**", "/api/auth/login/**","/api/auth/registerAdmin/**" };
}
9. for converting the object one to another we use the dependency that is model mapper for configuration that we create the class inside the config package that is ApplicationConfigs.java
package com.tier3Hub.user_auth_service.config;

import org.modelmapper.ModelMapper;
import org.springframework.context.annotation.Bean;
import org.springframework.context.annotation.Configuration;

@Configuration
public class ApplicationConfigs {
    @Bean
    public ModelMapper modelMapper()
    {
        return new ModelMapper();
    }
}
**
This is the basic setup that we do for every spring-boot application we create now securing the rest endpoint with JWT we started.
**
now inside the security package we create the class called JWTFilter.java
The JWTFilter is a custom Spring Security filter that intercepts HTTP requests to validate JWTs. It checks for the "Authorization" header, extracts the token, and retrieves the username. If the token is valid, it creates an authentication token with user details and sets it in the security context, allowing the application to recognize the authenticated user for further processing.
package com.tier3Hub.user_auth_service.security;

import jakarta.servlet.FilterChain;
import jakarta.servlet.ServletException;
import jakarta.servlet.http.HttpServletRequest;
import jakarta.servlet.http.HttpServletResponse;
import org.springframework.beans.factory.annotation.Autowired;
import org.springframework.security.authentication.UsernamePasswordAuthenticationToken;
import org.springframework.security.core.context.SecurityContextHolder;
import org.springframework.security.core.userdetails.UserDetails;
import org.springframework.security.core.userdetails.UserDetailsService;
import org.springframework.security.web.authentication.WebAuthenticationDetailsSource;
import org.springframework.stereotype.Service;
import org.springframework.web.filter.OncePerRequestFilter;

import java.io.IOException;

@Service
public class JWTFilter extends OncePerRequestFilter {
    @Autowired
    private UserDetailsService userDetailsService;

    @Autowired
    private JWTUtil jwtUtil;

    @Override
    protected void doFilterInternal(HttpServletRequest request, HttpServletResponse response, FilterChain chain) throws ServletException, IOException {
        String authorizationHeader = request.getHeader("Authorization");
        String username = null;
        String jwt = null;
        if (authorizationHeader != null && authorizationHeader.startsWith("Bearer ")) {
            jwt = authorizationHeader.substring(7);
            username = jwtUtil.extractUsername(jwt);
        }
        if (username != null) {
            UserDetails userDetails = userDetailsService.loadUserByUsername(username);
            if (jwtUtil.validateToken(jwt)) {
                UsernamePasswordAuthenticationToken auth = new UsernamePasswordAuthenticationToken(userDetails, null, userDetails.getAuthorities());
                auth.setDetails(new WebAuthenticationDetailsSource().buildDetails(request));
                SecurityContextHolder.getContext().setAuthentication(auth);
            }
        }
        chain.doFilter(request, response);
    }
}
create the class JWTUtil.java
The JWTUtil class manages JWT operations, including extracting usernames and expiration dates from tokens. It generates new tokens using a secret key and validates existing tokens by checking their expiration. The class uses HMAC for signing and includes methods to parse claims and determine if tokens are expired, ensuring secure authentication and authorization in the application.
package com.tier3Hub.user_auth_service.security;

import io.jsonwebtoken.Claims;
import io.jsonwebtoken.Jwts;
import io.jsonwebtoken.security.Keys;
import org.springframework.stereotype.Service;

import javax.crypto.SecretKey;
import java.util.Date;
import java.util.HashMap;
import java.util.Map;

@Service
public class JWTUtil {

    private String SECRET_KEY = "TaK HaV^uvCHEFsEVfypW#7g9^k*Z8$V";

    private SecretKey getSigningKey() {
        return Keys.hmacShaKeyFor(SECRET_KEY.getBytes());
    }

    public String extractUsername(String token) {
        Claims claims = extractAllClaims(token);
        return claims.getSubject();
    }

    public Date extractExpiration(String token) {
        return extractAllClaims(token).getExpiration();
    }

    private Claims extractAllClaims(String token) {
        return Jwts.parser()
                .verifyWith(getSigningKey())
                .build()
                .parseSignedClaims(token)
                .getPayload();
    }

    private Boolean isTokenExpired(String token) {
        return extractExpiration(token).before(new Date());
    }

    public String generateToken(String username) {
        Map claims = new HashMap();
        return createToken(claims, username);
    }

    private String createToken(Map claims, String subject) {
        return Jwts.builder()
                .claims(claims)
                .subject(subject)
                .header().empty().add("typ","JWT")
                .and()
                .issuedAt(new Date(System.currentTimeMillis()))
                .expiration(new Date(System.currentTimeMillis()   1000 * 60 * 50)) // 5 minutes expiration time
                .signWith(getSigningKey())
                .compact();
    }

    public Boolean validateToken(String token) {
        return !isTokenExpired(token);
    }
}
*configure the Spring security and add some modifictaion we create the class SecurityConfig.java *
The SecurityConfig class sets up security for the application using Spring Security. It defines access rules, allowing public endpoints while restricting others based on user roles. The class incorporates a JWT filter to validate tokens and uses BCrypt for password encoding. It also configures an authentication manager with a custom user details service for secure user authentication.
package com.tier3Hub.user_auth_service.config;

import com.tier3Hub.user_auth_service.security.JWTFilter;
import com.tier3Hub.user_auth_service.service.UserInfoConfigManager;
import com.tier3Hub.user_auth_service.utils.AppConstants;
import org.springframework.beans.factory.annotation.Autowired;
import org.springframework.context.annotation.Bean;
import org.springframework.context.annotation.Configuration;
import org.springframework.security.authentication.AuthenticationManager;
import org.springframework.security.config.annotation.authentication.builders.AuthenticationManagerBuilder;
import org.springframework.security.config.annotation.authentication.configuration.AuthenticationConfiguration;
import org.springframework.security.config.annotation.web.builders.HttpSecurity;
import org.springframework.security.config.annotation.web.configuration.EnableWebSecurity;
import org.springframework.security.config.annotation.web.configurers.AbstractHttpConfigurer;
import org.springframework.security.crypto.bcrypt.BCryptPasswordEncoder;
import org.springframework.security.crypto.password.PasswordEncoder;
import org.springframework.security.web.SecurityFilterChain;
import org.springframework.security.web.authentication.UsernamePasswordAuthenticationFilter;

@Configuration
@EnableWebSecurity
public class SecurityConfig {
    @Autowired
    private JWTFilter jwtFilter;

    @Autowired
    private UserInfoConfigManager userInfoConfigManager;

    @Bean
    public SecurityFilterChain securityFilterChain(HttpSecurity http) throws Exception {
        return http.authorizeHttpRequests(request -> request
                        .requestMatchers(AppConstants.PUBLIC_URLS).permitAll()
                        .requestMatchers("/api/test/public/hello/**").hasAnyRole("USER","ADMIN")
                        .requestMatchers("/api/test/private/**").hasRole("ADMIN")
                        .anyRequest()
                        .authenticated())
                .csrf(AbstractHttpConfigurer::disable)
                .addFilterBefore(jwtFilter, UsernamePasswordAuthenticationFilter.class)
                .build();
    }

    @Autowired
    public void configureGlobal(AuthenticationManagerBuilder auth) throws Exception {
        auth.userDetailsService(userInfoConfigManager).passwordEncoder(passwordEncoder());
    }

    @Bean
    public PasswordEncoder passwordEncoder() {
        return new BCryptPasswordEncoder();
    }

    @Bean
    public AuthenticationManager authenticationManager(AuthenticationConfiguration auth) throws Exception {
        return auth.getAuthenticationManager();
    }
}
The securityFilterChain method configures access rules for different API endpoints in the Spring application. It permits public URLs and applies role-based access control for user and admin roles. Role-based authentication restricts resource access based on user roles (e.g., USER, ADMIN). In Spring Boot, you define roles and configure security settings in the SecurityConfig class to specify access permissions. During user registration, assign roles, and use annotations like @PreAuthorize to enforce role checks in controllers. This approach enhances security, allows easy permission management, and simplifies user access rights as the application scales. Implementing role-based auth provides flexibility and maintainability for your user management system. CSRF protection is disabled, and a custom JWT filter is added to authenticate requests based on JSON Web Tokens, ensuring secure and controlled access to resources.
configureGlobal method handle configures global authentication settings in a Spring application. It uses a custom user details service for loading user data and a BCrypt password encoder for secure password hashing. Additionally, it provides an AuthenticationManager bean for handling authentication processes, ensuring a secure and efficient user authentication system that leverages strong password management practices.
create the endpoints for register and login
package com.tier3Hub.user_auth_service.Controller;
import com.tier3Hub.user_auth_service.dto.LoginDTO;
import com.tier3Hub.user_auth_service.dto.LoginResponse;
import com.tier3Hub.user_auth_service.dto.RegisterDTO;
import com.tier3Hub.user_auth_service.security.JWTUtil;
import com.tier3Hub.user_auth_service.service.AuthService;
import com.tier3Hub.user_auth_service.service.UserInfoConfigManager;
import com.tier3Hub.user_auth_service.utils.ResponseHandler;
import jakarta.validation.Valid;
import org.springframework.beans.factory.annotation.Autowired;
import org.springframework.http.HttpStatus;
import org.springframework.http.ResponseEntity;
import org.springframework.security.authentication.AuthenticationManager;
import org.springframework.security.authentication.UsernamePasswordAuthenticationToken;
import org.springframework.security.core.Authentication;
import org.springframework.security.core.context.SecurityContext;
import org.springframework.security.core.userdetails.UserDetails;
import org.springframework.web.bind.annotation.PostMapping;
import org.springframework.web.bind.annotation.RequestBody;
import org.springframework.web.bind.annotation.RequestMapping;
import org.springframework.web.bind.annotation.RestController;
@RestController
@RequestMapping("/api/auth")
public class AuthController {
@Autowired
JWTUtil jwtUtil;
@Autowired
AuthService authService;
@Autowired
AuthenticationManager authenticationManager;
@Autowired
private UserInfoConfigManager userInfoConfigManager;
@PostMapping("/register")
public ResponseEntity
This login method in the AuthController handles user login requests. It takes a LoginDTO containing the username and password, validates them, and attempts authentication using the AuthenticationManager. Upon successful authentication, it retrieves user details and generates a JWT token using the JWTUtil class. The token is then included in a LoginResponse object and returned with a success message. If authentication fails, it catches the exception and returns a "Incorrect username or password" response with a 400 status code.
generateToken(String username): This method creates an empty claims map and calls the createToken method with the username as the subject. It serves as the entry point for token generation.
c*reateToken(Map claims, String subject):* This method builds the JWT using the Jwts.builder(). It sets the claims, subject, and token metadata, such as issue date and expiration time (set to 5 minutes). The token is then signed with a secret key and compacted into a string format for transmission.
Testing
now we run the application
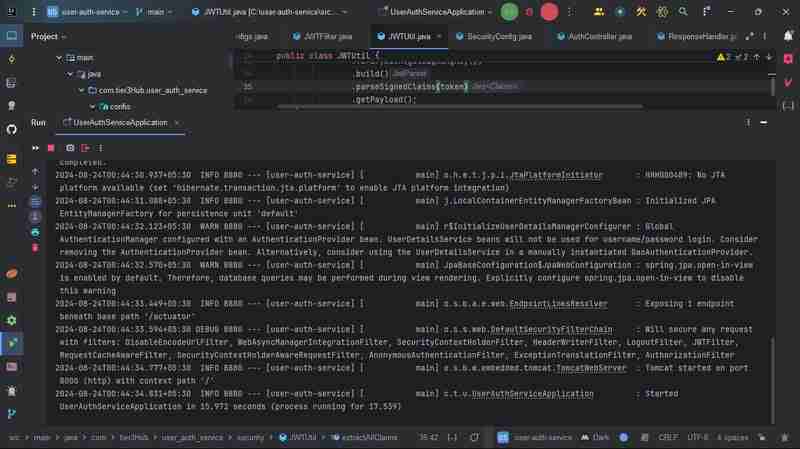
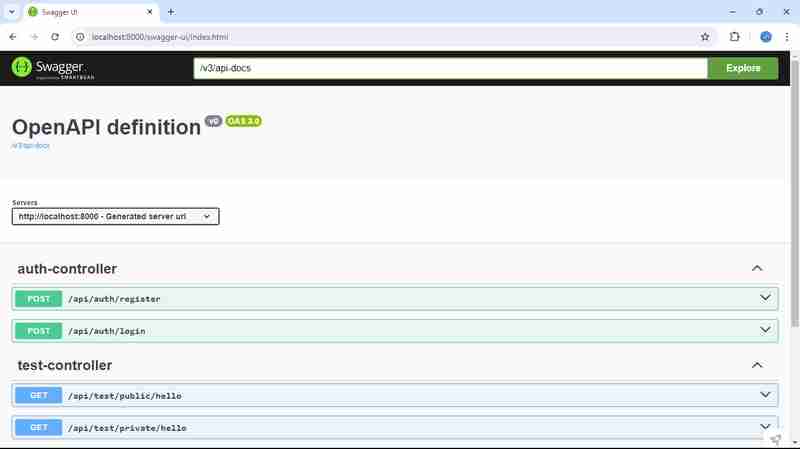
and hit the URL here our application is runing on 8000 port
http://localhost:8000/swagger-ui/index.html
Using Swagger in your project enhances API documentation and testing. It provides a user-friendly interface for developers to explore your APIs, understand request/response structures, and test endpoints directly from the documentation. By integrating Swagger, you enable automatic generation of API docs based on your code annotations, making it easier for both front-end and back-end developers to collaborate efficiently.
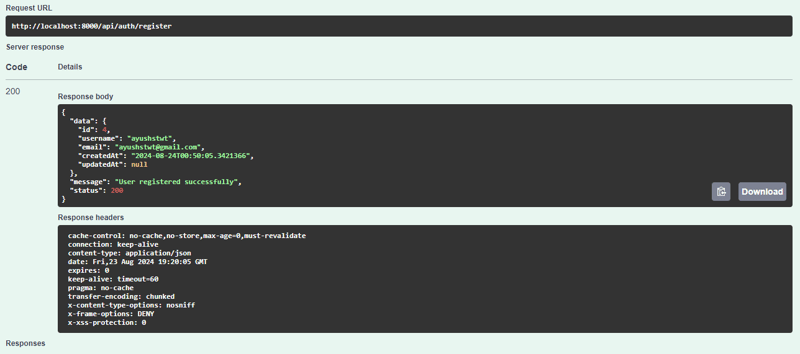
first we register the user
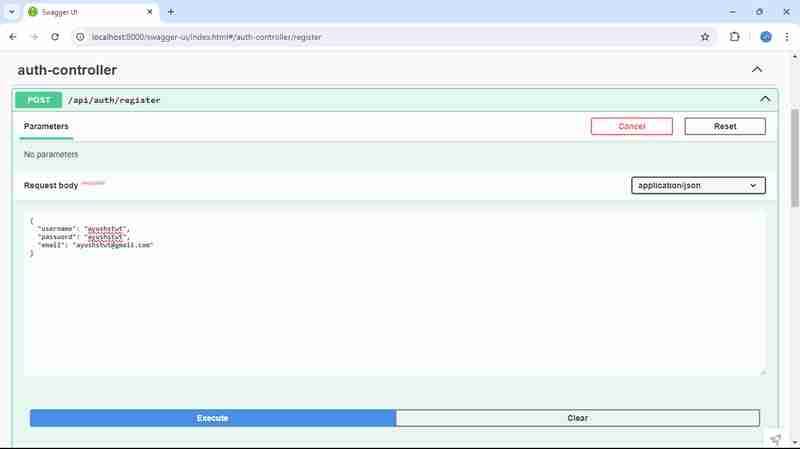
we get the response like this
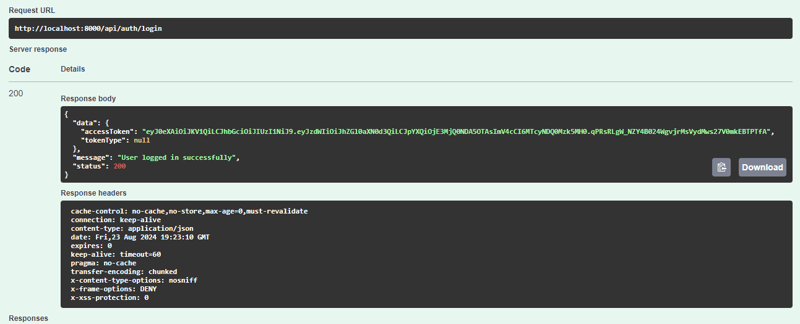
after that we login the user

we get the response like this
Conclusion
The project implements role-based authentication using JWT (JSON Web Tokens) in a Spring Boot application. It features a secure authentication mechanism where users can register and log in, receiving a JWT that grants access based on their assigned roles (like USER or ADMIN). The SecurityConfig class configures access permissions, ensuring that public endpoints are accessible to everyone while restricting sensitive operations to authorized users only. The JWTUtil class handles token creation, validation, and user extraction. Overall, this setup enhances security, enabling seamless and robust access control across the application.
The project employs a comprehensive security framework that leverages Spring Security for user authentication and authorization. The AuthController facilitates user registration and login, generating a JWT upon successful authentication. The application uses a JWTFilter to intercept requests and validate tokens, ensuring that only authenticated users can access protected resources. By integrating role-based access control, the project provides a flexible and secure user management system. This design not only improves security but also enhances user experience by minimizing the need for repeated logins. Overall, it lays a solid foundation for building scalable and secure microservices.
You can explore the complete source code for the User Authentication Service on my GitHub repository. This project showcases various features such as user registration, login, and secure access using JWT for authentication. Feel free to check it out, contribute, or use it as a reference for your own projects!
GitHub Repository: https://github.com/ishrivasayush/user-auth-service
For those interested in diving deeper into JSON Web Tokens (JWT), I recommend visiting jwt.io. This resource provides comprehensive information about JWT, including how it works, its structure, and practical examples. It's an excellent starting point for understanding token-based authentication and authorization, which are essential for modern web applications. Whether you're a beginner or looking to refresh your knowledge, jwt.io offers valuable insights into securely managing user sessions.
-
 如何使用Python的請求和假用戶代理繞過網站塊?如何使用Python的請求模擬瀏覽器行為,以及偽造的用戶代理提供了一個用戶 - 代理標頭一個有效方法是提供有效的用戶式header,以提供有效的用戶 - 設置,該標題可以通過browser和Acterner Systems the equestersystermery和操作系統。通過模仿像Chro...程式設計 發佈於2025-05-14
 -
人臉檢測失敗原因及解決方案:Error -215錯誤處理:解決“ error:( - 215)!empty()in Function openCv in Function MultSiscale中的“檢測”中的錯誤:在功能檢測中。”當Face Cascade分類器(即面部檢測至關重要的組件)未正確加載時,通常會出現此錯誤。 要解決此問題,必...程式設計 發佈於2025-05-14
-
PHP與C++函數重載處理的區別作為經驗豐富的C開發人員脫離謎題,您可能會遇到功能超載的概念。這個概念雖然在C中普遍,但在PHP中構成了獨特的挑戰。讓我們深入研究PHP功能過載的複雜性,並探索其提供的可能性。 在PHP中理解php的方法在PHP中,函數超載的概念(如C等語言)不存在。函數簽名僅由其名稱定義,而與他們的參數列表無關...程式設計 發佈於2025-05-14
-
用戶本地時間格式及時區偏移顯示指南在用戶的語言環境格式中顯示日期/時間,並使用時間偏移在向最終用戶展示日期和時間時,以其localzone and格式顯示它們至關重要。這確保了不同地理位置的清晰度和無縫用戶體驗。以下是使用JavaScript實現此目的的方法。 方法:推薦方法是處理客戶端的Javascript中的日期/時間格式化和...程式設計 發佈於2025-05-14
-
在Python中如何創建動態變量?在Python 中,動態創建變量的功能可以是一種強大的工具,尤其是在使用複雜的數據結構或算法時,Dynamic Variable Creation的動態變量創建。 Python提供了幾種創造性的方法來實現這一目標。 利用dictionaries 一種有效的方法是利用字典。字典允許您動態創建密鑰並...程式設計 發佈於2025-05-14
-
Java是否允許多種返回類型:仔細研究通用方法?在Java中的多個返回類型:一種誤解類型:在Java編程中揭示,在Java編程中,Peculiar方法簽名可能會出現,可能會出現,使開發人員陷入困境,使開發人員陷入困境。 getResult(string s); ,其中foo是自定義類。該方法聲明似乎擁有兩種返回類型:列表和E。但這確實是如此嗎...程式設計 發佈於2025-05-14
-
FastAPI自定義404頁面創建指南response = await call_next(request) if response.status_code == 404: return RedirectResponse("https://fastapi.tiangolo.com") else: ...程式設計 發佈於2025-05-14
-
Go語言如何動態發現導出包類型?與反射軟件包中的有限類型的發現能力相反,本文探討了在運行時發現所有包裝類型(尤其是struntime go import( “ FMT” “去/進口商” ) func main(){ pkg,err:= incorter.default()。導入(“ time”) ...程式設計 發佈於2025-05-14
-
在Java中使用for-to-loop和迭代器進行收集遍歷之間是否存在性能差異?For Each Loop vs. Iterator: Efficiency in Collection TraversalIntroductionWhen traversing a collection in Java, the choice arises between using a for-...程式設計 發佈於2025-05-14
-
Async Void vs. Async Task在ASP.NET中:為什麼Async Void方法有時會拋出異常?在ASP.NET async void void async void void void void void的設計無需返回asynchroncon而無需返回任務對象。他們在執行過程中增加未償還操作的計數,並在完成後減少。在某些情況下,這種行為可能是有益的,例如未期望或明確預期操作結果的火災和...程式設計 發佈於2025-05-14
-
如何解決由於Android的內容安全策略而拒絕加載腳本... \”錯誤?Unveiling the Mystery: Content Security Policy Directive ErrorsEncountering the enigmatic error "Refused to load the script..." when deployi...程式設計 發佈於2025-05-14
-
在Ubuntu/linux上安裝mysql-python時,如何修復\“ mysql_config \”錯誤?mysql-python安裝錯誤:“ mysql_config找不到”“ 由於缺少MySQL開發庫而出現此錯誤。解決此問題,建議在Ubuntu上使用該分發的存儲庫。使用以下命令安裝Python-MysqldB: sudo apt-get安裝python-mysqldb sudo pip in...程式設計 發佈於2025-05-14
-
C++20 Consteval函數中模板參數能否依賴於函數參數?[ consteval函數和模板參數依賴於函數參數在C 17中,模板參數不能依賴一個函數參數,因為編譯器仍然需要對非contexexpr futcoriations contim at contexpr function進行評估。 compile time。 C 20引入恆定函數,必須在編譯時進...程式設計 發佈於2025-05-14
-
如何使用Python理解有效地創建字典?在python中,詞典綜合提供了一種生成新詞典的簡潔方法。儘管它們與列表綜合相似,但存在一些顯著差異。 與問題所暗示的不同,您無法為鑰匙創建字典理解。您必須明確指定鍵和值。 For example:d = {n: n**2 for n in range(5)}This creates a dict...程式設計 發佈於2025-05-14
-
如何同步迭代並從PHP中的兩個等級陣列打印值?同步的迭代和打印值來自相同大小的兩個數組使用兩個數組相等大小的selectbox時,一個包含country代碼的數組,另一個包含鄉村代碼,另一個包含其相應名稱的數組,可能會因不當提供了exply for for for the uncore for the forsion for for ytry...程式設計 發佈於2025-05-14


學習中文
- 1 走路用中文怎麼說? 走路中文發音,走路中文學習
- 2 坐飛機用中文怎麼說? 坐飞机中文發音,坐飞机中文學習
- 3 坐火車用中文怎麼說? 坐火车中文發音,坐火车中文學習
- 4 坐車用中文怎麼說? 坐车中文發音,坐车中文學習
- 5 開車用中文怎麼說? 开车中文發音,开车中文學習
- 6 游泳用中文怎麼說? 游泳中文發音,游泳中文學習
- 7 騎自行車用中文怎麼說? 骑自行车中文發音,骑自行车中文學習
- 8 你好用中文怎麼說? 你好中文發音,你好中文學習
- 9 謝謝用中文怎麼說? 谢谢中文發音,谢谢中文學習
- 10 How to say goodbye in Chinese? 再见Chinese pronunciation, 再见Chinese learning


