
React - 伺服器操作
 瀏覽:901
React form Actions.
React has introduced new form Actions and related hooks to enhance native forms and streamline client-server communication. These features enable developers to handle form submissions more effectively, improving both user experience and code maintainability. For an in-depth exploration of React form Actions, you can refer to my detailed post on my post about React Form Actions.
Server Actions
With React 18, the Server Components feature was introduced. Server components are not Server-Side Rendering (SSR), Server Components are executed exclusively on the server during both runtime and build time. These components can access server-side resources, such as databases and the file system, but they are not capable of performing client-side actions like event listeners or hooks.
Prerequisites
To demonstrate the capabilities of Server Components and Server Actions, we'll use Next.js and Prisma.
Next.js is a React framework for building full-stack web applications. You use React Components to build user interfaces, and Next.js for additional features and optimizations. Under the hood, Next.js also abstracts and automatically configures tooling needed for React, like bundling, compiling, and more. This allows you to focus on building your application instead of spending time with configuration. learn more
Prisma is an ORM that simplifies database access and operations, allowing you to query and manipulate data without writing SQL. Learn more
Initial Setup
Start by creating a new Next.js application:
yarn create next-app server-example
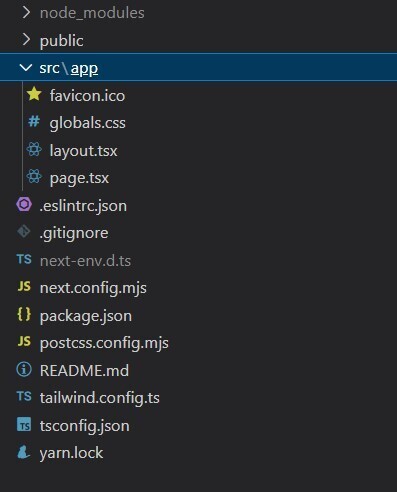
Your initial folder structure will look like this:
Upgrade to the Canary Release to access React 19 features, including Server Actions:
yarn add next@rc react@rc react-dom@rc
install Prisma
yarn add prisma
Prisma Configuration
Create a Prisma schema file at src/lib/prisma/schema.prisma:
generator client {
  provider = "prisma-client-js"
}

datasource db {
  provider = "sqlite"
  url      = "file:./dev.db"
}

model User {
  id    Int     @id @default(autoincrement())
  email String  @unique
  name  String?
  age Int
}
For demonstration purposes, we are using SQLite. For production, you should use a more robust database.
Next, add a Prisma client file at src/lib/prisma/prisma.ts
// ts-ignore 7017 is used to ignore the error that the global object is not
// defined in the global scope. This is because the global object is only
// defined in the global scope in Node.js and not in the browser.

import { PrismaClient } from '@prisma/client'

// PrismaClient is attached to the `global` object in development to prevent
// exhausting your database connection limit.
//
// Learn more:
// https://pris.ly/d/help/next-js-best-practices

const globalForPrisma = global as unknown as { prisma: PrismaClient }

export const prisma = globalForPrisma.prisma || new PrismaClient()

if (process.env.NODE_ENV !== 'production') globalForPrisma.prisma = prisma

export default prisma
Configure Prisma in package.json:
{
  //other settings
  "prisma": {
    "schema": "src/lib/prisma/schema.prisma",
    "seed": "ts-node src/lib/prisma/seed.ts"
  }
}
And update TypeScript settings in tsconfig.json:
{
  //Other settings here...

  "ts-node": {
    // these options are overrides used only by ts-node
    // same as the --compilerOptions flag and the
    // TS_NODE_COMPILER_OPTIONS environment variable
    "compilerOptions": {
      "module": "commonjs"
    }
  }
}
Install ts-node globally:
yarn global add ts-node
Seeding Initial Data
Add a seed file at src/lib/prisma/seed.ts to populate initial data:
import { PrismaClient } from "@prisma/client";
const prisma = new PrismaClient();
async function main() {
  await prisma.user.create({
    email: "[email protected]",
    name: "Anto",
    age: 35,
  });
  await prisma.user.create({
    email: "[email protected]",
    name: "Vinish",
    age: 32,
  });
}
main()
  .then(async () => {
    await prisma.$disconnect();
  })
  .catch(async (e) => {
    console.error(e);
    await prisma.$disconnect();
    process.exit(1);
  });
Install Prisma client
yarn add @prisma/client
Run the migration command:
yarn prisma migrate dev --name init
If the seed data is not reflected, add it manually:
yarn prisma db seed
Great! Since the installations are ready, you can create an actions file that performs database operations.
Creating Server Actions
Server Actions are a powerful feature that enables seamless client-server intercommunication. Let's create a file for database operations at src/actions/user.ts:
"use server";
import prisma from '@/lib/prisma/prisma'
import { revalidatePath } from "next/cache";

// export type for user
export type User = {
  id: number;
  name: string | null;
  email: string;
  age: number;
};


export async function createUser(user: any) {
  const resp = await prisma.user.create({ data: user });
  console.log("server Response");
  revalidatePath("/");
  return resp;
}

export async function getUsers() {
  return await prisma.user.findMany();
}

export async function deleteUser(id: number) {
  await prisma.user.delete({
    where: {
      id: id,
    },
  });
  revalidatePath("/");
}
Implementing Server Components
Let's create a React server component to read and render data from the database. Create src/app/serverexample/page.tsx:
import UserList from "./Users";
import "./App.css"

export default async function ServerPage() {
  return (


  );
}
Add some styling in src/app/serverexample/App.css
.App {
  text-align: center;
}

.App-logo {
  height: 40vmin;
  pointer-events: none;
}

.App-header {
  background-color: #282c34;
  min-height: 100vh;
  display: flex;
  flex-direction: column;
  align-items: center;
  justify-content: center;
  font-size: calc(10px   2vmin);
  color: white;
}

input {
  color: #000;
}

.App-link {
  color: #61dafb;
}
Create components to fetch and render the user list:
src/app/serverexample/UserList.tsx
import { getUsers } from "@/actions/user";
import { UserDetail } from "./UserDetail";
export default async function UserList() {
//Api call to fetch User details
const users = await getUsers();
return (
{users.length ? (
users.map((user) =>
src/app/serverexample/UserDetail.tsx
export function UserDetail({ user }) {
  return (


        {user.name}

          {user.email}


  );
}
{user.name}
{user.email}
);
}
Run the development server:
yarn dev
Navigate to http://localhost:3000/serverexample to see the rendered user list:
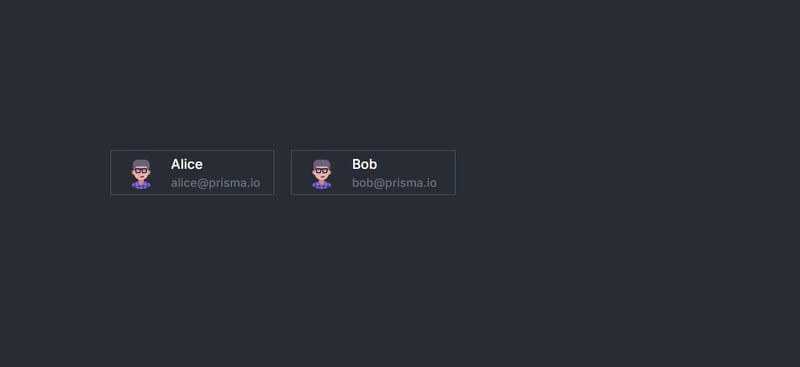
By default, components in Next.js are server components unless you specify the "use client" directive. Notice two important points:
- Async Component Definition: Server components can be asynchronous as they do not re-render and are only generated once.
- Data Fetching: The line const users = await getUsers(); fetches data from the server and renders it at runtime.
Exploring Server Actions
Server Actions enable seamless client-server intercommunication. Let's add a form to create new users.
Create a new file at src/app/serverexample/AddUser.tsx:
"use client";
import "./app.css";
import { useActionState } from "react";
import { createUser } from "../../actions/user";
const initialState = {
error: undefined,
};
export default function AddUser() {
const submitHandler = async (_previousState: object, formData: FormData) => {
try {
// This is the Server Action method that transfers the control
// Back to the server to do DB operations and get back the result.
const response = await createUser({
name: formData.get("name") as string,
email: formData.get("email") as string,
age: parseInt(formData.get("age") as string),
});
return { response };
} catch (error) {
return { error };
}
};
const [state, submitAction, isPending] = useActionState(
submitHandler,
initialState
);
return (
Add new User
{" "}
);
}
Update src/app/serverexample/page.tsx to include the AddUser component:
import UserList from "./UserList";
// Import new line
import AddUser from "./AddUser";
import "./App.css"
export default async function ServerPage() {
return (
);
}
Running the application will now allow you to add new users via the form, with server-side processing handled seamlessly.
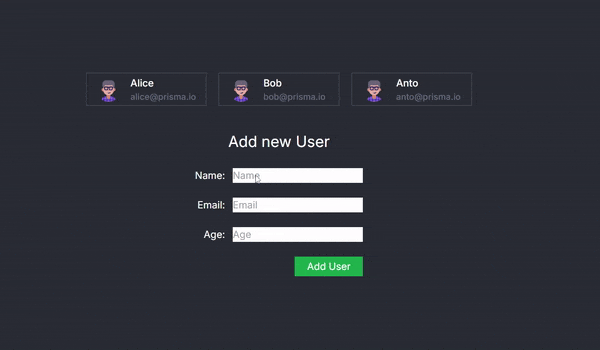
The AddUser Component and Seamless Client-Server Interaction
The AddUser component is at the heart of this example, showcasing how React Server Actions can revolutionize the way we handle client-server interactions. This component renders a form for adding new users and leverages the useActionState hook to create a smooth and seamless bridge between the client-side interface and server-side operations.
How It Works
- Form Rendering and Data Handling:
- The AddUser component provides a form where users can input their name, email, and age.
- Upon form submission, the data is captured and prepared to be sent to the server.
- useActionState Hook:
- The useActionState hook is a crucial part of this setup. It simplifies the complexity of managing client-side state and server-side actions by abstracting them into a unified interface.
- This hook accepts an asynchronous handler function, which processes the form data and then calls a Server Action method.
- The brilliance of this approach lies in its abstraction: it feels as though you’re invoking a regular function within the same file, even though it actually triggers a server-side operation.
- Server Action Method:
- The createUser function, defined as a Server Action, executes on the server side. It takes the user data from the form, performs the necessary database operations via Prisma, and returns the result.
- This server-side method is crucial for maintaining a clean separation between the client and server, while still enabling them to communicate effectively.
- Seamless Integration:
From the perspective of a developer working on the client side, it appears as if the form submission is handled locally. However, the heavy lifting such as database manipulation occurs on the server.
The useActionState hook encapsulates this process, managing the state transitions and handling errors, while maintaining an intuitive API for developers.
Server Actions Without Forms
So that's with forms, now lets test an example without forms.
update src/app/serverexample/UserDetail.tsx
"use client";
import { deleteUser } from "@/actions/user";
import { useTransition } from "react";

export function UserDetail({ user }) {
  const [pending, startTransition] = useTransition();

  const handleDelete = () => {
    startTransition(() => {
      deleteUser(user.id);
    });
  };

  return (

      {pending ? (
        Deleting...
      ) : (


            {user.name}

              {user.email}


        >
      )}

  );
}
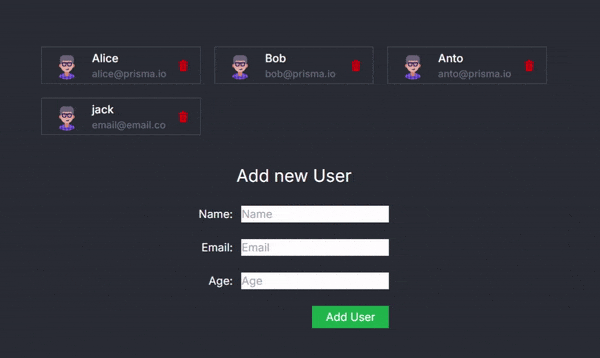
Key Points:
- Server Action: deleteUser(user.id) is a server action that removes the user from the database. This operation is triggered without any form submission.
- useTransition: This hook allows you to manage the asynchronous state of the deletion process, showing a "Deleting..." message while the operation is in progress.
- User Interface: The component maintains a clean UI, dynamically updating based on the action status.
Now, you can seamlessly delete a user within the application:
Conclusion
This approach is transformative because it abstracts away the complexities of client-server communication. Traditionally, such interactions would require handling API endpoints, managing asynchronous requests, and carefully coordinating client-side state with server responses. With React Server Actions and the useActionState hook, this complexity is reduced, allowing developers to focus more on building features rather than worrying about the underlying infrastructure.
By using this pattern, you gain:
- Cleaner Code: The client-side code remains simple and focused, without the need for explicit API calls.
- Improved Developer Experience: Server-side operations are seamlessly integrated, reducing cognitive load and potential for errors.
- Enhanced Performance: Server Actions are optimized for performance, reducing unnecessary client-server round trips and ensuring that server-side resources are used efficiently.
You can find the full code in the repository
-
 PHP陣列鍵值異常:了解07和08的好奇情況PHP數組鍵值問題,使用07&08 在給定數月的數組中,鍵值07和08呈現令人困惑的行為時,就會出現一個不尋常的問題。運行print_r($月)返回意外結果:鍵“ 07”丟失,而鍵“ 08”分配給了9月的值。 此問題源於PHP對領先零的解釋。當一個數字帶有0(例如07或08)的前綴時,PHP將...程式設計 發佈於2025-07-01
 -
解決Spring Security 4.1及以上版本CORS問題指南彈簧安全性cors filter:故障排除常見問題 在將Spring Security集成到現有項目中時,您可能會遇到與CORS相關的錯誤,如果像“訪問Control-allo-allow-Origin”之類的標頭,則無法設置在響應中。為了解決此問題,您可以實現自定義過濾器,例如代碼段中的MyFi...程式設計 發佈於2025-07-01
-
為什麼儘管有效代碼,為什麼在PHP中捕獲輸入?在php ;?>" method="post">The intention is to capture the input from the text box and display it when the submit button is clicked.但是,輸出...程式設計 發佈於2025-07-01
-
MySQL中如何高效地根據兩個條件INSERT或UPDATE行?在兩個條件下插入或更新或更新 solution:的答案在於mysql的插入中...在重複鍵更新語法上。如果不存在匹配行或更新現有行,則此功能強大的功能可以通過插入新行來進行有效的數據操作。如果違反了唯一的密鑰約束。 實現所需的行為,該表必須具有唯一的鍵定義(在這種情況下為'名稱'...程式設計 發佈於2025-07-01
-
如何同步迭代並從PHP中的兩個等級陣列打印值?同步的迭代和打印值來自相同大小的兩個數組使用兩個數組相等大小的selectbox時,一個包含country代碼的數組,另一個包含鄉村代碼,另一個包含其相應名稱的數組,可能會因不當提供了exply for for for the uncore for the forsion for for ytry...程式設計 發佈於2025-07-01
-
在Pandas中如何將年份和季度列合併為一個週期列?pandas data frame thing commans date lay neal and pree pree'和pree pree pree”,季度 2000 q2 這個目標是通過組合“年度”和“季度”列來創建一個新列,以獲取以下結果: [python中的concate...程式設計 發佈於2025-07-01
-
如何修復\“常規錯誤:2006 MySQL Server在插入數據時已經消失\”?How to Resolve "General error: 2006 MySQL server has gone away" While Inserting RecordsIntroduction:Inserting data into a MySQL database can...程式設計 發佈於2025-07-01
-
左連接為何在右表WHERE子句過濾時像內連接?左JOIN CONUNDRUM:WITCHING小時在數據庫Wizard的領域中變成內在的加入很有趣,當將c.foobar條件放置在上面的Where子句中時,據說左聯接似乎會轉換為內部連接。僅當滿足A.Foo和C.Foobar標準時,才會返回結果。 為什麼要變形?關鍵在於其中的子句。當左聯接的右側...程式設計 發佈於2025-07-01
-
同實例無需轉儲複製MySQL數據庫方法在同一實例上複製一個MySQL數據庫而無需轉儲在同一mySQL實例上複製數據庫,而無需創建InterMediate sqql script。以下方法為傳統的轉儲和IMPORT過程提供了更簡單的替代方法。 直接管道數據 MySQL手動概述了一種允許將mysqldump直接輸出到MySQL cli...程式設計 發佈於2025-07-01
-
如何在Java字符串中有效替換多個子字符串?在java 中有效地替換多個substring,需要在需要替換一個字符串中的多個substring的情況下,很容易求助於重複應用字符串的刺激力量。 However, this can be inefficient for large strings or when working with nu...程式設計 發佈於2025-07-01
-
eval()vs. ast.literal_eval():對於用戶輸入,哪個Python函數更安全?稱量()和ast.literal_eval()中的Python Security 在使用用戶輸入時,必須優先確保安全性。強大的Python功能Eval()通常是作為潛在解決方案而出現的,但擔心其潛在風險。本文深入研究了eval()和ast.literal_eval()之間的差異,突出顯示其安全性含義...程式設計 發佈於2025-07-01
-
如何簡化PHP中的JSON解析以獲取多維陣列?php 試圖在PHP中解析JSON數據的JSON可能具有挑戰性,尤其是在處理多維數組時。 To simplify the process, it's recommended to parse the JSON as an array rather than an object.To do...程式設計 發佈於2025-07-01
-
編譯器報錯“usr/bin/ld: cannot find -l”解決方法錯誤:“ usr/bin/ld:找不到-l “ 此錯誤表明鏈接器在鏈接您的可執行文件時無法找到指定的庫。為了解決此問題,我們將深入研究如何指定庫路徑並將鏈接引導到正確位置的詳細信息。 添加庫搜索路徑的一個可能的原因是,此錯誤是您的makefile中缺少庫搜索路徑。要解決它,您可以在鏈接器命令中添...程式設計 發佈於2025-07-01
-
為什麼不使用CSS`content'屬性顯示圖像?在Firefox extemers屬性為某些圖像很大,&& && && &&華倍華倍[華氏華倍華氏度]很少見,卻是某些瀏覽屬性很少,尤其是特定於Firefox的某些瀏覽器未能在使用內容屬性引用時未能顯示圖像的情況。這可以在提供的CSS類中看到:。 googlepic { 內容:url(&...程式設計 發佈於2025-07-01
-
如何從PHP中的Unicode字符串中有效地產生對URL友好的sl。為有效的slug生成首先,該函數用指定的分隔符替換所有非字母或數字字符。此步驟可確保slug遵守URL慣例。隨後,它採用ICONV函數將文本簡化為us-ascii兼容格式,從而允許更廣泛的字符集合兼容性。 接下來,該函數使用正則表達式刪除了不需要的字符,例如特殊字符和空格。此步驟可確保slug僅包...程式設計 發佈於2025-07-01


學習中文
- 1 走路用中文怎麼說? 走路中文發音,走路中文學習
- 2 坐飛機用中文怎麼說? 坐飞机中文發音,坐飞机中文學習
- 3 坐火車用中文怎麼說? 坐火车中文發音,坐火车中文學習
- 4 坐車用中文怎麼說? 坐车中文發音,坐车中文學習
- 5 開車用中文怎麼說? 开车中文發音,开车中文學習
- 6 游泳用中文怎麼說? 游泳中文發音,游泳中文學習
- 7 騎自行車用中文怎麼說? 骑自行车中文發音,骑自行车中文學習
- 8 你好用中文怎麼說? 你好中文發音,你好中文學習
- 9 謝謝用中文怎麼說? 谢谢中文發音,谢谢中文學習
- 10 How to say goodbye in Chinese? 再见Chinese pronunciation, 再见Chinese learning


