
React登入頁面範本原始碼
 瀏覽:938
In today's web development landscape, creating an engaging and user-friendly login page is crucial for any application. This article will guide you through the process of building a feature-rich, swipeable login page using React. We'll create a modern, responsive design that seamlessly transitions between login and signup modes, complete with animated transitions and social media login options.
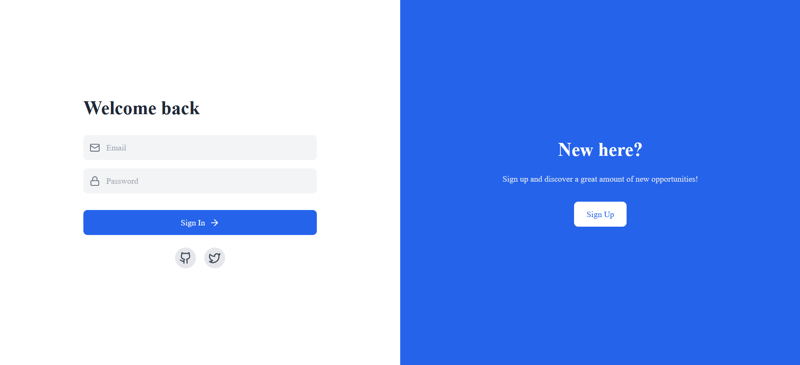
Preview of Login Page
Preview of SignUp Page

Setting Up the Project
First, ensure you have React set up in your project. We'll also be using a few additional libraries:
- Framer Motion for animations
- Lucide React for icons
- Tailwind CSS for styling
You can install these dependencies using npm or yarn:
npm install react framer-motion lucide-react
# or
yarn add react framer-motion lucide-react
Make sure you have Tailwind CSS configured in your project as well.
Creating the Login/Signup Component
Let's start by creating our main component, LoginSignupPage. This component will handle the state and rendering of our login/signup form.
import React, { useState } from 'react';
import { motion, AnimatePresence } from 'framer-motion';
import { Mail, Lock, User, ArrowRight, Github, Twitter } from 'lucide-react';

const LoginSignupPage = () => {
  const [isLogin, setIsLogin] = useState(true);
  const [email, setEmail] = useState('');
  const [password, setPassword] = useState('');
  const [name, setName] = useState('');

  const toggleMode = () => setIsLogin(!isLogin);

  // ... (rest of the component)
};

export default LoginSignupPage;
Here, we're importing the necessary dependencies and setting up our component with state variables for the form fields and a toggle for switching between login and signup modes.
Creating Reusable Input Fields
To keep our code DRY (Don't Repeat Yourself), let's create a reusable InputField component:
const InputField = ({ icon: Icon, placeholder, type, value, onChange }) => (
This component takes an icon, placeholder text, input type, value, and onChange function as props. It renders a styled input field with an icon, making our form look sleek and consistent.
Building the Form
Now, let's create the main structure of our login/signup form:
return ();{/* ... (right side panel) */}{isLogin ? 'Welcome back' : 'Create account'}
{!isLogin && ({/* ... (submit button and social login options) */}setName(e.target.value)} /> )} setEmail(e.target.value)} /> setPassword(e.target.value)} />
This code creates a responsive layout with the form on the left side. We use Framer Motion's AnimatePresence and motion.div to add smooth transitions when switching between login and signup modes.
Adding the Submit Button and Social Login Options
Let's add a submit button and social login options to our form:
{isLogin && ()}
This code adds a submit button that changes color and text based on the current mode (login or signup). For the login mode, we also add social login options for GitHub and Twitter.
Creating the Swipeable Side Panel
To complete our swipeable login page, let's add a side panel that allows users to switch between login and signup modes:
{isLogin ? 'New here?' : 'Already have an account?'}
{isLogin ? 'Sign up and discover a great amount of new opportunities!' : 'Sign in to access your account and continue your journey!'}
This side panel changes its content and color based on the current mode. The button allows users to switch between login and signup modes, triggering the toggleMode function we defined earlier.
Adding Animations
To make our login page more engaging, we've used Framer Motion for animations. Here's how we defined the animation variants:
const formVariants = {
  hidden: { opacity: 0, x: -30 },
  visible: { opacity: 1, x: 0 },
};
These variants are applied to the motion.div wrapping our form, creating a smooth transition effect when switching between login and signup modes.
Conclusion
By following this guide, you've created a feature-rich, swipeable login page using React. This login page includes:
- Responsive design that works on both mobile and desktop
- Smooth animations when switching between login and signup modes
- Reusable input components with icons
- Social login options
- A swipeable side panel for easy mode switching
This modern and engaging login page will provide a great user experience for your application. Remember to add proper form validation and connect the form submission to your backend authentication system to complete the functionality.
Feel free to customize the colors, add more fields, or incorporate additional features to make this login page perfect for your specific project needs!
Frequently Asked Questions (FAQs)
After reading this article, both beginners and senior developers might have some questions. Here are some common FAQs:
For Beginners:
Q: Do I need to know Tailwind CSS to implement this login page?
A: While the example uses Tailwind CSS for styling, you don't necessarily need to use it. You can replace the Tailwind classes with your own CSS styles. However, learning Tailwind CSS can speed up your development process.Q: What is Framer Motion, and is it necessary for this project?
A: Framer Motion is a popular animation library for React. It's used in this project to create smooth transitions between login and signup modes. While not strictly necessary, it greatly enhances the user experience. You can implement the login page without animations if you prefer.Q: How do I handle form submission and validation?
A: This example doesn't include form submission or validation. You'll need to add an onSubmit handler to the form and implement validation logic. Consider using libraries like Formik or react-hook-form for more complex form handling.Q: Can I use this login page with any backend?
A: Yes, this login page is frontend-only and can be integrated with any backend. You'll need to modify the form submission logic to send requests to your specific backend API.Q: How can I add more social login options?
A: To add more social login options, you can create additional buttons similar to the GitHub and Twitter buttons. You'll need to implement the actual authentication logic for each provider separately.
For Senior Developers:
-
Q: How can this component be optimized for performance?
A: Some optimization strategies include:- Memoizing the InputField component with React.memo
- Using the useCallback hook for event handlers
- Implementing code-splitting to load social login components on demand
-
Q: What considerations should be made for accessibility?
A: To improve accessibility:- Add proper aria labels to inputs and buttons
- Ensure correct heading hierarchy
- Implement keyboard navigation for the swipeable interface
- Provide text alternatives for icon-only buttons
-
Q: How can this component be made more reusable across different projects?
A: To increase reusability:- Extract the color scheme and styling into a theme configuration
- Create a higher-order component or custom hook to handle authentication logic
- Use environment variables for API endpoints and client IDs
-
Q: What testing strategies would you recommend for this component?
A: Consider implementing:- Unit tests for individual components using Jest and React Testing Library
- Integration tests for form submission and mode switching
- End-to-end tests using Cypress or Playwright to test the full user flow
-
Q: How would you handle state management for a larger application incorporating this login page?
A: For larger applications, consider:- Using Context API for local state management
- Implementing Redux or MobX for global state management
- Utilizing React Query or SWR for server state management
-
Q: What security considerations should be taken into account?
A: Important security considerations include:- Implementing HTTPS for all communications
- Using secure HTTP-only cookies for storing authentication tokens
- Implementing CSRF protection
- Rate limiting login attempts to prevent brute force attacks
- Considering two-factor authentication options
This article will really helpful for beginners !! Happy Coding❣️.
-
 左連接為何在右表WHERE子句過濾時像內連接?左JOIN CONUNDRUM:WITCHING小時在數據庫Wizard的領域中變成內在的加入很有趣,當將c.foobar條件放置在上面的Where子句中時,據說左聯接似乎會轉換為內部連接。僅當滿足A.Foo和C.Foobar標準時,才會返回結果。 為什麼要變形?關鍵在於其中的子句。當左聯接的右側...程式設計 發佈於2025-06-14
 -
如何從PHP中的Unicode字符串中有效地產生對URL友好的sl。為有效的slug生成首先,該函數用指定的分隔符替換所有非字母或數字字符。此步驟可確保slug遵守URL慣例。隨後,它採用ICONV函數將文本簡化為us-ascii兼容格式,從而允許更廣泛的字符集合兼容性。 接下來,該函數使用正則表達式刪除了不需要的字符,例如特殊字符和空格。此步驟可確保slug僅包...程式設計 發佈於2025-06-14
-
在程序退出之前,我需要在C ++中明確刪除堆的堆分配嗎?在C中的顯式刪除 在C中的動態內存分配時,開發人員通常會想知道是否有必要在heap-procal extrable exit exit上進行手動調用“ delete”操作員,但開發人員通常會想知道是否需要手動調用“ delete”操作員。本文深入研究了這個主題。 在C主函數中,使用了動態分配變量(...程式設計 發佈於2025-06-14
-
如何使用Regex在PHP中有效地提取括號內的文本php:在括號內提取文本在處理括號內的文本時,找到最有效的解決方案是必不可少的。一種方法是利用PHP的字符串操作函數,如下所示: 作為替代 $ text ='忽略除此之外的一切(text)'; preg_match('#((。 &&& [Regex使用模式來搜索特...程式設計 發佈於2025-06-14
-
如何限制動態大小的父元素中元素的滾動範圍?在交互式接口中實現垂直滾動元素的CSS高度限制問題:考慮一個佈局,其中我們具有與用戶垂直滾動一起移動的可滾動地圖div,同時與固定的固定sidebar保持一致。但是,地圖的滾動無限期擴展,超過了視口的高度,阻止用戶訪問頁面頁腳。 $("#map").css({ margin...程式設計 發佈於2025-06-14
-
如何使用Depimal.parse()中的指數表示法中的數字?在嘗試使用Decimal.parse(“ 1.2345e-02”中的指數符號表示法表示的字符串時,您可能會遇到錯誤。這是因為默認解析方法無法識別指數符號。 成功解析這樣的字符串,您需要明確指定它代表浮點數。您可以使用numbersTyles.Float樣式進行此操作,如下所示:[&& && && ...程式設計 發佈於2025-06-14
-
如何使用Java.net.urlConnection和Multipart/form-data編碼使用其他參數上傳文件?使用http request 上傳文件上傳到http server,同時也提交其他參數,java.net.net.urlconnection and Multipart/form-data Encoding是普遍的。 Here's a breakdown of the process:Mu...程式設計 發佈於2025-06-14
-
如何有效地轉換PHP中的時區?在PHP 利用dateTime對象和functions DateTime對象及其相應的功能別名為時區轉換提供方便的方法。例如: //定義用戶的時區 date_default_timezone_set('歐洲/倫敦'); //創建DateTime對象 $ dateTime = ne...程式設計 發佈於2025-06-14
-
如何使用“ JSON”軟件包解析JSON陣列?parsing JSON與JSON軟件包 QUALDALS:考慮以下go代碼:字符串 } func main(){ datajson:=`[“ 1”,“ 2”,“ 3”]`` arr:= jsontype {} 摘要:= = json.unmarshal([] byte(...程式設計 發佈於2025-06-14
-
可以在純CS中將多個粘性元素彼此堆疊在一起嗎?[2这里: https://webthemez.com/demo/sticky-multi-header-scroll/index.html </main> <section> { display:grid; grid-template-...程式設計 發佈於2025-06-14
-
哪種方法更有效地用於點 - 填點檢測:射線跟踪或matplotlib \的路徑contains_points?在Python Matplotlib's path.contains_points FunctionMatplotlib's path.contains_points function employs a path object to represent the polygon.它...程式設計 發佈於2025-06-14
-
CSS強類型語言解析您可以通过其强度或弱输入的方式对编程语言进行分类的方式之一。在这里,“键入”意味着是否在编译时已知变量。一个例子是一个场景,将整数(1)添加到包含整数(“ 1”)的字符串: result = 1 "1";包含整数的字符串可能是由带有许多运动部件的复杂逻辑套件无意间生成的。它也可以是故意从单个真理...程式設計 發佈於2025-06-14
-


學習中文
- 1 走路用中文怎麼說? 走路中文發音,走路中文學習
- 2 坐飛機用中文怎麼說? 坐飞机中文發音,坐飞机中文學習
- 3 坐火車用中文怎麼說? 坐火车中文發音,坐火车中文學習
- 4 坐車用中文怎麼說? 坐车中文發音,坐车中文學習
- 5 開車用中文怎麼說? 开车中文發音,开车中文學習
- 6 游泳用中文怎麼說? 游泳中文發音,游泳中文學習
- 7 騎自行車用中文怎麼說? 骑自行车中文發音,骑自行车中文學習
- 8 你好用中文怎麼說? 你好中文發音,你好中文學習
- 9 謝謝用中文怎麼說? 谢谢中文發音,谢谢中文學習
- 10 How to say goodbye in Chinese? 再见Chinese pronunciation, 再见Chinese learning


