
將 Stripe 整合到單一產品 Django Python 商店中
 瀏覽:751
In the first part of this series, we created a Django online shop with htmx.
In this second part, we'll handle orders using Stripe.
What We'll Do
We'll integrate Stripe to handle payments securely. This is what we want to achieve:
- In the purchase view, we start by creating a Stripe checkout session and redirect the customer to the corresponding URL. This is where we tell Stripe about the product we are selling, its quantity, and where the customer should be redirected to after a successful purchase (the success_url).
- The customer fills in their payment details on the Stripe checkout page and completes the payment. Stripe then makes a POST request to a webhook endpoint on our website, where we listen to events and process them accordingly. If the payment is successful, we save the order in our database and notify the customer (and our staff users) about the purchase.
- Finally, if the webhook returns a response with a 200 OK HTTP status code, Stripe redirects to the success_url created in the first step.
Setting Up Stripe for Our Django Python Store
We first need to jump over to Stripe and do the following:
- Create a Stripe account.
- Create a product (with a payment id).
- Create a webhook.
1: Create a Stripe Account
Start by creating a Stripe account. For now, you don’t really need to activate your account. You can just work in test mode, which will prevent you from making real payments while testing. Go to the API keys page and retrieve the publishable and secret keys. Save them in your project environment variables (STRIPE_PUBLISHABLE_KEY and STRIPE_SECRET_KEY). We will use these keys to authenticate your Stripe requests.
2: Create Your Product
Create a new product on the products page. Fill out the details and set the payment type to one-off. Your product should look something like this:
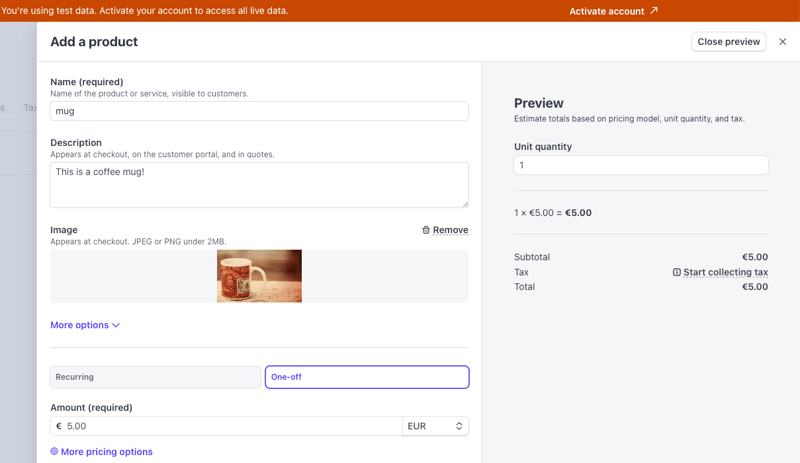
Once you press Add product, you should be able to see your product on the product list. If you click on it and scroll down to the Pricing section, you can find the API ID for the price item you created — it should be something like price_3ODP5…. Save it in an environment variable (STRIPE_PRICE_ID): you will need this when creating the Stripe checkout session.
3: Create the Webhook
We need to create a webhook endpoint for Stripe to call when a payment completes. In the webhooks page, choose to test in the local environment. This will allow you to forward the request to a local URL, like http://127.0.0.1:8000. Start by downloading the Stripe CLI. Then, you can:
- Log into Stripe
stripe login
- Forward events to the webhook endpoint that you will create:
stripe listen --forward-to http://127.0.0.1:8000/webhook
> Ready! Your webhook signing secret is whsec_06531a7ba22363ac038f284ac547906b89e5c939f8d55dfd03a3619f9adc590a (^C to quit)
This ensures that once a purchase is made, Stripe forwards the webhook calls to your local endpoint. The command will log a webhook signing secret, which you should also save as a project environment variable (STRIPE_WEBHOOK_SECRET). This will prove useful for verifying that a request does indeed come from Stripe and that you are handling the right webhook.
By the end of this section, you should have four Stripe environment variables. You can now load them in ecommerce_site/settings.py:
# ecommerce_site/settings.py

import os
from dotenv import load_dotenv
load_dotenv()

STRIPE_PUBLISHABLE_KEY = os.environ.get("STRIPE_PUBLISHABLE_KEY")
STRIPE_SECRET_KEY = os.environ.get("STRIPE_SECRET_KEY")
STRIPE_PRICE_ID = os.environ.get("STRIPE_PRICE_ID")
STRIPE_WEBHOOK_SECRET = os.environ.get("STRIPE_WEBHOOK_SECRET")
Note: We are using python-dotenv to load the environment variables.
Extend the Views
We now need to extend the views to integrate Stripe by creating a checkout session, a successful purchase view, and a webhook view.
1: Create a Stripe Checkout Session
In the purchase view, we'll create a Stripe checkout session if the purchase form is valid:
# ecommerce/views.py
from django_htmx import HttpResponseClientRedirect
from django.conf import settings
import stripe

@require_POST
def purchase(request):
    form = OrderForm(request.POST)
    if form.is_valid():
        quantity = form.cleaned_data["quantity"]

        # replace time.sleep(2) with the following code ⬇️

        # 1 - set stripe api key
        stripe.api_key = settings.STRIPE_SECRET_KEY

        # 2 - create success url
        success_url = (
            request.build_absolute_uri(
                reverse("purchase_success")
            )
              "?session_id={CHECKOUT_SESSION_ID}"
        )

        # 3 - create cancel url
        cancel_url = request.build_absolute_uri(reverse("home"))

        # 4 - create checkout session
        checkout_session = stripe.checkout.Session.create(
            line_items=[
                {
                    "price": settings.STRIPE_PRICE_ID,
                    "quantity": quantity,
                }
            ],
            mode="payment",
            success_url=success_url,
            cancel_url=cancel_url
        )

        # 5 - redirect to checkout session url
        return HttpResponseClientRedirect(checkout_session.url)
    return render(request, "product.html", {"form": form})
Let’s break this down:
- We first set the Stripe API key.
- We then create a successful purchase URL pointing to the purchase_success view (which we'll create in the next step). Stripe should automatically populate the CHECKOUT_SESSION_ID.
- We create a URL for when a purchase is canceled — for example, when the customer changes their mind. In this case, it’s just the home view.
- We create a Stripe checkout session with our price ID (the product identifier) and the quantity the customer wants to purchase.
- Stripe returns a session object from which we can extract the URL and redirect the customer. Since this request is coming from htmx, we can’t really use the standard Django redirect function. Instead, we use the django-htmx package, which provides this HttpResponseClientRedirect class.
2: Create the Successful Purchase View
After completing the purchase, Stripe will redirect the customer to our specified success_url. Here, we can handle the post-purchase logic:
from django.shortcuts import redirect

def purchase_success(request):
    session_id = request.GET.get("session_id")
    if session_id is None:
          return redirect("home")

    stripe.api_key = settings.STRIPE_SECRET_KEY
    try:
        stripe.checkout.Session.retrieve(session_id)
    except stripe.error.InvalidRequestError:
        messages.error(request, "There was a problem while buying your product. Please try again.")
        return redirect("home")
    return render(request, "purchase_success.html")
In this view, we first check if the session_id query parameter is present. If it is, we retrieve the corresponding session from Stripe using the secret key and the session_id. We then render the successful purchase template, which looks like this:
# ecommerce/templates/purchase_success.html {% extends "base.html" %} {% block
content %}


    Thank you for your purchase

      Your purchase was successful. You will receive an email with the details
      of your purchase soon.


{% endblock %}
You should also add it to the urlpatterns:
# ecommerce_site/urls.py

# ... same imports as before

urlpatterns = [
    # ... same urls as before
    path("purchase_success", views.purchase_success, name="purchase_success"),  # ⬅️ new
]
3: Create the Webhook View
While the customer is in the purchase process, and before they are redirected to the success view, Stripe will call our webhook endpoint (remember to have the webhook listener running, as explained in the earlier 'Create the Webhook' section of this post):
from django.views.decorators.csrf import csrf_exempt
from django.http import HttpResponse

@csrf_exempt
def webhook(request):
    stripe.api_key = settings.STRIPE_SECRET_KEY
    sig_header = request.headers.get('stripe-signature')
    payload = request.body
    event = None
    try:
            event = stripe.Webhook.construct_event(
                payload, sig_header, settings.STRIPE_WEBHOOK_SECRET
            )
    except stripe.error.SignatureVerificationError:
        # Invalid signature
        return HttpResponse(status=400)

    # Handle the checkout.session.completed event
    if event.type == "checkout.session.completed":
        # TODO: create line orders
        return HttpResponse(status=200)
    return HttpResponse(status=400)
Let’s break this down:
- We try to construct a Stripe event from the payload, the signature header, and the webhook secret: the first is used to build the actual event, and the last two variables are relevant to validate the authenticity of the request.
- If the signature verification fails, we return a 400 HTTP response. Remember that Stripe is actually calling this endpoint, not our customer, so Stripe will know what to do in this scenario.
- We check if the event type is checkout.session.completed, i.e., if a customer successfully paid for our product. For now, we don’t do much else here, but we will process the order in the next step.
Note: A Stripe event can have multiple types but we will only handle completed sessions in this post. However, you can (and should) extend a webhook by following the docs.
You should also add this view to urlpatterns:
# ecommerce_site/urls.py

# ... same imports as before

urlpatterns = [
    # ... same urls as before
    path("webhook", views.webhook, name="webhook"),  # ⬅️ new
]
If everything works well, once you click “buy”, you should be redirected to a Stripe payment page. Since we are in test mode, we can fill in the payment details with dummy data, like a 4242 4242 4242 4242 card:
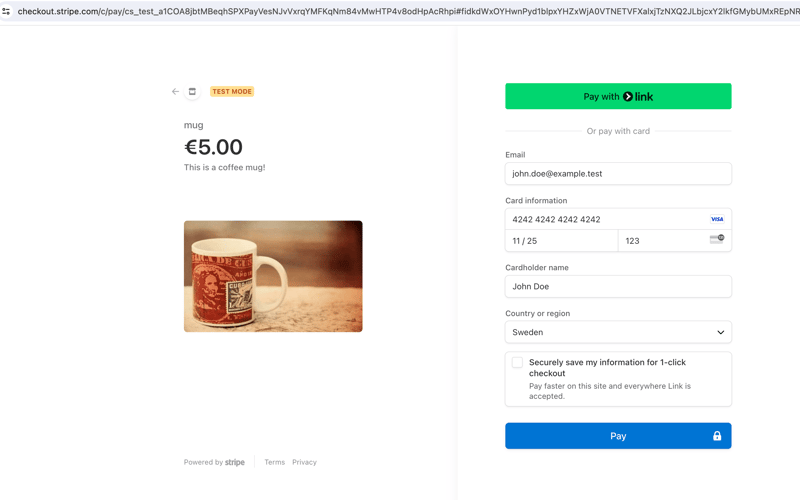
Once you press Pay, Stripe should call the webhook view and redirect you to the purchase_success view. Congratulations, you have successfully processed a payment with Stripe!
Create the Orders and Notify Users
Once a purchase is completed, we need to do a few things in the webhook view:
- Save the order information in our database.
- Notify staff users about the recent purchase.
- Send a confirmation email to the customer.
Let’s create a LineOrder database model in ecommerce/models.py to store some of the order information:
# ecommerce/models.py

from django.db import models

class LineOrder(models.Model):
    quantity = models.IntegerField()
    name = models.CharField(max_length=255, null=True, blank=True)
    email = models.EmailField(null=True, blank=True)
    shipping_details = models.TextField(null=True, blank=True)
    created_at = models.DateTimeField(auto_now_add=True)

    def __str__(self):
        return f"Order {self.id} - {self.quantity} units"
Remember to create and run the migrations:
python manage.py makemigrations # ⬅️ creates the migration files
python manage.py migrate # ⬅️ applies the migrations in the database
We can now create a function to process the orders and call it from the webhook view:
# ecommerce/views.py

@csrf_exempt
def webhook(request):
    # ...same code as before
        if event.type == "checkout.session.completed":
            create_line_orders(event.data.object) # ⬅️ new
            return HttpResponse(status=200)
        return HttpResponse(status=400)

# new ⬇️
def create_line_orders(session: stripe.checkout.Session):
    line_items = stripe.checkout.Session.list_line_items(session.id)
    for line_item in line_items.data:
        LineOrder.objects.create(
            name=session.customer_details.name,
            email=session.customer_details.email,
            shipping_details=session.shipping_details,
            quantity=line_item.quantity,
        )
    mail.send_mail(
        "Your order has been placed",
        f"""
        Hi {session.customer_details.name},
        Your order has been placed. Thank you for shopping with us!
        You will receive an email with tracking information shortly.

        Best,
        The one product e-commerce Team
        """,
        "[email protected]",
        [session.customer_details.email],
    )

    staff_users = User.objects.filter(is_staff=True)
    mail.send_mail(
        "You have a new order!",
        """
            Hi team!
            You have a new order in your shop! go to the admin page to see it.

            Best,
            The one product e-commerce Team
            """,
        "[email protected]",
        [user.email for user in staff_users],
    )
Let’s break this down:
- We first create line order instances from the Stripe session and send a confirmation email to the customer about their purchase.
- We then send an email to all staff users telling them to check the admin panel.
You can now register the LineOrder model in the admin panel, so it’s accessible to staff users:
# ecommerce/admin.py
from django.contrib import admin
from ecommerce.models import LineOrder

# Register your models here.
admin.site.register(LineOrder)
When staff users log in to the admin page, they will now be able to check new orders and process them accordingly — in this case, pack and ship mugs to the customer!
Some Tips to Optimize Your Django Store
Here are some tips to further improve on the store you've built:
- Write tests - you can see some examples in the GitHub repository.
- If you have more products to sell, create a database model for them, and connect the LineOrder through a ForeignKey.
- Configure email settings according to Django's email documentation. You can also use libraries such as django-post-office to manage your email templates and queues.
- Once you deploy your website, create an actual webhook (not a local listener).
- Take a look at the Stripe docs for alternatives to the checkout process we've outlined, including an embedded checkout form.
Wrapping Up
In this two-part series, we successfully built a one-product e-commerce site using Django, htmx, and Stripe. This guide has walked you through setting up your Django project, integrating htmx for seamless user interactions, and incorporating secure payments with Stripe.
We also covered how to handle order processing, including saving order information to your database, notifying staff users of new purchases, and sending confirmation emails to your customers. With these foundations, you can further customize and expand your e-commerce site to suit your specific needs.
Happy coding!
P.S. If you'd like to read Python posts as soon as they get off the press, subscribe to our Python Wizardry newsletter and never miss a single post!
-
 如何干淨地刪除匿名JavaScript事件處理程序?刪除匿名事件偵聽器將匿名事件偵聽器添加到元素中會提供靈活性和簡單性,但是當要刪除它們時,可以構成挑戰,而無需替換元素本身就可以替換一個問題。 element? element.addeventlistener(event,function(){/在這里工作/},false); 要解決此問題,請考...程式設計 發佈於2025-06-09
 -
為什麼HTML無法打印頁碼及解決方案無法在html頁面上打印頁碼? @page規則在@Media內部和外部都無濟於事。 HTML:Customization:@page { margin: 10%; @top-center { font-family: sans-serif; font-weight: ...程式設計 發佈於2025-06-09
-
在Pandas中如何將年份和季度列合併為一個週期列?pandas data frame thing commans date lay neal and pree pree'和pree pree pree”,季度 2000 q2 這個目標是通過組合“年度”和“季度”列來創建一個新列,以獲取以下結果: [python中的concate...程式設計 發佈於2025-06-09
-
如何在php中使用捲髮發送原始帖子請求?如何使用php 創建請求來發送原始帖子請求,開始使用curl_init()開始初始化curl session。然後,配置以下選項: curlopt_url:請求 [要發送的原始數據指定內容類型,為原始的帖子請求指定身體的內容類型很重要。在這種情況下,它是文本/平原。要執行此操作,請使用包含以下標頭...程式設計 發佈於2025-06-09
-
\“(1)vs.(;;):編譯器優化是否消除了性能差異?\”答案: 在大多數現代編譯器中,while(1)和(1)和(;;)之間沒有性能差異。編譯器: perl: 1 輸入 - > 2 2 NextState(Main 2 -E:1)V-> 3 9 Leaveloop VK/2-> A 3 toterloop(next-> 8 last-> 9 ...程式設計 發佈於2025-06-09
-
解決Spring Security 4.1及以上版本CORS問題指南彈簧安全性cors filter:故障排除常見問題 在將Spring Security集成到現有項目中時,您可能會遇到與CORS相關的錯誤,如果像“訪問Control-allo-allow-Origin”之類的標頭,則無法設置在響應中。為了解決此問題,您可以實現自定義過濾器,例如代碼段中的MyFi...程式設計 發佈於2025-06-09
-
如何解決AppEngine中“無法猜測文件類型,使用application/octet-stream...”錯誤?appEngine靜態文件mime type override ,靜態文件處理程序有時可以覆蓋正確的mime類型,在錯誤消息中導致錯誤消息:“無法猜測mimeType for for file for file for [File]。 application/application/octet...程式設計 發佈於2025-06-09
-
C++20 Consteval函數中模板參數能否依賴於函數參數?[ consteval函數和模板參數依賴於函數參數在C 17中,模板參數不能依賴一個函數參數,因為編譯器仍然需要對非contexexpr futcoriations contim at contexpr function進行評估。 compile time。 C 20引入恆定函數,必須在編譯時進...程式設計 發佈於2025-06-09
-
在PHP中如何高效檢測空數組?在PHP 中檢查一個空數組可以通過各種方法在PHP中確定一個空數組。如果需要驗證任何數組元素的存在,則PHP的鬆散鍵入允許對數組本身進行直接評估:一種更嚴格的方法涉及使用count()函數: if(count(count($ playerList)=== 0){ //列表為空。 } 對...程式設計 發佈於2025-06-09
-
Python環境變量的訪問與管理方法Accessing Environment Variables in PythonTo access environment variables in Python, utilize the os.environ object, which represents a mapping of envir...程式設計 發佈於2025-06-09
-
您可以使用CSS在Chrome和Firefox中染色控制台輸出嗎?在javascript console 中顯示顏色是可以使用chrome的控制台顯示彩色文本,例如紅色的redors,for for for for錯誤消息? 回答是的,可以使用CSS將顏色添加到Chrome和Firefox中的控制台顯示的消息(版本31或更高版本)中。要實現這一目標,請使用以下...程式設計 發佈於2025-06-09
-
如何避免Go語言切片時的內存洩漏?,a [j:] ...雖然通常有效,但如果使用指針,可能會導致內存洩漏。這是因為原始的備份陣列保持完整,這意味著新切片外部指針引用的任何對象仍然可能佔據內存。 copy(a [i:] 對於k,n:= len(a)-j i,len(a); k程式設計 發佈於2025-06-09
-
Java為何無法創建泛型數組?通用陣列創建錯誤 arrayList [2]; JAVA報告了“通用數組創建”錯誤。為什麼不允許這樣做? 答案:Create an Auxiliary Class:public static ArrayList<myObject>[] a = new ArrayList<my...程式設計 發佈於2025-06-09
-
Python讀取CSV文件UnicodeDecodeError終極解決方法在試圖使用已內置的CSV模塊讀取Python中時,CSV文件中的Unicode Decode Decode Decode Decode decode Error讀取,您可能會遇到錯誤的錯誤:無法解碼字節 在位置2-3中:截斷\ uxxxxxxxx逃脫當CSV文件中包含特殊字符或Unicode的路徑...程式設計 發佈於2025-06-09
-
如何使用替換指令在GO MOD中解析模塊路徑差異?在使用GO MOD時,在GO MOD 中克服模塊路徑差異時,可能會遇到衝突,其中3個Party Package將另一個PAXPANCE帶有導入式套件之間的另一個軟件包,並在導入式套件之間導入另一個軟件包。如迴聲消息所證明的那樣: go.etcd.io/bbolt [&&&&&&&&&&&&&&&&...程式設計 發佈於2025-06-09


學習中文
- 1 走路用中文怎麼說? 走路中文發音,走路中文學習
- 2 坐飛機用中文怎麼說? 坐飞机中文發音,坐飞机中文學習
- 3 坐火車用中文怎麼說? 坐火车中文發音,坐火车中文學習
- 4 坐車用中文怎麼說? 坐车中文發音,坐车中文學習
- 5 開車用中文怎麼說? 开车中文發音,开车中文學習
- 6 游泳用中文怎麼說? 游泳中文發音,游泳中文學習
- 7 騎自行車用中文怎麼說? 骑自行车中文發音,骑自行车中文學習
- 8 你好用中文怎麼說? 你好中文發音,你好中文學習
- 9 謝謝用中文怎麼說? 谢谢中文發音,谢谢中文學習
- 10 How to say goodbye in Chinese? 再见Chinese pronunciation, 再见Chinese learning


