
建立您自己的 GitHub Copilot:程式碼完成工具逐步指南
 瀏覽:115
Ever thought building a code completion tool like GitHub Copilot was complex? Surprisingly, it’s not as hard as it seems!
As an engineer, I’ve always been fascinated by how code completion tools work under the hood. So, I reverse-engineered the process to see if I could build one myself.
Here is one i build myself and published it - LLM-Autocompleter
With AI-assisted tools becoming the norm in software development, creating your own code completion tool is a great way to learn about Language Server Protocol (LSP), APIs, and integration with advanced models like OpenAI's GPT. Plus, it’s an incredibly rewarding project.
Code completion tools essentially combine a Language Server Protocol (LSP) server with inline code completion mechanisms from platforms like VS Code. In this tutorial, we'll leverage VS Code’s inline completion API and build our own LSP server.
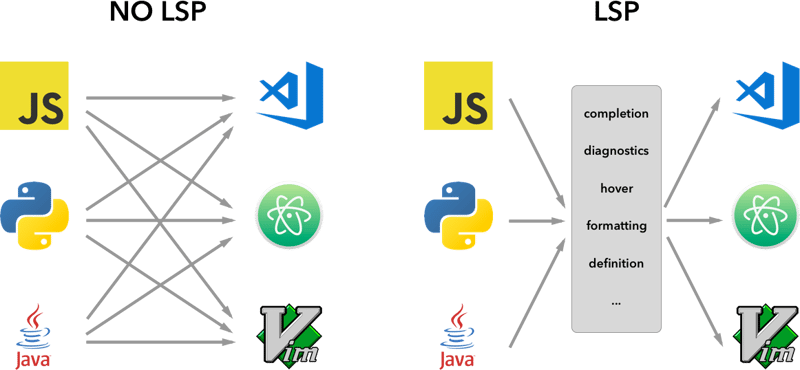
Before we dive in, let's understand what an LSP Server is.
Language Server Protocol (LSP)
An LSP server is a backend service that provides language-specific features to text editors or Integrated Development Environments (IDEs). It acts as a bridge between the editor (the client) and the language-specific tools, delivering features like:
Code completion (suggesting snippets of code as you type),
Go-to definition (navigating to the part of the code where a symbol is defined),
Error checking (highlighting syntax errors in real-time).
The idea behind the Language Server Protocol (LSP) is to standardize the protocol for how such servers and development tools communicate. This way, a single Language Server can be re-used in multiple development tools and LSP is just a protocol.
By standardizing how these servers communicate with editors through LSP, developers can create language-specific features that work seamlessly across a variety of platforms, like VS Code, Sublime Text, and even Vim.
Now that you understand the basics of LSP, let’s dive into building our own code completion tool, step by step.
We’ll begin by using a sample inline completion extension provided by VS Code. You can clone it directly from GitHub:
vscode-sample-inlinecompletion
now lets go we setting up the lsp-server, you can follow the below structure
.
├── client // Language Client
│   ├── src
│   │   ├── test // End to End tests for Language Client / Server
│   │   └── extension.ts // Language Client entry point
├── package.json // The extension manifest.
└── server // Language Server
    └── src
        └── server.ts // Language Server entry point
for more information you take a look into as well lsp-sample
Code
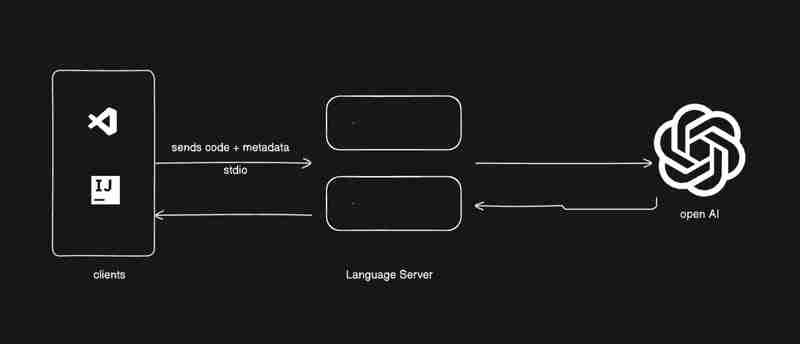
I would be giving you bit's of code, You have to stitch things together i want you guys to learn. The below image shows what we are going to build.
Lets go to client/src/extension.ts and remove everything from activate function
export function activate(context: ExtensionContext) {
}
lets start the setup
- Creating an lsp client and start it.
- serverModule: Points to the path of the language server’s main script.
- debugOptions: Useful for running the server in debug mode.
extension.ts
export function activate(context: ExtensionContext) {
    const serverModule = context.asAbsolutePath(
        path.join("server", "out", "server.js")
    );

    const debugOptions = { execArgv: ['--nolazy', '--
 inspect=6009'] };

  // communication with the server using Stdio
    const serverOptions: ServerOptions = {
        run: {
            module: serverModule,
            transport: TransportKind.stdio,
        },
        debug: {
            module: serverModule,
            transport: TransportKind.stdio,
            options: debugOptions
        }
    };

        const clientOptions: LanguageClientOptions = {
        documentSelector: [{ scheme: 'file' }],
        initializationOptions: serverConfiguration
    };


     client = new LanguageClient(
        'LSP Server Name',
        serverOptions,
        clientOptions
    );

  client.start();
}
- Receive data on lsp server go to server/src/server.ts
Some bit for information
we have different types of protocol we can follow to communicate between server and client.
for more information you can go to microsoft-lsp-docs
Why stdio? Stdio is one of the most widely supported communication protocols between clients and servers. It allows the LSP server we’re building to work not only in VS Code but also in other editors like Vim and Sublime Text.
server.ts
const methodStore: Record= { exit, initialize, shutdown, }; process.stdin.on("data", async (bufferChuck) => { buffer = bufferChuck; while (true) { try { // Check for the Content-Length line const lengthMatch = buffer.match(/Content-Length: (\d )\r\n/); if (!lengthMatch) break; const contentLength = parseInt(lengthMatch[1], 10); const messageStart = buffer.indexOf("\r\n\r\n") 4; // Continue unless the full message is in the buffer if (buffer.length initialize.ts
export const initialize = (message: RequestMessage): InitializeResult => { return { capabilities: { completionProvider: { resolveProvider: true }, textDocumentSync: TextDocumentSyncKind.Incremental, codeActionProvider: { resolveProvider: true } }, serverInfo: { name: "LSP-Server", version: "1.0.0", }, }; };exit.ts
export const exit = () => { process.exit(0); };shutdown.ts
export const shutdown = () => { return null; };Once done with basic function, you can now run the vscode in debugging mode using F5 key on keyboard or follow debugging-guide
Now lets start with adding in-line provider and get the request and response according
Let's add a new method into the methodStore
server.ts
const methodStore: Record= { exit, initialize, shutdown, "textDocument/generation": generation }; generation.ts
export const generation = async (message: any) => { if(!message && message !== undefined) return {}; const text = message.params.textDocument.text as string; if(!text) return {}; const cursorText = getNewCursorText(text, message.params.position.line, message.params.position.character); const response = await getResponseFromOpenAI(cursorText, message.params.fsPath); return { generatedText: response, } } function getNewCursorText(text: string, line: number, character: number): string { const lines = text.split('\n'); if (line = lines.length) return text; const targetLine = lines[line]; if (character targetLine.length) return text; lines[line] = targetLine.slice(0, character) '' targetLine.slice(character); return lines.join('\n'); } const getResponseFromOpenAI = async (text: string, fsPath: stiring): Promise => { const message = { "role": "user", "content": text }; const systemMetaData: Paramaters = { max_token: 128, max_context: 1024, messages: [], fsPath: fsPath } const messages = [systemPrompt(systemMetaData), message] const chatCompletion: OpenAI.Chat.ChatCompletion | undefined = await this.open_ai_client?.chat.completions.create({ messages: messages, model: "gpt-3.5-turbo", max_tokens: systemMetaData?.max_tokens ?? 128, }); if (!chatCompletion) return ""; const generatedResponse = chatCompletion.choices[0].message.content; if (!generatedResponse) return ""; return generatedResponse; } template.ts
interface Parameters { max_tokens: number; max_context: number; messages: any[]; fsPath: string; } export const systemPrompt = (paramaters: Parameters | null) => { return { "role": "system", "content": ` Instructions: - You are an AI programming assistant. - Given a piece of code with the cursor location marked by, replace with the correct code. - First, think step-by-step. - Describe your plan for what to build in pseudocode, written out in great detail. - Then output the code replacing the . - Ensure that your completion fits within the language context of the provided code snippet. - Ensure, completion is what ever is needed, dont write beyond 1 or 2 line, unless the is on start of a function, class or any control statment(if, switch, for, while). Rules: - Only respond with code. - Only replace ; do not include any previously written code. - Never include in your response. - Handle ambiguous cases by providing the most contextually appropriate completion. - Be consistent with your responses. - You should only generate code in the language specified in the META_DATA. - Never mix text with code. - your code should have appropriate spacing. META_DATA: ${paramaters?.fsPath}` }; }; Let's now register the inline providers
extension.ts
import {languages} from "vscode"; function getConfiguration(configName: string) { if(Object.keys(workspace.getConfiguration(EXTENSION_ID).get(configName)).length > 0){ return workspace.getConfiguration(EXTENSION_ID).get(configName); } return null; } const inLineCompletionConfig = getConfiguration("inlineCompletionConfiguration"); export function activate(context: ExtensionContext) { // OTHER CODE languages.registerInlineCompletionItemProvider( { pattern: "**" }, { provideInlineCompletionItems: (document: TextDocument, position: Position) => { const mode = inLineCompletionConfig["mode"] || 'slow'; return provideInlineCompletionItems(document, position, mode); }, } ); } let lastInlineCompletion = Date.now(); let lastPosition: Position | null = null; let inlineCompletionRequestCounter = 0; const provideInlineCompletionItems = async (document: TextDocument, position: Position, mode: 'fast' | 'slow') => { const params = { textDocument: { uri: document.uri.toString(), text: document.getText(), }, position: position, fsPath: document.uri.fsPath.toString() }; inlineCompletionRequestCounter = 1; const localInCompletionRequestCounter = inlineCompletionRequestCounter; const timeSinceLastCompletion = (Date.now() - lastInlineCompletion) / 1000; const minInterval = mode === 'fast' ? 0 : 1 / inLineCompletionConfig["maxCompletionsPerSecond"]; if (timeSinceLastCompletion setTimeout(r, (minInterval - timeSinceLastCompletion) * 1000)); } if (inlineCompletionRequestCounter === localInCompletionRequestCounter) { lastInlineCompletion = Date.now(); let cancelRequest = CancellationToken.None; if (lastPosition && position.isAfter(lastPosition)) { cancelRequest = CancellationToken.Cancelled; } lastPosition = position; try { const result = await client.sendRequest("textDocument/generation", params, cancelRequest); const snippetCode = new SnippetString(result["generatedText"]); return [new InlineCompletionItem(snippetCode)]; } catch (error) { console.error("Error during inline completion request", error); client.sendNotification("window/showMessage", { type: 1, // Error type message: "An error occurred during inline completion: " error.message }); return []; } } else { return []; } };This blog provides the foundation you need to build your own code completion tool, but the journey doesn’t end here. I encourage you to experiment, research, and improve upon this code, exploring different features of LSP and AI to tailor the tool to your needs.
Whoever is trying to implement this i want them to learn, research and stitch things together.
What You've Learned
Understanding LSP Servers: You’ve learned what an LSP server is, how it powers language-specific tools, and why it’s critical for cross-editor support.
Building VS Code Extensions: You’ve explored how to integrate code completions into VS Code using APIs.
AI-Driven Code Completion: By connecting to OpenAI’s GPT models, you’ve seen how machine learning can enhance developer productivity with intelligent suggestions.
If you reach here, i love to know what you have learned.
Please Hit a like if you learned something new today from my blog.
Connect with me- linked-In
-
 將圖片浮動到底部右側並環繞文字的技巧在Web設計中圍繞在Web設計中,有時可以將圖像浮動到頁面右下角,從而使文本圍繞它纏繞。這可以在有效地展示圖像的同時創建一個吸引人的視覺效果。 css位置在右下角,使用css float and clear properties: img { 浮點:對; ...程式設計 發佈於2025-05-21
 -
在JavaScript中如何並發運行異步操作並正確處理錯誤?同意操作execution 在執行asynchronous操作時,相關的代碼段落會遇到一個問題,當執行asynchronous操作:此實現在啟動下一個操作之前依次等待每個操作的完成。要啟用並發執行,需要進行修改的方法。 第一個解決方案試圖通過獲得每個操作的承諾來解決此問題,然後單獨等待它們: c...程式設計 發佈於2025-05-21
-
可以在純CS中將多個粘性元素彼此堆疊在一起嗎?[2这里: https://webthemez.com/demo/sticky-multi-header-scroll/index.html </main> <section> { display:grid; grid-template-...程式設計 發佈於2025-05-21
-
C++中如何將獨占指針作為函數或構造函數參數傳遞?在構造函數和函數中將唯一的指數管理為參數 unique pointers( unique_ptr [2啟示。通過值: base(std :: simelor_ptr n) :next(std :: move(n)){} 此方法將唯一指針的所有權轉移到函數/對象。指針的內容被移至功能中,在操作...程式設計 發佈於2025-05-21
-
eval()vs. ast.literal_eval():對於用戶輸入,哪個Python函數更安全?稱量()和ast.literal_eval()中的Python Security 在使用用戶輸入時,必須優先確保安全性。強大的Python功能Eval()通常是作為潛在解決方案而出現的,但擔心其潛在風險。本文深入研究了eval()和ast.literal_eval()之間的差異,突出顯示其安全性含義...程式設計 發佈於2025-05-21
-
如何使用替換指令在GO MOD中解析模塊路徑差異?在使用GO MOD時,在GO MOD 中克服模塊路徑差異時,可能會遇到衝突,其中3個Party Package將另一個PAXPANCE帶有導入式套件之間的另一個軟件包,並在導入式套件之間導入另一個軟件包。如迴聲消息所證明的那樣: go.etcd.io/bbolt [&&&&&&&&&&&&&&&&...程式設計 發佈於2025-05-21
-
如何高效地在一個事務中插入數據到多個MySQL表?mySQL插入到多個表中,該數據可能會產生意外的結果。雖然似乎有多個查詢可以解決問題,但將從用戶表的自動信息ID與配置文件表的手動用戶ID相關聯提出了挑戰。 使用Transactions和last_insert_id() 插入用戶(用戶名,密碼)值('test','tes...程式設計 發佈於2025-05-21
-
在細胞編輯後,如何維護自定義的JTable細胞渲染?在JTable中維護jtable單元格渲染後,在JTable中,在JTable中實現自定義單元格渲染和編輯功能可以增強用戶體驗。但是,至關重要的是要確保即使在編輯操作後也保留所需的格式。 在設置用於格式化“價格”列的“價格”列,用戶遇到的數字格式丟失的“價格”列的“價格”之後,問題在設置自定義單元...程式設計 發佈於2025-05-21
-
Python中何時用"try"而非"if"檢測變量值?使用“ try“ vs.” if”來測試python 在python中的變量值,在某些情況下,您可能需要在處理之前檢查變量是否具有值。在使用“如果”或“ try”構建體之間決定。 “ if” constructs 結果= function() 如果結果: 對於結果: #處理...程式設計 發佈於2025-05-21
-
如何在Java中正確顯示“ DD/MM/YYYY HH:MM:SS.SS”格式的當前日期和時間?如何在“ dd/mm/yyyy hh:mm:mm:ss.ss”格式“ gormat 解決方案:的,請訪問量很大,並應為procectiquiestate的,並在整個代碼上正確格式不多: java.text.simpledateformat; 導入java.util.calendar; 導入java...程式設計 發佈於2025-05-21
-
Spark DataFrame添加常量列的妙招在Spark Dataframe ,將常數列添加到Spark DataFrame,該列具有適用於所有行的任意值的Spark DataFrame,可以通過多種方式實現。使用文字值(SPARK 1.3)在嘗試提供直接值時,用於此問題時,旨在為此目的的column方法可能會導致錯誤。 df.withCo...程式設計 發佈於2025-05-21
-
如何使用PHP從XML文件中有效地檢索屬性值?從php $xml = simplexml_load_file($file); foreach ($xml->Var[0]->attributes() as $attributeName => $attributeValue) { echo $attributeName,...程式設計 發佈於2025-05-21
-
Java中假喚醒真的會發生嗎?在Java中的浪費喚醒:真實性或神話? 在Java同步中偽裝喚醒的概念已經是討論的主題。儘管存在這種行為的潛力,但問題仍然存在:它們實際上是在實踐中發生的嗎? Linux的喚醒機制根據Wikipedia關於偽造喚醒的文章,linux實現了pthread_cond_wait()功能的Linux實現,...程式設計 發佈於2025-05-21
-
同實例無需轉儲複製MySQL數據庫方法在同一實例上複製一個MySQL數據庫而無需轉儲在同一mySQL實例上複製數據庫,而無需創建InterMediate sqql script。以下方法為傳統的轉儲和IMPORT過程提供了更簡單的替代方法。 直接管道數據 MySQL手動概述了一種允許將mysqldump直接輸出到MySQL cli...程式設計 發佈於2025-05-21
-
您如何在Laravel Blade模板中定義變量?在Laravel Blade模板中使用Elegance 在blade模板中如何分配變量對於存儲以後使用的數據至關重要。在使用“ {{}}”分配變量的同時,它可能並不總是最優雅的解決方案。 幸運的是,Blade通過@php Directive提供了更優雅的方法: $ old_section =...程式設計 發佈於2025-05-21


學習中文
- 1 走路用中文怎麼說? 走路中文發音,走路中文學習
- 2 坐飛機用中文怎麼說? 坐飞机中文發音,坐飞机中文學習
- 3 坐火車用中文怎麼說? 坐火车中文發音,坐火车中文學習
- 4 坐車用中文怎麼說? 坐车中文發音,坐车中文學習
- 5 開車用中文怎麼說? 开车中文發音,开车中文學習
- 6 游泳用中文怎麼說? 游泳中文發音,游泳中文學習
- 7 騎自行車用中文怎麼說? 骑自行车中文發音,骑自行车中文學習
- 8 你好用中文怎麼說? 你好中文發音,你好中文學習
- 9 謝謝用中文怎麼說? 谢谢中文發音,谢谢中文學習
- 10 How to say goodbye in Chinese? 再见Chinese pronunciation, 再见Chinese learning


