
使用 Oats~i 建立 Web 應用程式 – 設定
 瀏覽:747
In the last article, I wrote an introductory post about Oats~i, the open web framework. I talked about its core features, a bit of how it works, and what to expect. If you didn’t read that piece, give it a quick look.
Over the past couple of days, I’ve created a few tooling around Oats~i to ensure we can quickly get up and running installing the framework, running a starter project, and seamlessly working on tutorials and learning.
This piece is the first of a series called Build a Web App with Oats~i. We’ll start with setting up an Oats~i project using two methods – using the cli or manually.
Using the Oats~i CLI (Recommended)
This is the most recommended method for setting up an Oats~i project. It saves you the time of writing boiler plate code and installing the dependencies needed to get an Oats~i project up and running.
However, you should use this method only when creating a completely new project to avoid potential file conflicts between Oats~i and your current project structure.
The cli comes set up with a starter project with a home and about page. You can navigate between these two pages to see Oats~i already in action, handling routing and fragments.
How to Use the Oats~i CLI
- Navigate to the folder you want to create an Oats~i project
- Open the terminal and run
npx oats-i-cli
- Follow the prompts and wait for the setup to complete
- Run
npm run dev
- Navigate to the address shown in the terminal at the start of the build (often is localhost:8080). That will open the starter project on your browser. (You can use the local network address to view it on your other devices connected to the same network)
Manual Installation
If you have an existing project you want to install Oats~i to, or love being hardcore, you can set up Oats~i manually. This process is much longer, and requires more attention to ensure everything works well.
Install Dependencies
Now, start by navigating to your project’s directory and open the terminal.
First, we install the dependencies needed to build and run Oats~i. If you’re starting a new project, start by running.
npm init -y
Then, follow the steps outlined below.
NOTE: Apart from installing Oats~i, you can skip any of the steps after it if you already have the libraries/dependencies installed in your current project.
Install Oats~i (Core)
Install the core Oats~i library.
Run
npm install oats-i
Install Webpack
Install Webpack as a development dependency. Webpack will allow us to have better project structures among other features, with the library handling module bundling and asset management.
Run
npm install --save-dev webpack webpack-cli
Install Webpack Dev Server
Install the webpack dev server as a development dependency. This will allow us to run a development server that will auto-update on new changes while we’re building and testing our Oats~i web app.
Run
npm install --save-dev webpack-dev-server
Install Handlebars-Loader
It’s strongly recommended that you use a templating engine for rendering your views in Oats~i. My preferred choice is handlebars. (Learn more about handlebars)
To work with webpack, we’ll need to install the handlebars-loader as a development dependency. That will allow us to use handlebars templates to generate and render our views in-app.
Run
npm install --save-dev handlebars-loader
Install HTML-Loader
To create server-side views, the base Oats~i configuration uses a combination of html-loader and html-webpack-plugin. Let’s first install the html-loader library as a development dependency.
Run
npm install --save-dev html-loader
Install HTML-Webpack-Plugin
The html-webpack-plugin library allows us to output server-side views for our app using webpack. It works in conjunction with html-loader. Install it as a development dependency.
Run
npm install --save-dev html-webpack-plugin
Install Babel-Loader
Babel-loader will load and transform our JavaScript files using webpack. Install it as a development dependency.
Run
npm install --save-dev babel-loader
Install Style-Loader and CSS-Loader
Style-loader and css-loader will inject our css imports as stylesheets in our html files produced by html-loader and html-webpack-plugin. Install these loaders as development dependencies.
Run
npm install --save-dev style-loader

npm install --save-dev css-loader
Install Webpack-Merge
Webpack-merge will allow us to merge multiple webpack configuration files, allowing us to structure our configuration files in optimal ways for our project setup. Install this library as a development dependency.
Run
npm install --save-dev webpack-merge
Install Express-Handlebars
Express-handlebars will allow us to emulate server-side rendering in development using handlebars view files outputted by our webpack configuration, using html-loader and html-webpack-plugin. Install this library as a development dependency.
Run
npm install --save-dev express-handlebars
Create Webpack Configuration Files
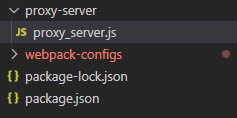
At the root of your project’s directory, create a new folder and call it “webpack-configs”.
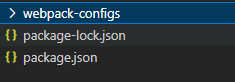
Navigate into this folder and create two new folders inside it named “main” and “oats~i”.
Your folder structure should now look like this:

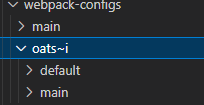
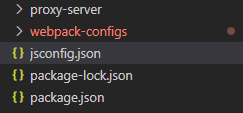
Now, navigate into “oats~i” and create two more folders named “default” and “main”.
Your folder structure should now look like this:
------
The “default” folder will hold the default webpack configuration needed by Oats~i to have it’s webpack-dependent functions work. Currently, that is code splitting and lazy loading for fragments.
The “main” folder will hold the webpack configuration for loaders used and recommended by Oats~i. These are the loaders we installed in the “install dependencies” stage. Feel free to edit this configuration later if you want to change loaders.
------
Navigate to the “default” folder and create a new file called “webpack.config.js”
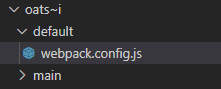
Open the file and paste the following code inside it.
//@ts-check
const DefaultOats_iConfig = {

    optimization: {

        splitChunks: {

            minSize: 0, //Minimum size, in bytes, for a chunk to be generated.
            minSizeReduction: 1, //Minimum size reduction to the main chunk (bundle), in bytes, needed for a chunk to be generated.
            minChunks: 2,
            cacheGroups: {

                commons: {

                    chunks: "async", //Allow chunks to be shared between sync and async
                }
            }
        }
    }
}

module.exports = DefaultOats_iConfig;
Now, navigate back to the “oats~i” folder and navigate into “main”.
Create a new file and name it “webpack.config.js”.

Open the file and paste the following code inside.
//@ts-check
/**
 * Contains loaders
 */
const DefaultOats_iLoadersConfig = {

    module: {

        rules: [

            {
                test: /\.(html|sv.hbs|p.hbs)$/,
                use: [
                        {
                            loader: "html-loader",
                            options: {
                                minimize: false
                            }
                        }
                ]
            },
            {
                test: /\.(hbs)$/,
                exclude: /\.(sv.hbs|p.hbs)/,
                use: [
                    {
                        loader: "handlebars-loader",
                        options: {
                            inlineRequires: "./assets"
                        }
                    }
                ]
            },
            {
                test: /\.(js)$/,
                exclude: /node_modules/,
                use: [
                    {
                        loader: "babel-loader"
                    }
                ]
            },
            {
                test: /\.(png|svg|jpg|gif)$/,
                type: 'asset/resource',
            },
            {
                test: /\.css$/,
                use: [

                    'style-loader',
                    'css-loader'
                ]
            }
        ]
    }
}

module.exports = DefaultOats_iLoadersConfig;
We’re done setting up the core webpack configuration for Oats~i. Now, we need to merge them in a common configuration file that we’ll use project-wide.
Now, navigate back to the “oats~i” folder then back to the “webpack-configurations” folder. Now navigate into “main”.
Create a new file and name it “webpack.config.js”.
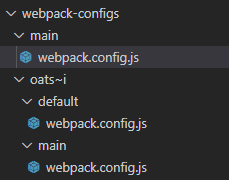
Open the file and paste the following code inside.
//@ts-check
const path = require("path");
const HtmlWebpackPlugin = require("html-webpack-plugin");
const DevServerMiddlewareConfig = require("../../proxy-server/proxy_server");
//The folder we'll have our assets emitted after build
const DIST_PATH_PUBLIC_ASSETS = "../../dist/public";
const { merge } = require("webpack-merge");
const DefaultOats_iConfig = require("../oats~i/default/webpack.config");
const DefaultOats_iLoadersConfig = require("../oats~i/main/webpack.config");

//@ts-expect-error
module.exports = merge(DefaultOats_iConfig, DefaultOats_iLoadersConfig, {

    mode: "development",
    devtool: "eval-source-map",
    output: {

        //Where we'll output public assets
        path: path.resolve(__dirname, `${DIST_PATH_PUBLIC_ASSETS}`),
        publicPath: "/",
        assetModuleFilename: 'assets/[name][ext]',
        filename: "js/[name].dev_bundle.js",
        clean: true
    },
    entry: {

        //The main entry (app)
        index: "./src/app/index/scripts/index.js",
    },
    plugins: [
        new HtmlWebpackPlugin({

            template: "./src/server/home/home.sv.hbs",
            filename: "../views/home.hbs",
            chunks: ["index"],
            minify: false
        })
    ],
    devServer: {

        devMiddleware: {

            writeToDisk: true, //Because of our configured server
        },
        setupMiddlewares: DevServerMiddlewareConfig,
    }
});
Now, we should be done setting up our webpack configurations that’s just fine to run an Oats~i project.
Update package.json
Navigate back to your project’s root folder. Open package.json, look for the “scripts” line, and add the following line after “test” (remember to separate with a comma).
"dev": "webpack-dev-server --config ./webpack-configs/main/webpack.config.js"

Set Up Dev Server Middlewares
In our final webpack configuration file, we specified a middlewares file for the webpack dev server under
setupMiddlewares: DevServerMiddlewareConfig
Under normal circumstances, you don’t need this setup. You can simply write your server view files in html format, use html-loader and html-webpack-plugin to produce them, and have them directly served by webpack-dev-server during development.
However, as you’ll come to learn later, this is not the best setup for building an Oats~i project that’s already primed for server-side rendering. The server-side files are already in html format, meaning they can’t be easily templated with data before being rendered to the client on the initial request.
To accommodate that, the default Oats~i setup ensures you’re creating template files for your server views that will be easy to render with data from your server every time a client requests for a fresh page.
Our dev server middlewares setup will allow us to mimic such as setup on the actual server, for our development environment.
With its default setup, you don’t need to update it for new fragments that you add to the project, as long as you’re not interested in having them server-side rendered. However, once you get to the point where you want to have server-side rendering and test it in development, setting things up will be much easier and faster, without a change in file formats you’ve already used across the project.
Let’s Set Up this Config
At your project’s root directory, create a new folder and name it “proxy-server”. Inside this new folder, create a file and name it “proxy_server.js”
Open the file and paste the following code:
//@ts-check
const express = require("express");
const path = require("path");
const hbs = require("express-handlebars");

const DevServerMiddlewareConfig = (middlewares, devServer) => {

    /**
     * @type {import("express").Application}
     */
    const app = devServer.app;

    //Configure the view engine
    app.set("views", path.resolve(__dirname, "../dist/views"));
    app.set("view engine", "hbs");
    app.engine("hbs", hbs.engine({

        extname: "hbs",
        layoutsDir: path.resolve(__dirname, "../dist/views"),
        partialsDir: path.resolve(__dirname, "../dist/views/partials")
    }));

    //for json
    app.use(express.json());
    //I think params and queries
    app.use(express.urlencoded({ extended: false }));
    //static
    app.use(express.static(path.resolve(__dirname, "../dist/public")));

    //My middlewares
    //Capture all
    app.get("/*", (req, res, next) => {

        res.render("home", {
            layout: "home"
        });
    });

    return middlewares;
}

module.exports = DevServerMiddlewareConfig;
This configuration will capture all requests to the dev server and return the home.hbs layout file. You can rename this later to your file’s actual name once you start creating your own Oats~i project and leave it as is as long as you’ll not require server-side rendering for any of your fragments.
Create jsconfig.json
Oats~i is typed using a combination of typescript declaration files and JSDoc. There’s a slight issue where types may not always reflect correctly when using the framework, slightly hurting the developer experience.
Instead of refactoring over 100 files and thousands of lines of code, I’ve found a way to make typescript and intellisense (at least in VSCode) to understand the JSDoc types used in Oats~i.
To do this, navigate to your project’s root folder. Create a file named “jsconfig.json”.
Open it and paste the code below:
{
    "include": [
        "*/**/*.js",
        "**/*",
        "/**/*",
        "node_modules/oats-i" //to get type definitions for oats-i in your project
    ],
}
NOTE: This bit comes automatically with the cli, so don’t do this for an Oats~i project you’ve set up using the cli.
Create Starter Project Files
Let’s now put everything together and create our starter project files to run an Oats~i app for the first time.
Server-side Base Layout
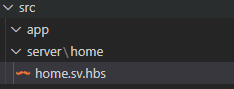
Navigate to your project’s root folder and create a new folder named “src”. This folder will contain all of our project’s source files.
Inside the “src” folder, create two folders named “app” and “server”.

Navigate to the “server” folder and create a new folder named “home”. Inside the “home” folder, create a new file and name it “home.sv.hbs”
Open the file and paste the code below:
    Home - My Oats~i App


    Home
App Files
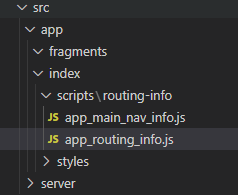
Now navigate back to “src”. Get into the “app” folder and create two folders name “fragments” and “index”.
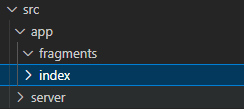
Navigate into the “index” folder and create two folders named “scripts” and “styles”.

Inside the “scripts” folder, create a new folder called “routing-info”. Inside “routing-info” create two files named “app_main_nav_info.js” and “app_routing_info.js”
Main Navigation info
Open “app_main_nav_info.js” and paste the following code:
//@ts-check
import MainNavigationInfoBuilder from "oats-i/router/utils/nav-info/main_nav_info_builder";

const AppMainNavInfo = MainNavigationInfoBuilder.buildMainNavigationInfo([
    {
        selector: "home-link",
        defaultRoute: "/",
        baseActiveRoute: "/",
    }
]);

export default AppMainNavInfo;
Main Routing Info
Now open “app_routing_info.js” and paste the following code:
//@ts-check
import RoutingInfoUtils from "oats-i/router/utils/routing-info/routing_info_utils";
import AppMainNavInfo from "./app_main_nav_info";
import homeMainFragmentBuilder from "../../../fragments/home/scripts/home_main_fragment";

const AppRoutingInfo = RoutingInfoUtils.buildMainRoutingInfo([

    {
        route: "/",
        target: homeMainFragmentBuilder,
        nestedChildFragments: null
    }
], AppMainNavInfo);

export default AppRoutingInfo;
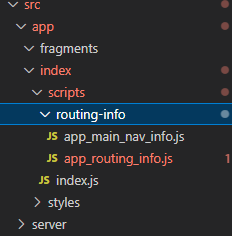
Index.css
We’ll create an index.css file for a special reason, which MUST be replicated across all your Oats~i projects if you want consistent behavior.
Navigate back to the “index” folder, and create a new folder named “styles”. Inside the folder, create a new file called “index.css”

Open the file and paste the following code:
/* Crucial styling to allow specially structured A links to still have clicks intercepted by router. */
/* Carry over to your project */
a *:not([click-override=true]){

    pointer-events: none
}
What this css code does is remove pointer events from elements nested inside an A tag, to ensure the browser doesn’t intercept it before Oats~i does. It also gives you, the developer, the freedom to override this behavior using the attribute click-override=true on any element nested within an A tag.
However, expect Oats~i, at its current state, not to intercept links from an A tag with a child element having that attribute.
This means that you can safely write A tags without any modification or special attributes for Oats~i to automatically intercept them and navigate your app locally. You only add special attributes when you want to stop this behavior and have the browser manually route the website.
Carry over this css directive in all Oats~i projects you create. If you use the cli, you’ll find it already in index.css.
Index.js
Navigate back to “scripts” (inside index) and create a new file named “index.js”.
Open the file and paste the following code.
//@ts-check
//import styles
import "../styles/index.css";
import AppStateManager from "oats-i/base-history/app_state_manager";
import appRoot from "oats-i/bin/app_root"
import AppRoutingInfo from "./routing-info/app_routing_info";
import MainRouter from "oats-i/router/main_router";
import AppMainNavInfo from "./routing-info/app_main_nav_info";

function initApp(){

    const appStateManager = new AppStateManager(AppRoutingInfo);
    appRoot.initApp(appStateManager, new MainRouter(AppRoutingInfo, appStateManager, (args) => {}, "", async (url) => {

        return {

            canAccess: true,
            fallbackRoute: "/"
        }
    }), { template: null, mainNavInfos: AppMainNavInfo }, "");
}

initApp();
Fragments
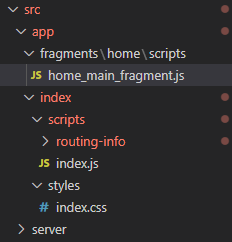
Navigate back to the “app” folder. Navigate into “fragments” and create a new folder named “home”.
Inside “home”, create a new folder named “scripts”. Inside “scripts”, create a new file named “home_main_fragment.js”.
Open the file and paste the code below.
//@ts-check
import AppFragmentBuilder from "oats-i/fragments/builder/AppFragmentBuilder";
import AppMainFragment from "oats-i/fragments/AppMainFragment"

class HomeMainFragment extends AppMainFragment{

    async initializeView(cb){

        //@ts-expect-error cannot find module (for view)
        const uiTemplate = require("../views/home_fragment.hbs")();
        this.onViewInitSuccess(uiTemplate, cb);
    }
}

const homeMainFragmentBuilder = new AppFragmentBuilder(HomeMainFragment, {

    localRoutingInfos: null,
    viewID: "home-main-fragment",
});
export default homeMainFragmentBuilder;
Now navigate back to “home” and create a new folder called “views”. Inside “views”, create a new file and name it “home_fragment.hbs”

Open file and paste the following code:
Home Fragment
Test the Configuration
Navigate to your project’s root. Open the terminal and run
npm run dev
This will start the webpack-dev-server which will bundle the files and run Oats~i. If you open the browser at the url shown in the terminal (often is localhost:8080) and see a page with “Home Fragment” showing, your project has been successfully set up and Oats~i is working fine.
Configuration Extensibility
Regardless of whether you’ve manually set up an Oats~i project or used the cli, there are configuration flexibilities you can enjoy thanks to Oats~i running on top of Webpack.
Basically, apart from the default Oats~i webpack configuration, you can change anything else to your liking as long as you understand webpack, plugins, and loaders, and how they’ll affect your project.
For instance, you can have a production configuration that will use MiniCssExtractPlugin to extract your css into files that will be added to the final html-webpack-plugin output. You can use advanced babel configurations and even switch handlebars-loader for a loader that suits your favorite templating engine.
However, the default setup provided by Oats~i is good enough for most projects. Later on in the tutorials, we’ll add a new configuration to create the final production build with key features such as minification.
Further Reading
I encourage you to learn about Webpack, why it’s needed, and how you can configure it, to make the most out of Oats~i and other projects you may have using Webpack as a bundler.
Sign Up and Follow for the Next Tutorial
That’s it for setting up Oats~i for your project. If you’re working on a new project, just use the cli. It’s easier, faster, and will directly load you into a beautiful starter project that you can inspect and start getting ideas of how to setup a full project with view, styling, and script files in Oats~I, before we start doing that together.
In the next tutorial, we’ll create our first simple project in Oats~i, where we’ll start learning what routing infos, nav infos, and fragments are in Oats~i.
Leave a like and follow to get notified when the next tutorial drops.
See you then.
Support Oats~i
You can support the development of Oats~i through Patreon or buy me a coffee.
-
 Python高效去除文本中HTML標籤方法在Python中剝離HTML標籤,以獲取原始的文本表示Achieving Text-Only Extraction with Python's MLStripperTo streamline the stripping process, the Python standard librar...程式設計 發佈於2025-05-06
 -
在Java中如何為PNG文件添加坐標軸和標籤?如何用java 在現有png映像中添加軸和標籤的axes和labels如何註釋png文件可能具有挑戰性。與其嘗試可能導致錯誤和不一致的修改,不如建議在圖表創建過程中集成註釋。 使用JFReechArt import java.awt.color; 導入java.awt.eventqueue; 導...程式設計 發佈於2025-05-06
-
您可以使用CSS在Chrome和Firefox中染色控制台輸出嗎?在javascript console 中顯示顏色是可以使用chrome的控制台顯示彩色文本,例如紅色的redors,for for for for錯誤消息? 回答是的,可以使用CSS將顏色添加到Chrome和Firefox中的控制台顯示的消息(版本31或更高版本)中。要實現這一目標,請使用以下...程式設計 發佈於2025-05-06
-
PHP陣列鍵值異常:了解07和08的好奇情況PHP數組鍵值問題,使用07&08 在給定數月的數組中,鍵值07和08呈現令人困惑的行為時,就會出現一個不尋常的問題。運行print_r($月)返回意外結果:鍵“ 07”丟失,而鍵“ 08”分配給了9月的值。 此問題源於PHP對領先零的解釋。當一個數字帶有0(例如07或08)的前綴時,PHP將...程式設計 發佈於2025-05-06
-
為什麼不使用CSS`content'屬性顯示圖像?在Firefox extemers屬性為某些圖像很大,&& && && &&華倍華倍[華氏華倍華氏度]很少見,卻是某些瀏覽屬性很少,尤其是特定於Firefox的某些瀏覽器未能在使用內容屬性引用時未能顯示圖像的情況。這可以在提供的CSS類中看到:。 googlepic { 內容:url(&...程式設計 發佈於2025-05-06
-
如何處理PHP文件系統功能中的UTF-8文件名?在PHP的Filesystem functions中處理UTF-8 FileNames 在使用PHP的MKDIR函數中含有UTF-8字符的文件很多flusf-8字符時,您可能會在Windows Explorer中遇到comploreer grounder grounder grounder gro...程式設計 發佈於2025-05-06
-
為什麼我的CSS背景圖像出現?故障排除:CSS背景圖像未出現 ,您的背景圖像儘管遵循教程說明,但您的背景圖像仍未加載。圖像和样式表位於相同的目錄中,但背景仍然是空白的白色帆布。 而不是不棄用的,您已經使用了CSS樣式: bockent {背景:封閉圖像文件名:背景圖:url(nickcage.jpg); 如果您的html,cs...程式設計 發佈於2025-05-06
-
在Go語言中如何簡潔定義10的冪常量在GO 利用浮點線文字一種簡潔的方式是使用浮點文字,該方法是使用floingpoint protals。寫作1E3比寫作1000更有效。這是一個示例(67個沒有空間的字符):的文字用於未構圖的整數常數,我們可以將1000用於KB,並用KB將隨後的常量乘以KB,如下所示(77個沒有空格的字符):,作...程式設計 發佈於2025-05-06
-
查找當前執行JavaScript的腳本元素方法如何引用當前執行腳本的腳本元素在某些方案中理解問題在某些方案中,開發人員可能需要將其他腳本動態加載其他腳本。但是,如果Head Element尚未完全渲染,則使用document.getElementsbytagname('head')[0] .appendChild(v)的常規方...程式設計 發佈於2025-05-06
-
Android如何向PHP服務器發送POST數據?在android apache httpclient(已棄用) httpclient httpclient = new defaulthttpclient(); httppost httppost = new httppost(“ http://www.yoursite.com/script.p...程式設計 發佈於2025-05-06
-
為什麼在我的Linux服務器上安裝Archive_Zip後,我找不到“ class \” class \'ziparchive \'錯誤?Class 'ZipArchive' Not Found Error While Installing Archive_Zip on Linux ServerSymptom:When attempting to run a script that utilizes the ZipAr...程式設計 發佈於2025-05-06
-
Go語言如何動態發現導出包類型?與反射軟件包中的有限類型的發現能力相反,本文探索了替代方法,探索了在Runruntime。 go import( “ FMT” “去/進口商” ) func main(){ pkg,err:= incorter.default()。導入(“ time”) 如果er...程式設計 發佈於2025-05-06
-
如何在Chrome中居中選擇框文本?選擇框的文本對齊:局部chrome-inly-ly-ly-lyly solument 您可能希望將文本中心集中在選擇框中,以獲取優化的原因或提高可訪問性。但是,在CSS中的選擇元素中手動添加一個文本 - 對屬性可能無法正常工作。 初始嘗試 state)</option> < o...程式設計 發佈於2025-05-06
-
為什麼不````''{margin:0; }`始終刪除CSS中的最高邊距?在CSS 問題:不正確的代碼: 全球範圍將所有餘量重置為零,如提供的代碼所建議的,可能會導致意外的副作用。解決特定的保證金問題是更建議的。 例如,在提供的示例中,將以下代碼添加到CSS中,將解決餘量問題: body H1 { 保證金頂:-40px; } 此方法更精確,避免了由全局保證金重置...程式設計 發佈於2025-05-06
-
人臉檢測失敗原因及解決方案:Error -215錯誤處理:解決“ error:((-215)!empty()in Function Multultiscale中的“ openCV 要解決此問題,必須確保提供給HAAR CASCADE XML文件的路徑有效。在提供的代碼片段中,級聯分類器裝有硬編碼路徑,這可能對您的系統不准確。相反,OPENCV提...程式設計 發佈於2025-05-06


學習中文
- 1 走路用中文怎麼說? 走路中文發音,走路中文學習
- 2 坐飛機用中文怎麼說? 坐飞机中文發音,坐飞机中文學習
- 3 坐火車用中文怎麼說? 坐火车中文發音,坐火车中文學習
- 4 坐車用中文怎麼說? 坐车中文發音,坐车中文學習
- 5 開車用中文怎麼說? 开车中文發音,开车中文學習
- 6 游泳用中文怎麼說? 游泳中文發音,游泳中文學習
- 7 騎自行車用中文怎麼說? 骑自行车中文發音,骑自行车中文學習
- 8 你好用中文怎麼說? 你好中文發音,你好中文學習
- 9 謝謝用中文怎麼說? 谢谢中文發音,谢谢中文學習
- 10 How to say goodbye in Chinese? 再见Chinese pronunciation, 再见Chinese learning


