
像專業人士一樣自動化:使用Generate React CLI 掌握React 中的元件生成
 瀏覽:388
Simplify React component creation, automate file generation, and customize templates with Generate React CLI. Boost productivity and maintain code consistency effortlessly!

Being a React developer is exciting. With its component-based architecture, React has revolutionized the way we build user interfaces.
Creating new components manually in React can be a tedious and time-consuming task. As a software engineer or a front-end developer, you might often find yourself copying, pasting, and renaming files for every new component you create. This is where automating React components generation comes in. This article is a comprehensive guide that will help you master the process of generating React components automatically using a tool called "Generate React CLI."
A Brief Introduction to React Components
React is a popular JavaScript library for building user interfaces. It allows developers to create large web applications that can change data without reloading the page. The main building blocks of a React application are React components.
React components are independent, reusable pieces of code. They serve the same purpose as JavaScript functions, but work in isolation and return HTML via a render function.
The Need for Automating React Components Generation
Automating the generation of React components can significantly streamline the development process, especially for seasoned front-end developers. Manual creation of these components, although initially engaging for novices, can quickly become burdensome and time-consuming. This typically involves duplicating extensive code, configuring test and style files, and preparing Storybook files, among other repetitive actions.
With automation, developers can bypass the tedium of repetitive tasks, enabling quicker and more efficient code production. By automating component generation, developers can focus more on complex
problem-solving and creative aspects of development, thus optimizing productivity and project quality.
Introducing Generate React CLI
Generate React CLI is an open-source tool that automates the creation of React components. It generates a component folder and files for each component, including tests, styles, and Storybook files. This tool allows you to customize your components and create your component types and templates, making it a flexible solution for React developers.
This tool is available as an NPM package and can be installed into any React project. It can be used as a dependency or as a command in the console.
To use Generate React CLI, you need to have Node version 18.x or higher and NPM version 10.x or greater installed on your computer. You can install Generate React CLI as a dev dependency using the command:
npm install generate-react-cli --save-dev
or
yarn add -D generate-react-cli
Alternatively, you can run it directly using npx:
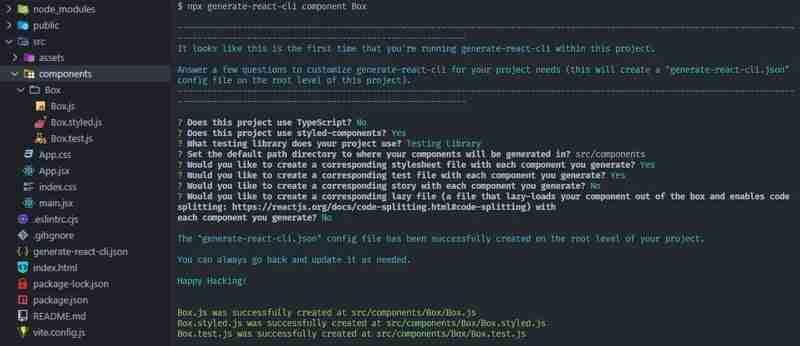
npx generate-react-cli component Box
Note: npx is a package runner tool that ships with npm 5.2 .
Using Generate React CLI
A simple command:
npx generate-react-cli component Box
Executed in the console begins the magic. A brief Q&A session is initiated, inquiring about your usage of TypeScript, styled-components, testing, and a lot more. And it creates a new React component named Box. The answers to these questions are stored in a generate-react-cli.json config file at the root of your project, ready for future references and customizations.
Here is an example of the generate-react-cli.json config file:
{
  "usesTypeScript": false,
  "usesStyledComponents": true,
  "testLibrary": "Testing Library",
  "component": {
    "default": {
      "path": "src/components",
      "withStyle": true,
      "withTest": true,
      "withStory": false,
      "withLazy": false
    }
  }
}
Override the default configuration with options
You can override some of the default configuration rules using one-off commands. For example, if you have set withTest to be true in the component.default property, you can override it like this:
npx generate-react-cli component Box --withTest=false
If you have set withTest to be false, you can override it like this:
npx generate-react-cli component Box --withTest=true
If you don't pass any options, the default values that you have set in the generate-react-cli.json config file under the component.default will be used.
Other options can be found on the Generate React CLI GitHub repository
Generate React CLI as a dev dependency
What is the disadvantage of using the utility as such a long command:
npx generate-react-cli component Box, this is that everyone inside the team must remember all this history to use and so on. It is better to just install generate-react-cli as a dev dependency.
npm i --save-dev generate-react-cli
or
yarn add -D generate-react-cli
As we obtained the dependence of D, we can create an npm script and the same story is a little shorter.
Suppose we have a script called component, and to create components we can now say either
npm run component ComponentName
or
yarn component ComponentName
and create the component name, the same thing happens, just a little shorter.
Also, no one needs to memorize a long command. We can always go to the package.json and execute the command that is there.
{
  "name": "component-generate-react-cli",
  "private": true,
  "version": "0.0.0",
  "type": "module",
  "scripts": {
    "dev": "vite",
    "build": "vite build",
    "lint": "eslint . --ext js,jsx --report-unused-disable-directives --max-warnings 0",
    "preview": "vite preview",
    "component": "generate-react component"
  },
  "dependencies": {
    "react": "^18.2.0",
    "react-dom": "^18.2.0"
  },
  "devDependencies": {
    "@types/react": "^18.2.66",
    "@types/react-dom": "^18.2.22",
    "@vitejs/plugin-react-swc": "^3.5.0",
    "eslint": "^8.57.0",
    "eslint-plugin-react": "^7.34.1",
    "eslint-plugin-react-hooks": "^4.6.0",
    "eslint-plugin-react-refresh": "^0.4.6",
    "vite": "^5.2.0"
  }
}
Customize Component Templates
Generate React CLI also provides a customTemplates object where the keys represent the file type, and the values are paths pointing to your custom template's location in your project.
Template File Examples:
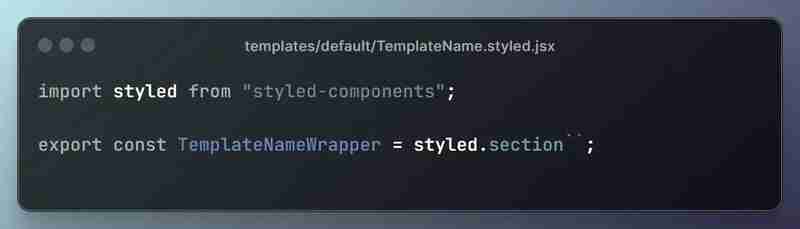
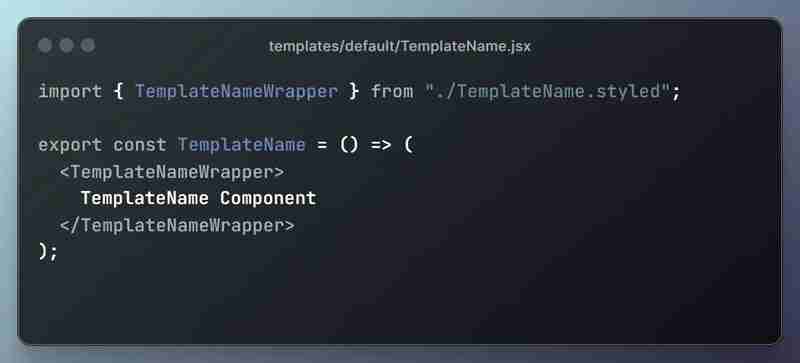
An example of a customTemplates object:
{
  "usesTypeScript": false,
  "usesStyledComponents": true,
  "testLibrary": "Testing Library",
  "component": {
    "default": {
      "customTemplates": {
        "component": "templates/default/TemplateName.jsx",
        "style": "templates/default/TemplateName.styled.jsx"
      },
      "path": "src/components",
      "withStyle": true,
      "withTest": true,
      "withStory": false,
      "withLazy": false
    }
  }
}
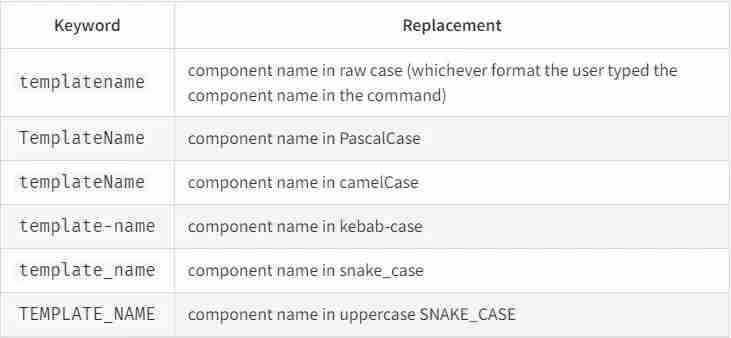
Note: the TemplateName keyword, as this keyword is used by GRC and will replace it with our component name based on one of the formats in which we entered the component name into the command as a filename. However, you can use the following keywords in your custom templates to properly format component names in your templates:
Generate Custom Component Files
When you use Generate React CLI, it automatically generates essential files for your component, such as styles, tests, stories, and lazy loading support. However, you have the flexibility to customize this process by editing the generate-react-cli.json configuration file.
If you want additional files, you can specify them by adding new keys prefixed with "with" in the configuration. For instance, if you wish to include an index.js file for each component to streamline imports, you can enable this feature by setting "withIndex" to true and adding "index" to the "customTemplates" object.
{
 "usesTypeScript": false,
 "usesStyledComponents": true,
 "testLibrary": "Testing Library",
 "component": {
  "default": {
   "customTemplates": {
    "component": "templates/default/TemplateName.jsx",
    "style": "templates/default/TemplateName.styled.jsx",
    "index": "templates/default/index.jsx"
   },
   "path": "src/components",
   "withStyle": true,
   "withTest": true,
   "withStory": false,
   "withLazy": false,
   "withIndex": true
  }
 }
}

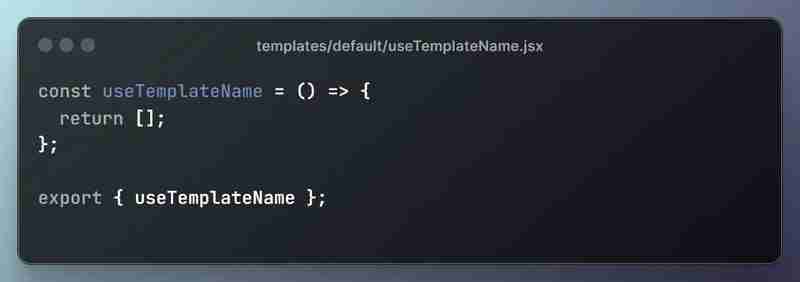
Similarly, we can create our own hook, let's say it will be called useTemplateName accordingly here we will have withHook: true
{
 "usesTypeScript": false,
 "usesStyledComponents": true,
 "testLibrary": "Testing Library",
 "component": {
  "default": {
   "customTemplates": {
    "component": "templates/default/TemplateName.jsx",
    "style": "templates/default/TemplateName.styled.jsx",
    "index": "templates/default/index.jsx",
    "hook": "templates/default/useTemplateName.jsx"
   },
   "path": "src/components",
   "withStyle": true,
   "withTest": true,
   "withStory": false,
   "withLazy": false,
   "withIndex": true,
   "withHook": true
  }
 }
}
Developing Personalized Component Types
By default, the Generate React CLI uses component.default configuration rules to generate new components. However, we may want to generate other types of components that have their own set of configuration rules, such as pages or layout components.
Additionally, we can also augment these types components with templates.
You can do this by extending the generate-react-cli.json configuration file as follows:
{
 "usesTypeScript": false,
 "usesStyledComponents": true,
 "testLibrary": "Testing Library",
 "component": {
  "default": {
     "customTemplates": {
      "component": "templates/default/TemplateName.jsx",
      "style": "templates/default/TemplateName.styled.jsx",
      "lazy": "templates/default/TemplateName.lazy.jsx",
      "index": "templates/default/index.jsx"
     },
     "path": "src/components",
     "withStyle": true,
     "withTest": false,
     "withStory": false,
     "withLazy": false,
     "withIndex": true
     },
    "page": {
     "customTemplates": {
      "component": "templates/page/TemplateName.jsx",
      "lazy": "templates/page/TemplateName.lazy.jsx",
      "style": "templates/page/TemplateName.styled.jsx",
      "index": "templates/page/index.jsx"
     },
     "path": "src/pages",
     "withLazy": true,
     "withStory": false,
     "withStyle": true,
     "withTest": false,
     "withIndex": true
    },
    "layout": {
     "customTemplates": {
      "component": "templates/layout/TemplateName.jsx",
      "index": "templates/layout/index.jsx"
     },
     "path": "src/layouts",
     "withIndex": true
   }
  }
 }
}
In the above configuration file, there are three types of components: default, page, and layout. Each type of component has its own configuration rules.
We can generate a component of a particular type using the - type option:
npx generate-react-cli component HomePage --type=page
The above command generates a new React component of the type page with the name HomePage.
We can also create our script for this by adding it to package.json to make it a bit faster and easier.
npm run page HomePage
{
  "name": "component-generate-react-cli",
  "private": true,
  "version": "0.0.0",
  "type": "module",
  "scripts": {
    "dev": "vite",
    "build": "vite build",
    "lint": "eslint . --ext js,jsx --report-unused-disable-directives --max-warnings 0",
    "preview": "vite preview",
    "component": "generate-react component",
    "page": "generate-react component  --type=page",
    "layout": "generate-react component  --type=layout"
  },
  "dependencies": {
    "react": "^18.2.0",
    "react-dom": "^18.2.0"
  },
  "devDependencies": {
    "@types/react": "^18.2.66",
    "@types/react-dom": "^18.2.22",
    "@vitejs/plugin-react-swc": "^3.5.0",
    "eslint": "^8.57.0",
    "eslint-plugin-react": "^7.34.1",
    "eslint-plugin-react-hooks": "^4.6.0",
    "eslint-plugin-react-refresh": "^0.4.6",
    "vite": "^5.2.0"
  }
}
You can see my proposed and finalized GLC component types in their final form on my GitHub, where not only are layouts and pages added, but there is also a template for quickly creating a redux store.
Benefits of Using Generate React CLI
While we have already discussed the basics of using Generate React CLI, let's dive deeper into its benefits and how it can transform your development process.
1. Increased Productivity
As mentioned earlier, manually creating React components can be a tedious and time-consuming task. With Generate React CLI, you can automate this process and save yourself hours of repetitive work. This allows you to focus on more critical aspects of your project, ultimately increasing your productivity.
2. Consistency in Code
Consistency is crucial in software development, especially when working with teams. With the Generate React CLI, all components are created using the same set of defaults, ensuring consistency throughout your codebase. This avoids any confusion or discrepancies in the code and makes it easier for team members to work together seamlessly.
3. Customizability
The ability to create custom templates and add them to Generate React CLI allows you to tailor the tool according to your specific project needs. This not only enhances its functionality but also makes it more versatile and suitable for a wide range of projects.
4. Time-Saving
With Generate React CLI, creating components is just a matter of executing a few simple commands. This not only saves time but also reduces the chances of errors that may occur while manually creating components. This feature is particularly useful when working on tight deadlines or complex projects.
Wrapping Up
Automating the process of generating React components can save a lot of time and improve productivity. With Generate React CLI, you can automate this process and customize it to suit your project's needs. Whether you are a novice or an experienced React developer, mastering component generation can make your work easier and more enjoyable.
Remember, being a successful software engineer is not just about writing code. It's also about finding ways to work smarter and making the most of the tools available to you.
I have tried to explain the practices with the best example that I know. If you know others, share in the comments for everyone!
Thanks For Reading, Follow Me For More
-
 eval()vs. ast.literal_eval():對於用戶輸入,哪個Python函數更安全?稱量()和ast.literal_eval()中的Python Security 在使用用戶輸入時,必須優先確保安全性。強大的Python功能Eval()通常是作為潛在解決方案而出現的,但擔心其潛在風險。 This article delves into the differences betwee...程式設計 發佈於2025-05-19
 -
Java中假喚醒真的會發生嗎?在Java中的浪費喚醒:真實性或神話? 在Java同步中偽裝喚醒的概念已經是討論的主題。儘管存在這種行為的潛力,但問題仍然存在:它們實際上是在實踐中發生的嗎? Linux的喚醒機制根據Wikipedia關於偽造喚醒的文章,linux實現了pthread_cond_wait()功能的Linux實現,...程式設計 發佈於2025-05-19
-
\“(1)vs.(;;):編譯器優化是否消除了性能差異?\”答案: 在大多數現代編譯器中,while(1)和(1)和(;;)之間沒有性能差異。編譯器: perl: 1 輸入 - > 2 2 NextState(Main 2 -E:1)V-> 3 9 Leaveloop VK/2-> A 3 toterloop(next-> 8 last-> 9 ...程式設計 發佈於2025-05-19
-
-
Spark DataFrame添加常量列的妙招在Spark Dataframe ,將常數列添加到Spark DataFrame,該列具有適用於所有行的任意值的Spark DataFrame,可以通過多種方式實現。使用文字值(SPARK 1.3)在嘗試提供直接值時,用於此問題時,旨在為此目的的column方法可能會導致錯誤。 df.withCo...程式設計 發佈於2025-05-19
-
如何在GO編譯器中自定義編譯優化?在GO編譯器中自定義編譯優化 GO中的默認編譯過程遵循特定的優化策略。 However, users may need to adjust these optimizations for specific requirements.Optimization Control in Go Compi...程式設計 發佈於2025-05-19
-
如何簡化PHP中的JSON解析以獲取多維陣列?php 試圖在PHP中解析JSON數據的JSON可能具有挑戰性,尤其是在處理多維數組時。要簡化過程,建議將JSON作為數組而不是對象解析。 執行此操作,將JSON_DECODE函數與第二個參數設置為true:[&&&&& && &&&&& json = JSON = JSON_DECODE($ ...程式設計 發佈於2025-05-19
-
如何在鼠標單擊時編程選擇DIV中的所有文本?在鼠標上選擇div文本單擊帶有文本內容,用戶如何使用單個鼠標單擊單擊div中的整個文本?這允許用戶輕鬆拖放所選的文本或直接複製它。 在單個鼠標上單擊的div元素中選擇文本,您可以使用以下Javascript函數: function selecttext(canduterid){ if(d...程式設計 發佈於2025-05-19
-
MySQL中如何高效地根據兩個條件INSERT或UPDATE行?在兩個條件下插入或更新或更新 solution:的答案在於mysql的插入中...在重複鍵更新語法上。如果不存在匹配行或更新現有行,則此功能強大的功能可以通過插入新行來進行有效的數據操作。如果違反了唯一的密鑰約束。 實現所需的行為,該表必須具有唯一的鍵定義(在這種情況下為'名稱'...程式設計 發佈於2025-05-19
-
圖片在Chrome中為何仍有邊框? `border: none;`無效解決方案在chrome 在使用Chrome and IE9中的圖像時遇到的一個頻繁的問題是圍繞圖像的持續薄薄邊框,儘管指定了圖像,儘管指定了;和“邊境:無;”在CSS中。要解決此問題,請考慮以下方法: Chrome具有忽略“ border:none; none;”的已知錯誤,風格。要解決此問題,請使用以下...程式設計 發佈於2025-05-19
-
如何有效地轉換PHP中的時區?在PHP 利用dateTime對象和functions DateTime對象及其相應的功能別名為時區轉換提供方便的方法。例如: //定義用戶的時區 date_default_timezone_set('歐洲/倫敦'); //創建DateTime對象 $ dateTime = ne...程式設計 發佈於2025-05-19
-
在GO中構造SQL查詢時,如何安全地加入文本和值?在go中構造文本sql查詢時,在go sql queries 中,在使用conting and contement和contement consem per時,尤其是在使用integer per當per當per時,per per per當per. [&&&&&&&&&&&&&&&&默元組方法在...程式設計 發佈於2025-05-19
-
PHP未來:適應與創新PHP的未來將通過適應新技術趨勢和引入創新特性來實現:1)適應云計算、容器化和微服務架構,支持Docker和Kubernetes;2)引入JIT編譯器和枚舉類型,提升性能和數據處理效率;3)持續優化性能和推廣最佳實踐。 引言在編程世界中,PHP一直是網頁開發的中流砥柱。作為一個從1994年就開始發展...程式設計 發佈於2025-05-19
-
Python中何時用"try"而非"if"檢測變量值?使用“ try“ vs.” if”來測試python 在python中的變量值,在某些情況下,您可能需要在處理之前檢查變量是否具有值。在使用“如果”或“ try”構建體之間決定。 “ if” constructs result = function() 如果結果: 對於結果: ...程式設計 發佈於2025-05-19
-
為什麼不使用CSS`content'屬性顯示圖像?在Firefox extemers屬性為某些圖像很大,&& && && &&華倍華倍[華氏華倍華氏度]很少見,卻是某些瀏覽屬性很少,尤其是特定於Firefox的某些瀏覽器未能在使用內容屬性引用時未能顯示圖像的情況。這可以在提供的CSS類中看到:。 googlepic { 內容:url(&...程式設計 發佈於2025-05-19


學習中文
- 1 走路用中文怎麼說? 走路中文發音,走路中文學習
- 2 坐飛機用中文怎麼說? 坐飞机中文發音,坐飞机中文學習
- 3 坐火車用中文怎麼說? 坐火车中文發音,坐火车中文學習
- 4 坐車用中文怎麼說? 坐车中文發音,坐车中文學習
- 5 開車用中文怎麼說? 开车中文發音,开车中文學習
- 6 游泳用中文怎麼說? 游泳中文發音,游泳中文學習
- 7 騎自行車用中文怎麼說? 骑自行车中文發音,骑自行车中文學習
- 8 你好用中文怎麼說? 你好中文發音,你好中文學習
- 9 謝謝用中文怎麼說? 谢谢中文發音,谢谢中文學習
- 10 How to say goodbye in Chinese? 再见Chinese pronunciation, 再见Chinese learning


