
4 Ways to Fix VLC Not Playing MKV Files on Windows 11
 Browse:701
Basic Fixes
- Shorten the file/directory name: VLC may fail to play an MKV file if its name or the directory name (where it’s located) is unusually long. Rename the MKV file or directory and retry playing it.
- Install the MKV codec for VLC: If the VLC media player is missing the required MKV codecs, it may not play the Matroska video file. Download and install the Mega K-Lite Codec Pack to fix all missing video codecs in VLC.
- Update or reinstall the VLC Media Player: Open the Microsoft Store, search VLC, and click Update (if available). Alternatively, uninstall it from Windows Settings > Apps > Installed apps, and install it afresh.
Fix 1: Repair the MKV File Using VLC
The VLC media player has an in-built feature to repair damaged AVI files. By renaming a non-playable MKV extension file to AVI, you can use VLC to repair and play it without errors.
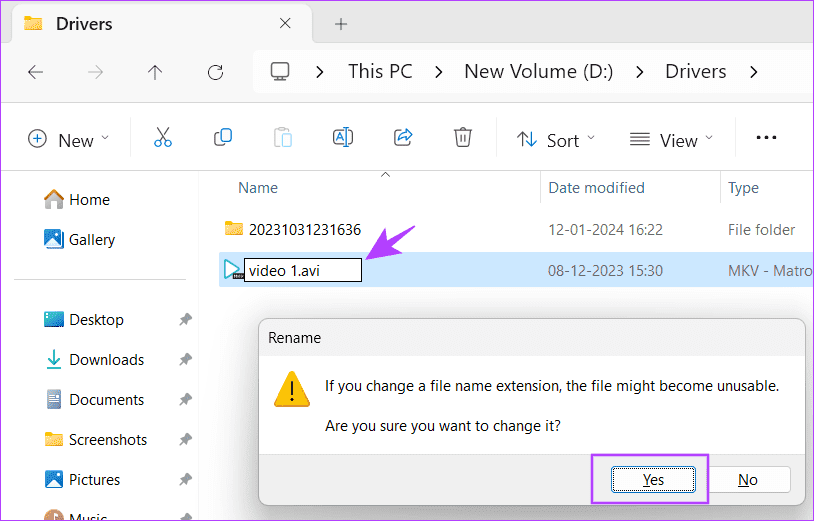
Step 1: Press the Windows E shortcut to open the File Explorer app, navigate to the folder containing the MKV file, and press F2 to rename it.
Step 2: Replace the .mkv extension with .avi, and press Enter. Click Yes when prompted to change the file extension.
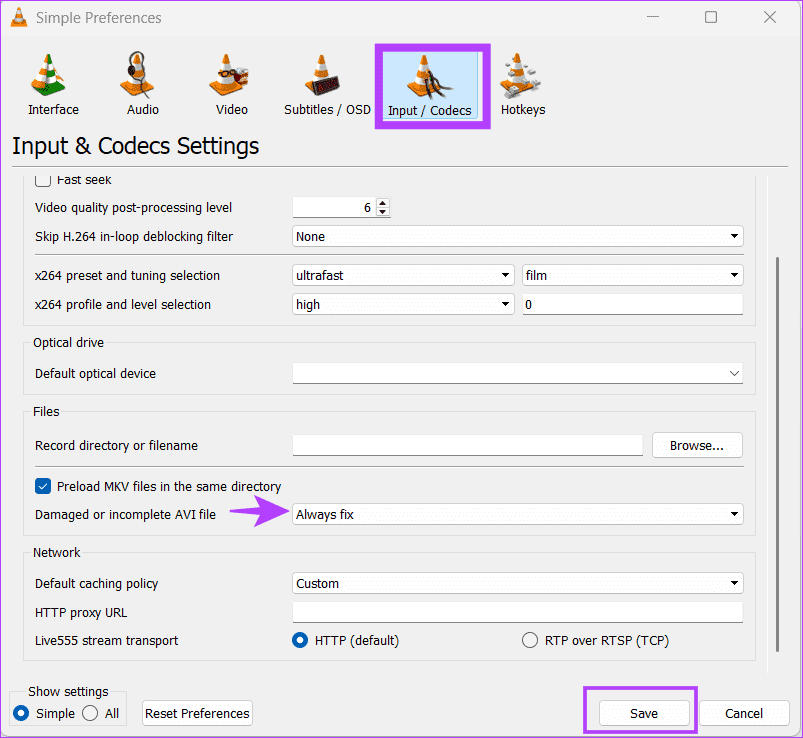
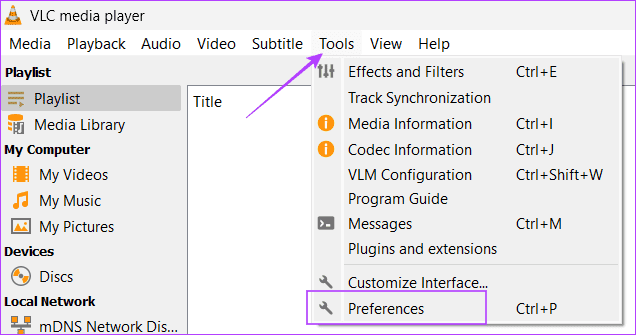
Step 3: Open VLC, click Tools, and select Preferences.

Step 4: Select the Input/Codecs tab, set the Damaged or incomplete AVI file to Always fix, and click Save. Double-click the video file to play it.
Fix 2: Increase the File Caching Value
If VLC isn’t playing MKV files, throwing an ‘unidentified codec: VLC could not identify the audio or video codec’ error, adjusting the file caching value should fix it.
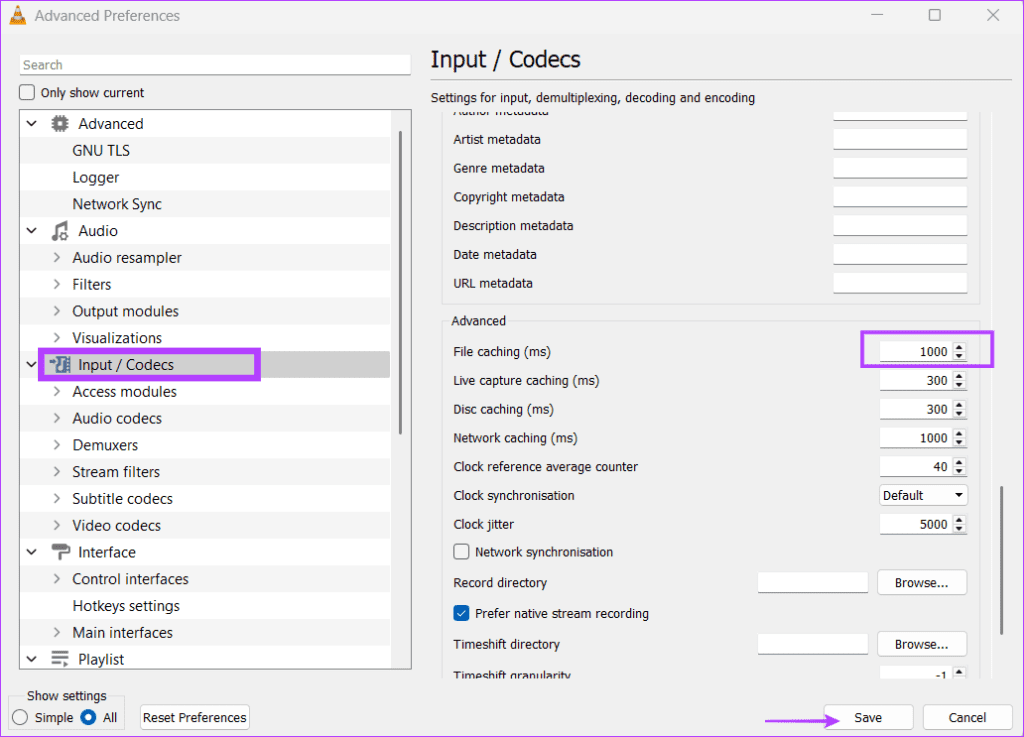
Step 1: Open the VLC Media Player, click Tools, and select Preferences.

Step 2: Select the Input/Codecs tab and set Show settings to All.

Step 3: Click Input / Codecs in the left sidebar, type 1000 in the File caching (ms) option under ‘Advanced’, and select Save. Retry playing the MKV video file.
Fix 3: Disable Hardware-Accelerated Decoding
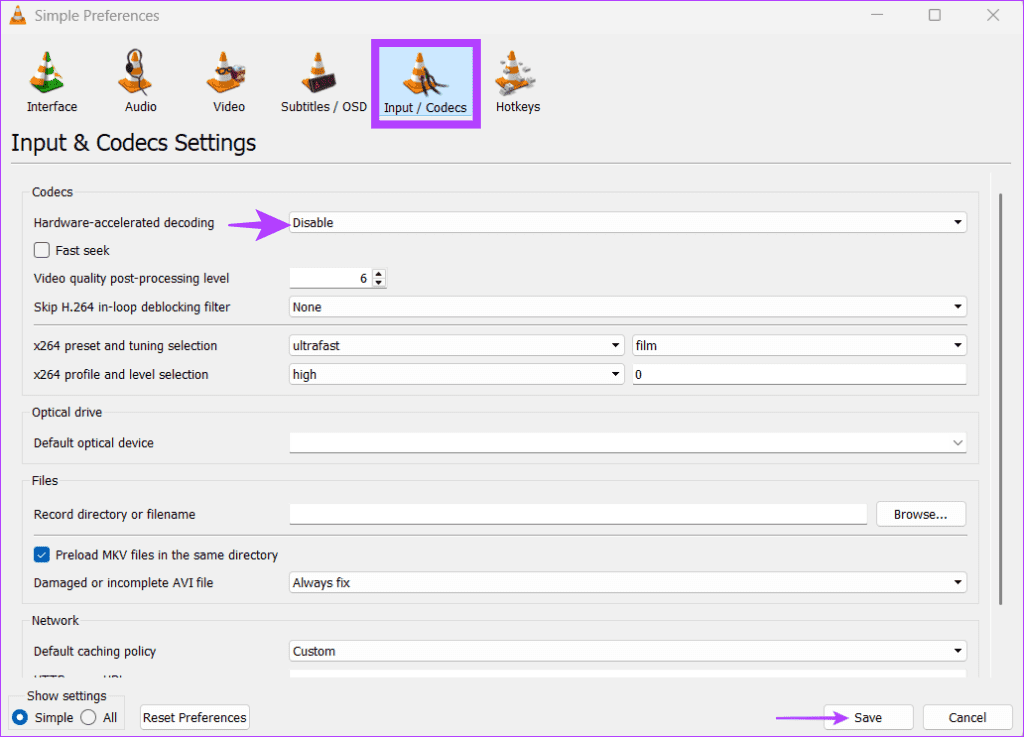
Hardware-accelerated decoding in VLC leverages your GPU to handle video decoding. However, this feature is known to create video playback issues. Disable it from the VLC app settings and retry playing the MKV file.
Step 1: Open the VLC media player Preferences (check the above steps).
Step 2: Click the Input / Codecs tab, set Hardware-accelerated decoding to Disable, and hit Save.
Fix 4: Reset All Preferences
Lastly, if nothing works, reset all VLC preferences to fix MKV files not playing on Windows 11.
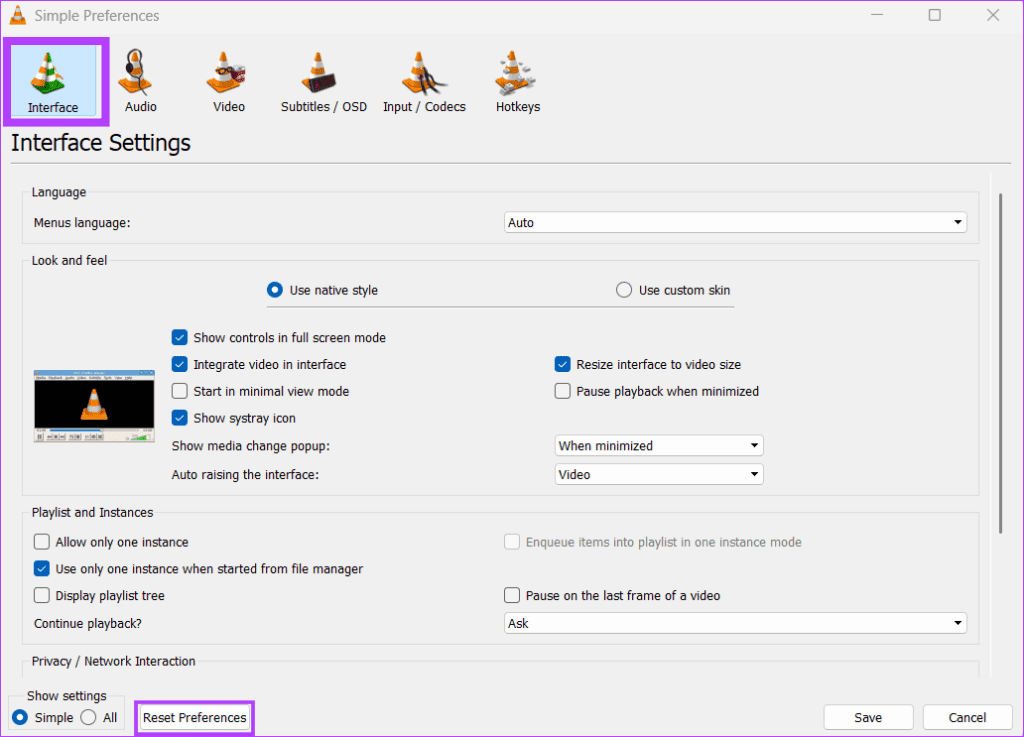
Step 1: Access the VLC media player Preferences.
Step 2: Select the Interface tab and click Reset Preferences. Select OK when prompted to confirm it.
-
 How to delete duplicate photos on Mac?Digital clutter is a common problem, especially with photos. Most people take numerous shots from similar angles, leading to a proliferation of dupli...Software tutorial Posted on 2025-05-02
 -
Recommended Best Solar Chargers in 2025Whether you often camp off the grid, go backpacking, or grapple with power outages, a solar charger is a nifty gadget to have in your arsenal. It can ...Software tutorial Posted on 2025-05-02
-
The ultimate guide to resetting your phone without losing dataRejuvenate Your Smartphone: A Guide to Factory Resets Remember that initial thrill of powering on your new phone? That pristine interface, lightning-...Software tutorial Posted on 2025-05-01
-
7 practical tips for Apple's new version of Messages applicationiMessage's Hidden Gems: Mastering iOS 16's Enhanced Messaging Features iMessage, Apple's secure messaging platform, has evolved significan...Software tutorial Posted on 2025-05-01
-
How to hide yourself on social platforms such as Instagram, Facebook, XMaintaining online privacy on social media is crucial, even for close friends and family. You might want to limit access to prevent unwanted attentio...Software tutorial Posted on 2025-05-01
-
A simple tutorial on how to fax files on your phoneSome organizations still don't accept documents via email—you may need to fax documents instead. No, you can't use your smartphone's phon...Software tutorial Posted on 2025-04-29
-
How to delete temporary Mac files? Find and clear methodsClearing Temporary Files on Your Mac: Reclaim Disk Space and Boost Performance Temporary files, often overlooked, can consume significant disk space o...Software tutorial Posted on 2025-04-29
-
Is the volume stuck at 100% in Windows? Try these solutionsWindows volume stuck at 100%? Easy to fix! Computer volume issues are a headache! If your Windows volume is stuck at 100%, don't worry, this Min...Software tutorial Posted on 2025-04-29
-
How to delete your data from a person search siteThis article was last updated on February 24, 2025. Many people are unaware that a significant amount of their personal data is readily accessible on...Software tutorial Posted on 2025-04-21
-
How to disguise an iPad as a laptopThis updated article (originally published October 31, 2019) explores how to transform your iPad into a laptop alternative using iPadOS 16 beta featur...Software tutorial Posted on 2025-04-21
-
How to clean Mac mailbox cache? How to delete it on Mac?This guide explains how to clear the Mail cache on your Mac, addressing common issues like slow performance and email loading problems. The macOS Mai...Software tutorial Posted on 2025-04-21
-
How to prioritize the allocation of WiFi to the most needed devicesModern homes usually have multiple devices connected to Wi-Fi access networks simultaneously, which often leads to bandwidth tightness, especially w...Software tutorial Posted on 2025-04-19
-
McAfee antivirus software review: Is it enough? 【Function, Price】McAfee: A Veteran Antivirus, But Is It the Best for Macs? McAfee, a long-standing and reputable name in cybersecurity, offers a robust antivirus suite...Software tutorial Posted on 2025-04-19
-
OnePlus Watch 3 is postponed to April due to funny issuesAfter the long-awaited OnePlus Watch 3 smartwatch is released, the purchase plan may require a slight adjustment. A ridiculous production problem has...Software tutorial Posted on 2025-04-19
-
Tips to make the most of the tap function on the back of your iPhoneOver the years, Apple has developed a large number of tools to make using iPhones more convenient. Although the "Tap Back" feature is dull,...Software tutorial Posted on 2025-04-18


Study Chinese
- 1 How do you say "walk" in Chinese? 走路 Chinese pronunciation, 走路 Chinese learning
- 2 How do you say "take a plane" in Chinese? 坐飞机 Chinese pronunciation, 坐飞机 Chinese learning
- 3 How do you say "take a train" in Chinese? 坐火车 Chinese pronunciation, 坐火车 Chinese learning
- 4 How do you say "take a bus" in Chinese? 坐车 Chinese pronunciation, 坐车 Chinese learning
- 5 How to say drive in Chinese? 开车 Chinese pronunciation, 开车 Chinese learning
- 6 How do you say swimming in Chinese? 游泳 Chinese pronunciation, 游泳 Chinese learning
- 7 How do you say ride a bicycle in Chinese? 骑自行车 Chinese pronunciation, 骑自行车 Chinese learning
- 8 How do you say hello in Chinese? 你好Chinese pronunciation, 你好Chinese learning
- 9 How do you say thank you in Chinese? 谢谢Chinese pronunciation, 谢谢Chinese learning
- 10 How to say goodbye in Chinese? 再见Chinese pronunciation, 再见Chinese learning


